Quick guideline about how to install multiple sites on a single server using Virtualhosting, and have the SSL certificate installed and automatically renewed using Letsencrypt.
There are plenty of how to online, but I wanted to have a quick reference page for myself 🙂
Firstly, this has been tested on Debian 12, but it should work on previous Debian versions and Ubuntu too.
Apache setup and virtualhosts
Firstly, install Apache and other packages that you will mostly likely need, especially if you run WordPress or any php based framework:
apt-get install apache2 php php-mysql libapache2-mod-php php-gd php-curl net-tools telnet dos2unix
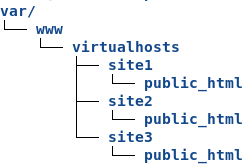
Now, you should create the folder structure to host your sites. I used /var/www/virtualhosts/<site>/public_html
I made sure permissions were set correctly too:
chown -R www-data:www-data /var/www/
find /var/www -type -d -exec chmod 775 {} \;
Now, create a virtualhost file for each site. In the following example we are going to create the conf file for site1.
Create /etc/apache2/sites-available/site1.conf
<VirtualHost *:80>
    ServerName site1.com
    ServerAlias www.site1.com
    ServerAdmin webmaster@localhost
    DocumentRoot /var/www/virtualhosts/site1/public_html

    <Directory /var/www/virtualhosts/site1/public_html>
        Options -Indexes +FollowSymLinks
        AllowOverride All
    </Directory>

    ErrorLog ${APACHE_LOG_DIR}/site1-error.log
    CustomLog ${APACHE_LOG_DIR}/site1-access.log combined
</VirtualHost>
Do the same for all the sites you have.
Once done, upload the content of your sites in public_html folder.
Disable all the default Apache sites and enable the ones you have created. You can use the commands a2dissite and a2ensite or manually create symbolic links into /etc/apache2/sites-enabled/
Check that all the virtualhosts are properly loaded:
source /etc/apache2/envvars
apache2 -S
You should see all your sites under *80 section.
Right now we have enabled only Apache on port 80 to return the sites we have hosted. No 443 yet.
Now, you can use curl to do some tests to see if the virtual hosts are responding correctly.
~ curl -IH'Host: site1.com' http://<server_IP>  # to get the header of site1.com
~ curl -H'Host: site1.com' http://<server_IP>  # to get the full page of site1.com
Hopefully all works (if not, troubleshoot it heheh), let’s point our DNS to our server, and test directly using the domain names.
All good? Cool!
Make sure now that your firewall allows port 80 and port 443. Even if you’re considering to serve your site ONLY over SSL (port 443), the certbot tool that does the auto-renewal of the certificate needs port 80 open.
Installation and configuration of certbot – Letsencrypt
As root, issue the below commands:
apt-get install snapd
snap install core
snap refresh core
snap install --classic certbot
ln -s /snap/bin/certbot /usr/bin/certbot
You have now the certbot tool installed.
Following the above example of site1.com, we are going now to get the SSL certificate for that site (even the www.site1.com one), and let the tool install and configure everything automatically.
certbot --apache -d site1.com -d www.site1.com
Hopefully all goes well 🙂 Repeat for each of your sites accordingly.
Once done with all the sites, just to make sure the auto-renewal works, you can also issue a dry-run check:
certbot renew --dry-run
Letsencrypt certificates last 90 days (afaik), but the certbot tool installed in this way does the auto-renewal in an automatic fashion.
If you’re curios where this is written (you might think about cron but unable to find anything – like it happend to me).
If this is the case, you can try to run this command, and you may find the certbot listed:
systemctl list-timers
More information are available on the official website at this address.
You can now test using curl again, but hitting https instead of http:
~ curl -IH'Host: site1.com' https://<server_IP>  # to get the header of site1.com
~ curl -H'Host: site1.com' https://<server_IP>  # to get the full page of site1.com
Oh, one note.
By default, at least at the time when I’m writing this article, once you install the certificate, the *80 virtualhost of your site will be modified, adding the following lines, which force a 302 redirect from http to https.
RewriteEngine on
RewriteCond %{SERVER_NAME} =www.site1.com [OR]
RewriteCond %{SERVER_NAME} =site1.com
RewriteRule ^ https://%{SERVER_NAME}%{REQUEST_URI} [END,NE,R=permanent]
If it’s what you want – cool.
If you still want to serve your site on http AND https, comment out (or delete) those new lines.
Happy virtualhosting and ssl’ing! 🙂