Intro
LVM is a very powerful technology, and can really help the Sysadmin’s life.
However, this is something that we generally setup at the beginning (most of the time now it’s automatically setup during the installation process), and it’s well know… when we stop using something, we tend to forget how to use it.
This is why I’m writing this how to, mostly to keep track of the major features and commands, in case I will need them again in the future 😉
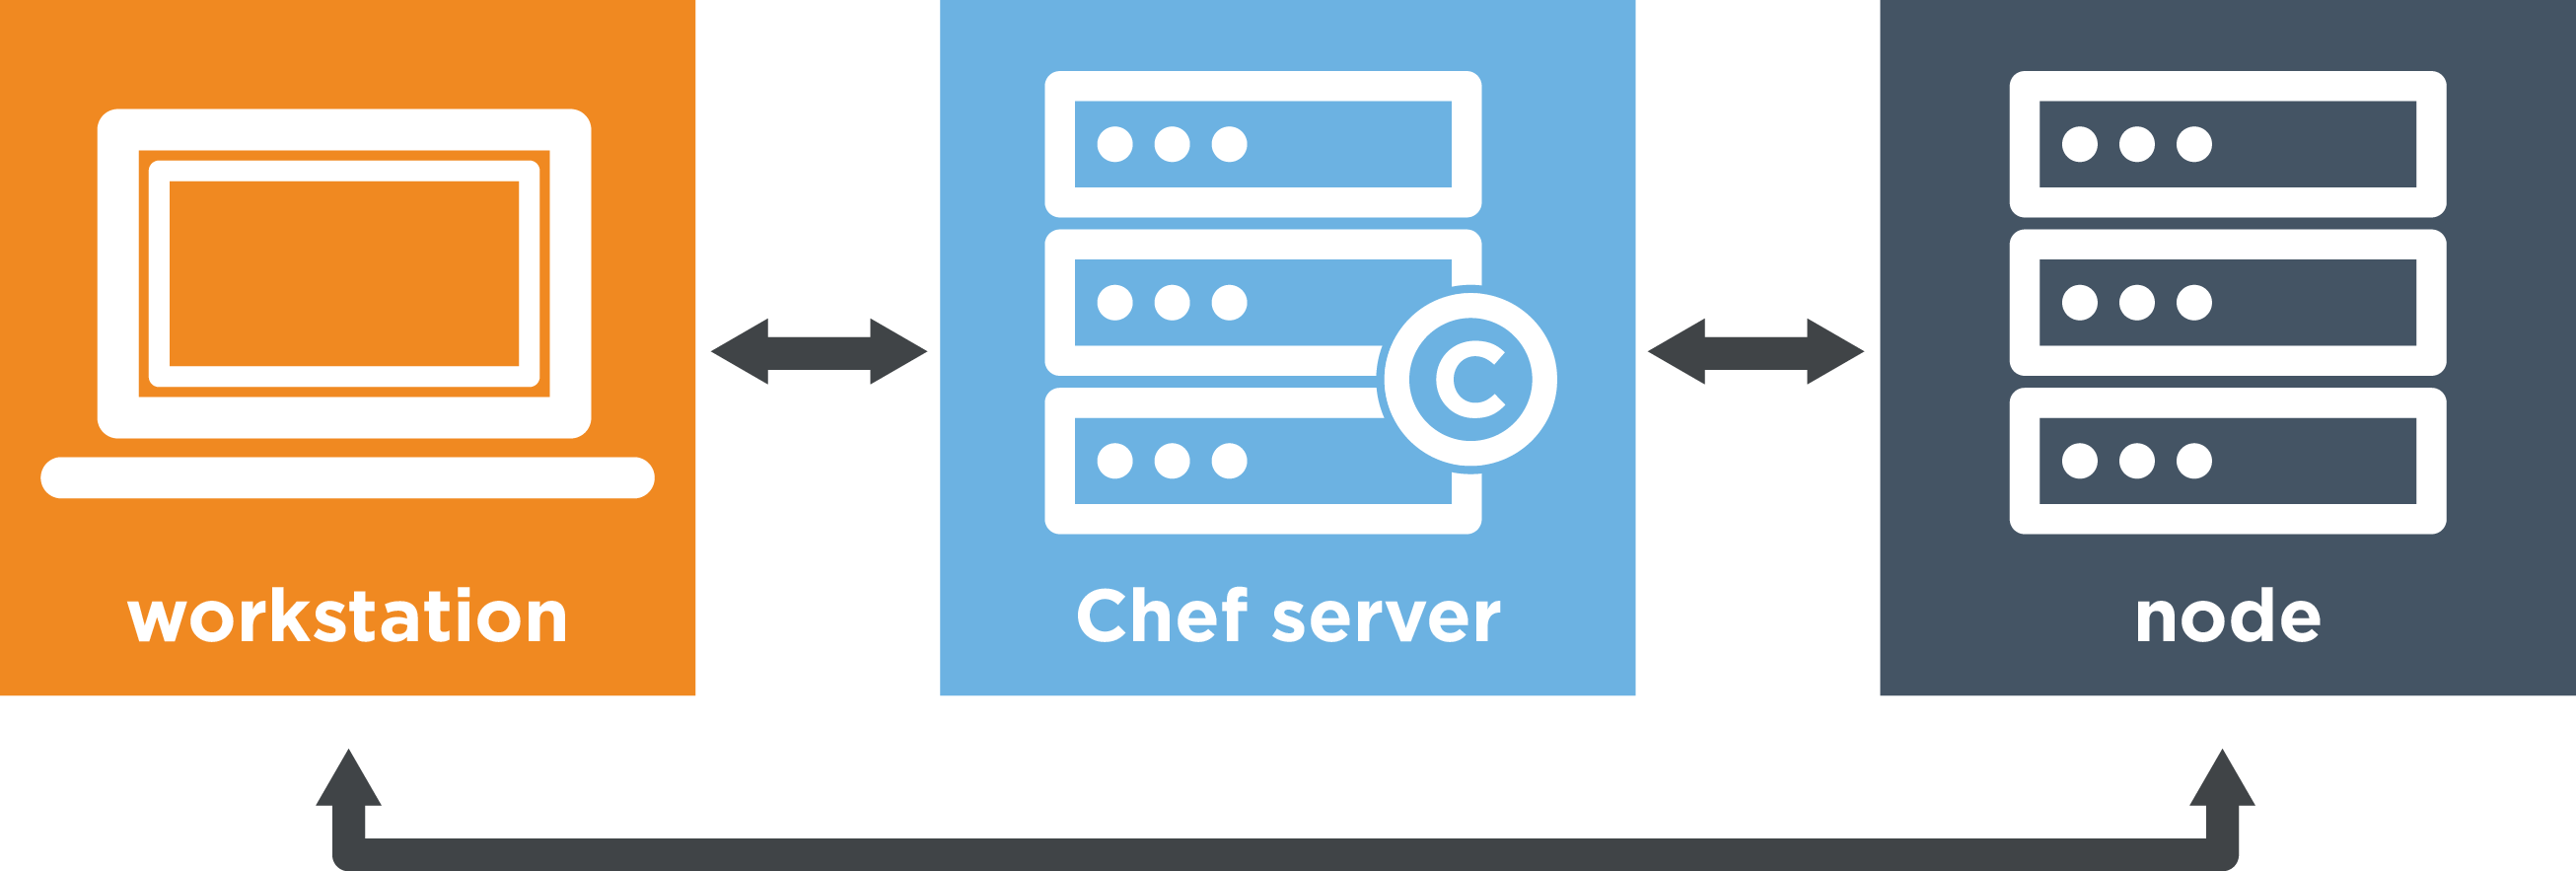
Before proceeding, please digest the following journey of this poor physical device that gets abstracted up to usable pieces.
                                                          VG                        VG
                                                   +---------------+         +---------------+
                                                   |      PV       |  +--->  |               |
                                   PV              | +-----------+ |         |  LV           |
                              +-----------+        | |  8E LVM   | |         |               |
              8E LVM          |  8E LVM   |        | | +-------+ | |         +---------------+
             +-------+        | +-------+ |        | | | +---+ | | |  +--->  +---------------+
+---+        | +---+ |        | | +---+ | |        | | | |DEV| | | |         |               |
|DEV| +----> | |DEV| | +----> | | |DEV| | | +----> | | | +---+ | | |         |  LV           |
+---+        | +---+ |        | | +---+ | |        | | +-------+ | |         |               |
  1.         +-------+        | +-------+ |        | +-----------+ |  +--->  |               |
                2.            +-----------+        |               |         +---------------+
                                   3.              |      PV       |         +---------------+
                                                   | +-----------+ |         |               |
 1. Original Device:                               | |  8E LVM   | |  +--->  |  LV           |
    (physical/virtual disk/partition/raid)         | | +-------+ | |         |               |
 2. fdisk'd to label 8E for LVM                    | | | +---+ | | |         |               |
 3. initialised as LVM Physical Volume             | | | |DEV| | | |         |               |
 4. Added in a LVM Volume Group                    | | | +---+ | | |  +--->  |               |
 5. "partitioned" in single/multiple               | | +-------+ | |         |               |
    LVM Logical Groups                          4. | +-----------+ |      5. |               |
                                                   +---------------+         +---------------+
Prepare partions
First of all, we need to find which device(s) we want to setup for LVM
fdisk -l
[root@n1 ~]# fdisk -l

Disk /dev/xvda: 21.5 GB, 21474836480 bytes, 41943040 sectors
Units = sectors of 1 * 512 = 512 bytes
Sector size (logical/physical): 512 bytes / 512 bytes
I/O size (minimum/optimal): 512 bytes / 512 bytes
Disk label type: dos
Disk identifier: 0x000b7f16

    Device Boot      Start         End      Blocks   Id  System
/dev/xvda1   *        2048    41943039    20970496   83  Linux

Disk /dev/md1: 4996 MB, 4996726784 bytes, 9759232 sectors
Units = sectors of 1 * 512 = 512 bytes
Sector size (logical/physical): 512 bytes / 512 bytes
I/O size (minimum/optimal): 512 bytes / 512 bytes


Disk /dev/md2: 4996 MB, 4996726784 bytes, 9759232 sectors
Units = sectors of 1 * 512 = 512 bytes
Sector size (logical/physical): 512 bytes / 512 bytes
I/O size (minimum/optimal): 512 bytes / 512 bytes


Disk /dev/md3: 4996 MB, 4996726784 bytes, 9759232 sectors
Units = sectors of 1 * 512 = 512 bytes
Sector size (logical/physical): 512 bytes / 512 bytes
I/O size (minimum/optimal): 512 bytes / 512 bytes
We can see 3 md devices, probably RAID devices. These are the ones that we are going to use for our LVM exercise.
Now, let’s create an LVM partition.
fdisk <device> => n , p , 1 , (enter) , (enter) , t , 8e , w
[root@n1 ~]# fdisk /dev/md1
Welcome to fdisk (util-linux 2.23.2).

Changes will remain in memory only, until you decide to write them.
Be careful before using the write command.

Device does not contain a recognized partition table
Building a new DOS disklabel with disk identifier 0x50b03cd2.

Command (m for help): n
Partition type:
   p   primary (0 primary, 0 extended, 4 free)
   e   extended
Select (default p): p
Partition number (1-4, default 1): 1
First sector (2048-9759231, default 2048):
Using default value 2048
Last sector, +sectors or +size{K,M,G} (2048-9759231, default 9759231):
Using default value 9759231
Partition 1 of type Linux and of size 4.7 GiB is set

Command (m for help): t
Selected partition 1
Hex code (type L to list all codes): 8e
Changed type of partition 'Linux' to 'Linux LVM'

Command (m for help): w
The partition table has been altered!

Calling ioctl() to re-read partition table.
Syncing disks.
Do the same for all the devices that you want to use for LVM. In my example, I’ve done this for /dev/md1, /dev/md2 and /dev/md3.
Shortcut (risky but quicker) 🙂
echo -e "o\nn\np\n1\n\n\nt\n8e\nw" | fdisk /dev/mdx
All seems now good to go: we have Linux LVM partitions!
Disk /dev/md1: 4996 MB, 4996726784 bytes, 9759232 sectors
Units = sectors of 1 * 512 = 512 bytes
Sector size (logical/physical): 512 bytes / 512 bytes
I/O size (minimum/optimal): 512 bytes / 512 bytes
Disk label type: dos
Disk identifier: 0x50b03cd2

    Device Boot      Start         End      Blocks   Id  System
/dev/md1p1            2048     9759231     4878592   8e  Linux LVM

Disk /dev/md2: 4996 MB, 4996726784 bytes, 9759232 sectors
Units = sectors of 1 * 512 = 512 bytes
Sector size (logical/physical): 512 bytes / 512 bytes
I/O size (minimum/optimal): 512 bytes / 512 bytes
Disk label type: dos
Disk identifier: 0x4b68e9a3

    Device Boot      Start         End      Blocks   Id  System
/dev/md2p1            2048     9759231     4878592   8e  Linux LVM

Disk /dev/md3: 4996 MB, 4996726784 bytes, 9759232 sectors
Units = sectors of 1 * 512 = 512 bytes
Sector size (logical/physical): 512 bytes / 512 bytes
I/O size (minimum/optimal): 512 bytes / 512 bytes
Disk label type: dos
Disk identifier: 0x8dcf9ba0

    Device Boot      Start         End      Blocks   Id  System
/dev/md3p1            2048     9759231     4878592   8e  Linux LVM
Time to start to configure LVM
Configure LVM
First of all, we need to make these Linux LVM partition able to be part of a group (vg). I always find tricky to remember the logic behind. Let’s imagine that the device itself now is just labelled “Linux LVM” but we need to initiate it in somehow.
pvcreate <dev>
[root@n1 ~]# pvcreate /dev/md1p1
  Physical volume "/dev/md1p1" successfully created.
[root@n1 ~]# pvcreate /dev/md2p1
  Physical volume "/dev/md2p1" successfully created.
[root@n1 ~]# pvcreate /dev/md3p1
  Physical volume "/dev/md3p1" successfully created.
Now these guys are ready to be part of a group. In this case a Virtual Group (vg).
Let’s check that it’s actually true:
pvs
[root@n1 ~]# pvs
  PV         VG Fmt  Attr PSize PFree
  /dev/md1p1    lvm2 ---  4.65g 4.65g
  /dev/md2p1    lvm2 ---  4.65g 4.65g
  /dev/md3p1    lvm2 ---  4.65g 4.65g
Time to create a group with these devices (this could be done also with just a single device):
vgcreate <lvmgroupname> <dev> <dev> …
[root@n1 ~]# vgcreate mylvmvg /dev/md1p1 /dev/md2p1 /dev/md3p1
  Volume group "mylvmvg" successfully created
Now, let’s check again with pvs and vgs
[root@n1 ~]# pvs
  PV         VG      Fmt  Attr PSize PFree
  /dev/md1p1 mylvmvg lvm2 a--  4.65g 4.65g
  /dev/md2p1 mylvmvg lvm2 a--  4.65g 4.65g
  /dev/md3p1 mylvmvg lvm2 a--  4.65g 4.65g
[root@n1 ~]# vgs
  VG      #PV #LV #SN Attr   VSize  VFree
  mylvmvg   3   0   0 wz--n- 13.95g 13.95g
Now pvs shows the VG group no longer empty but with mylvmvg. And vgs tells us that the VG is about 14GB in size, fully free with no LV in it.
Good! Now, let’s make some LVs (logical volumes). These will be the new “partitions/disks” that we will be actually able to format, mount and use! 🙂
lvcreate -n <name> -L xGB <vg_group_name>
[root@n1 ~]# lvcreate -n part1 -L 2GB mylvmvg
  Logical volume "part1" created.
Some checks to verify:
[root@n1 ~]# vgs
  VG      #PV #LV #SN Attr   VSize  VFree
  mylvmvg   3   1   0 wz--n- 13.95g 11.95g
[root@n1 ~]# lvs
  LV    VG      Attr       LSize Pool Origin Data%  Meta%  Move Log Cpy%Sync Convert
  part1 mylvmvg -wi-a----- 2.00g
A new LV appears in vgs and lvs shows the 2GB volume that we have created.
Let’s create another one, but this time, using the full remaining space (using -l 100%VG option instead of -L xGB)
[root@n1 ~]# lvcreate -n part2 -l 100%VG mylvmvg
  Logical volume "part2" created.
[root@n1 ~]# vgs
  VG      #PV #LV #SN Attr   VSize  VFree
  mylvmvg   3   2   0 wz--n- 13.95g    0
[root@n1 ~]# lvs
  LV    VG      Attr       LSize  Pool Origin Data%  Meta%  Move Log Cpy%Sync Convert
  part1 mylvmvg -wi-a-----  2.00g
  part2 mylvmvg -wi-a----- 11.95g
[root@n1 ~]#
Magic!
Now, we have two devices, both ‘a’ -> active and ready to be formatted:
mkfs.ext4 <device>
[root@n1 ~]# mkfs.ext4 /dev/mylvmvg/part1
mke2fs 1.42.9 (28-Dec-2013)
Filesystem label=
OS type: Linux
Block size=4096 (log=2)
Fragment size=4096 (log=2)
Stride=0 blocks, Stripe width=0 blocks
131072 inodes, 524288 blocks
26214 blocks (5.00%) reserved for the super user
First data block=0
Maximum filesystem blocks=536870912
16 block groups
32768 blocks per group, 32768 fragments per group
8192 inodes per group
Superblock backups stored on blocks:
	32768, 98304, 163840, 229376, 294912

Allocating group tables: done
Writing inode tables: done
Creating journal (16384 blocks): done
Writing superblocks and filesystem accounting information: done
I’ve done this for /dev/mylvmvg/part1 and /dev/mylvmvg/part2.
Let’s create the mount points and mount them:
[root@n1 ~]# mkdir -p /mountpoint1 /mountpoint2

[root@n1 ~]# mount -t ext4 /dev/mylvmvg/part1 /mountpoint1

[root@n1 ~]# mount -t ext4 /dev/mylvmvg/part2 /mountpoint2

[root@n1 ~]# mount | grep mylvmvg
/dev/mapper/mylvmvg-part1 on /mountpoint1 type ext4 (rw,relatime,data=ordered)
/dev/mapper/mylvmvg-part2 on /mountpoint2 type ext4 (rw,relatime,data=ordered)

[root@n1 ~]# df -Th | grep mapper
/dev/mapper/mylvmvg-part1 ext4      2.0G  6.0M  1.8G   1% /mountpoint1
/dev/mapper/mylvmvg-part2 ext4       12G   41M   11G   1% /mountpoint2
As you can see, the devices are appearing now as /dev/mapper/mylvmvg-partX. You can use either /dev/mylvmvg/partX or /dev/mapper/mylvmvg-partX. Theoretically, the mapper one is recommended (my bad!).
Now the 2 devices are ready to be used as a typical disk/partition formatted with ext4 filesystem.
Resize Logical Volume
Now, imagine that part1 is too small, and you need more space. And luckily, your part2 volume has plenty. Is there any way to “steal” some space from part2 and give it to part1?
Ooohh yesss! 🙂
How?
- shrink part2 logical volume AND its filesystem
- expand part1 logical volume AND its filesystem
Here the comments inline:
# Important the -r (this RESIZE the filesystem during the process)
[root@n1 ~]# lvreduce -L -5GB -r /dev/mylvmvg/part2
Do you want to unmount "/mountpoint2"? [Y|n] y
fsck from util-linux 2.23.2
/dev/mapper/mylvmvg-part2: 12/783360 files (0.0% non-contiguous), 92221/3131392 blocks
resize2fs 1.42.9 (28-Dec-2013)
Resizing the filesystem on /dev/mapper/mylvmvg-part2 to 1820672 (4k) blocks.
The filesystem on /dev/mapper/mylvmvg-part2 is now 1820672 blocks long.

  Size of logical volume mylvmvg/part2 changed from 11.95 GiB (3058 extents) to 6.95 GiB (1778 extents).
  Logical volume mylvmvg/part2 successfully resized.

# Here we can see that part2 is now smaller than before
[root@n1 ~]# lvs
  LV    VG      Attr       LSize Pool Origin Data%  Meta%  Move Log Cpy%Sync Convert
  part1 mylvmvg -wi-ao---- 2.00g
  part2 mylvmvg -wi-ao---- 6.95g

# And here we can see 5GB available in the vg
[root@n1 ~]# vgs
  VG      #PV #LV #SN Attr   VSize  VFree
  mylvmvg   3   2   0 wz--n- 13.95g 5.00g

# We assign the 5GB available to part1
[root@n1 ~]# lvextend -L +5GB -r /dev/mylvmvg/part1
  Size of logical volume mylvmvg/part1 changed from 2.00 GiB (512 extents) to 7.00 GiB (1792 extents).
  Logical volume mylvmvg/part1 successfully resized.
resize2fs 1.42.9 (28-Dec-2013)
Filesystem at /dev/mapper/mylvmvg-part1 is mounted on /mountpoint1; on-line resizing required
old_desc_blocks = 1, new_desc_blocks = 1
The filesystem on /dev/mapper/mylvmvg-part1 is now 1835008 blocks long.

# No more Free space
[root@n1 ~]# vgs
  VG      #PV #LV #SN Attr   VSize  VFree
  mylvmvg   3   2   0 wz--n- 13.95g    0

# part1 is now 7GB (prev 2GB)
[root@n1 ~]# lvs
  LV    VG      Attr       LSize Pool Origin Data%  Meta%  Move Log Cpy%Sync Convert
  part1 mylvmvg -wi-ao---- 7.00g
  part2 mylvmvg -wi-ao---- 6.95g

# df shows as well the new size
[root@n1 ~]# df -Th | grep mapper
/dev/mapper/mylvmvg-part1 ext4      6.9G  9.1M  6.6G   1% /mountpoint1
/dev/mapper/mylvmvg-part2 ext4      6.8G   37M  6.4G   1% /mountpoint2
Move logical volume onto a new RAID array
Now, let’s imagine that one of the 3 initial md devices are having problems, or simply we want to move on a faster/bigger raid array.
The magic of LVM is that we can actually do this with NO DOWNTIME!
How?
In this example we assume that a new /dev/md10 device is attached to our server and we want to remove /dev/md2 device.
- We need to take the new device and go through all the previous steps:
- fdisk
- pvcreate
- After that, we need to add this initialised device in the existing volume group (vg)
- Move whatever is stored on the physical device
- Shrink the volume group
- Remove the device
[root@n1 ~]# echo -e "o\nn\np\n1\n\n\nt\n8e\nw" | fdisk /dev/md10
Welcome to fdisk (util-linux 2.23.2).

Changes will remain in memory only, until you decide to write them.
Be careful before using the write command.

Device does not contain a recognized partition table
Building a new DOS disklabel with disk identifier 0x465fad01.

Command (m for help): Building a new DOS disklabel with disk identifier 0x5aa41f03.

Command (m for help): Partition type:
   p   primary (0 primary, 0 extended, 4 free)
   e   extended
Select (default p): Partition number (1-4, default 1): First sector (2048-104791935, default 2048): Using default value 2048
Last sector, +sectors or +size{K,M,G} (2048-104791935, default 104791935): Using default value 104791935
Partition 1 of type Linux and of size 50 GiB is set

Command (m for help): Selected partition 1
Hex code (type L to list all codes): Changed type of partition 'Linux' to 'Linux LVM'

Command (m for help): The partition table has been altered!

Calling ioctl() to re-read partition table.
Syncing disks.

[root@n1 ~]# fdisk -l | grep md10
Disk /dev/md10: 53.7 GB, 53653471232 bytes, 104791936 sectors
/dev/md10p1            2048   104791935    52394944   8e  Linux LVM

[root@n1 ~]# pvcreate /dev/md10p1
  Physical volume "/dev/md10p1" successfully created.

[root@n1 ~]# pvs
  PV          VG      Fmt  Attr PSize  PFree
  /dev/md10p1         lvm2 ---  49.97g 49.97g
  /dev/md1p1  mylvmvg lvm2 a--   4.65g     0
  /dev/md2p1  mylvmvg lvm2 a--   4.65g     0
  /dev/md3p1  mylvmvg lvm2 a--   4.65g     0

[root@n1 ~]# vgextend mylvmvg /dev/md10p1
  Volume group "mylvmvg" successfully extended

[root@n1 ~]# pvs
  PV          VG      Fmt  Attr PSize  PFree
  /dev/md10p1 mylvmvg lvm2 a--  49.96g 49.96g
  /dev/md1p1  mylvmvg lvm2 a--   4.65g     0
  /dev/md2p1  mylvmvg lvm2 a--   4.65g     0
  /dev/md3p1  mylvmvg lvm2 a--   4.65g     0

[root@n1 ~]# vgs
  VG      #PV #LV #SN Attr   VSize  VFree
  mylvmvg   4   2   0 wz--n- 63.91g 49.96g
Now where the new bits are starting:
pvmove, vgreduce, pvremove
[root@n1 ~]# pvmove /dev/md2p1
  /dev/md2p1: Moved: 0.00%
  /dev/md2p1: Moved: 5.63%
  /dev/md2p1: Moved: 11.51%
  ...
  /dev/md2p1: Moved: 92.61%
  /dev/md2p1: Moved: 98.07%
  /dev/md2p1: Moved: 100.00%

# Here we can see 4 phisical volumes, and a size of ~64GB
[root@n1 ~]# vgs
  VG      #PV #LV #SN Attr   VSize  VFree
  mylvmvg   4   2   0 wz--n- 63.91g 49.96g

# We can see also that /dev/md2p1 is now fully FREE
[root@n1 ~]# pvs
  PV          VG      Fmt  Attr PSize  PFree
  /dev/md10p1 mylvmvg lvm2 a--  49.96g 45.32g
  /dev/md1p1  mylvmvg lvm2 a--   4.65g     0
  /dev/md2p1  mylvmvg lvm2 a--   4.65g  4.65g
  /dev/md3p1  mylvmvg lvm2 a--   4.65g     0

# we can safely remove this device from the vg
[root@n1 ~]# vgreduce mylvmvg /dev/md2p1
  Removed "/dev/md2p1" from volume group "mylvmvg"

[root@n1 ~]# vgs
  VG      #PV #LV #SN Attr   VSize  VFree
  mylvmvg   3   2   0 wz--n- 59.26g 45.32g

#/dev/md2p1 doesn't belong to any VG anymore
[root@n1 ~]# pvs
  PV          VG      Fmt  Attr PSize  PFree
  /dev/md10p1 mylvmvg lvm2 a--  49.96g 45.32g
  /dev/md1p1  mylvmvg lvm2 a--   4.65g     0
  /dev/md2p1          lvm2 ---   4.65g  4.65g
  /dev/md3p1  mylvmvg lvm2 a--   4.65g     0

# Removing and confirm: no more /dev/md2p1
[root@n1 ~]# pvremove /dev/md2p1
  Labels on physical volume "/dev/md2p1" successfully wiped.

[root@n1 ~]# pvs
  PV          VG      Fmt  Attr PSize  PFree
  /dev/md10p1 mylvmvg lvm2 a--  49.96g 45.32g
  /dev/md1p1  mylvmvg lvm2 a--   4.65g     0
  /dev/md3p1  mylvmvg lvm2 a--   4.65g     0
In this example we have left LVM to decide where to put the data that was stored on /dev/md2 device.
Just for reference, we could have specified the destination physical device (e.g. if we were thinking to remove more devices and make sure that the data was ending up on the new RAID and not sprat across the other disks):
pvmove /dev/md2p1 /dev/md10p1
Or, in case we just wanted to move a specific logical volume, let’s say part1
pvmove -n part1 /dev/md2p1 /dev/md10p1
…happy LVM’ing! 😉