Tag Archives: windows

Mount/Access physical disks and USB devices into WSL2

With Windows 11 and WSL2, you can do much more than before. For example, you can run application from the WSL2 with graphical interface as well.

I used to have a virtual machine with Linux used mainly to perform tasks like partitioning, Linux filesystem checks etc, mainly with SD cards used on Raspberry Pis or even for external big disks where I keep backups – and the filesystem is EXT4, for example.

Well, with some little “tuning”, you can now have your WSL2 vms (yes, they are virtual machines too) able to access the physical disks/usb devices as you would do in a VMWare vm or if your pc was actually a Linux box.

To do so, at today, May 2025, you can natively access physical disks but not USB pen/SD cards using USB dongle. In fact, if you run zcat /proc/config.gz | grep ^CONFIG_USB_STORAGE within your WSL VM, you will probably see some output like “not set” or something that’s telling you… nothing here, sorry.

But here… how we can achieve it.

How to access a Physical disk

Source: https://learn.microsoft.com/en-us/windows/wsl/wsl2-mount-disk

You need to open Powershell, and run the following command to identify what is the disk that you want to mount/access from the WSL2 vm.

GET-CimInstance -query "SELECT * from Win32_DiskDrive"

Let’s say that you see that you want to access the secondary disk \\.\PHYSICALDRIVE2
REMEMBER: this procedure is for a physical disk, not USB one.

To safely mount the disk to WSL, it’s recommended to put the disk offline. To do so, use diskpart command.

diskpart /s /select disk 2
diskpart /s /offline disk

Then, still in Powershell (Admin), you can run the following command to expose the full disk to the WSL2. I have multiple WSL2 vms, so I wanted to connect to a specific one called “Workspace” and not to the default Ubuntu one.

wsl -d Workspace --mount \\.\PHYSICALDRIVE2 --bare 

At this point, in your Linux WSL2 machine, you should be able to see the new disk. You can use fdisk -l or any other commands as you would do on a disk physically attached to a Linux box.

Once done, you can unmount (and have the device back in Windows) with:

wsl --unmount \\.\PHYSICALDRIVE2
diskpart /s /select disk 2
diskpart /s /online disk

How to access an USB Mass Storage device

Sources: https://learn.microsoft.com/en-us/windows/wsl/connect-usb and https://www.tomshardware.com/how-to/access-linux-ext4-partitions-in-windows

Here things gets a bit more complicated.

We need to:

  • recompile the WSL2 kernel
  • configure WSL2 to use the new kernel
  • install USBIPD-WIN and use it to connect the USB device to the vm

Recompile the kernel

Source: https://www.tomshardware.com/how-to/access-linux-ext4-partitions-in-windows

I used a second WSL2 vm for this, just to avoid to install loads of packages. But you can safely do in your own.

NOTE: all the WSL vms that you’re running are using the same kernel, unless you specify differently. You can find how to setup Advanced settings configuration in WSL in this link.

Now, you need to be sure to find the right version of the kernel that you’re running. At this stage I’m running version 5.15.167.4

uname -r | awk -F- '{print $1}'

I used this command. Or a simple uname -a will show all the information and you can pick it manually.

You can elevate yourself as root user, and run the following:

# Update and install required packages
apt update && apt upgrade
apt install -y build-essential flex bison libgtk2.0-dev libelf-dev libncurses-dev autoconf libudev-dev libtool zip unzip v4l-utils libssl-dev python3-pip cmake git iputils-ping net-tools dwarves usbutils bc git

# Set the version of your kernel and download the right version
VER=$(uname -r | awk -F- '{print $1}')
git clone -b linux-msft-wsl-${VER} https://github.com/microsoft/WSL2-Linux-Kernel.git ${VER}-microsoft-standard && cd ${VER}-microsoft-standard

# Set the config and start menuconfig
cp /proc/config.gz config.gz && sudo gunzip config.gz && sudo mv config .config

At this stage you should see a GUI menu:

  • Navigate to Device Drivers > USB support
  • Select USB Mass Storage Support and hit Y to put an * next to it, to include this module within the main kernel, instead of adding it as a module.
  • Select Exit on the bottom of the screen (using the Tab key) multiple times until you get asked to save
  • Make sure to select YES when it asks to save your configuration.

Now, it’s time to compile! (it reminds me the old times…). Well, back to now 🙂

Use the following and fingers crossed:

make -j$(nproc) && make modules_install -j$(nproc) &&  make install -j$(nproc) && echo "ALL DONE"

Once you see ALL DONE, it means that you can proceed with the following steps. If you see errors… well… time to troubleshooting yourself 😉

Configure WSL2 to use the new kernel

Hoping all went fine, here the following steps. I assume your Windows username is pippo.

USER="pippo"
cp -rf vmlinux /mnt/c/Users/$USER/
cd /mnt/c/Users/$USER/
echo -e "[wsl2]\nkernel=C:\\\\\\Users\\\\\\$USER\\\\\\\vmlinux" > .wslconfig

You should have now copied the new kernel into pippo’s home directory on the Windows machine, and have a hidden file called .wslconfig (file that applies to ALL your WSL2 vms – see above the advanced settings) with a content like this:
[wsl2]
kernel=C:\Users\pippo\vmlinux

Now, back to Powershell (Admin), and restart WSL to pick up the new changes.

wsl --shutdown

Restart your WSL2 virtual machine. If all went well, you should have your new kernel with the new USB module built in. You can verify it using the same grep that we used before, and you should see a line with a nice “Y”:

$ zcat /proc/config.gz | grep ^CONFIG_USB_STORAGE
CONFIG_USB_STORAGE=y

Install and use USBIPD-WIN

Now that the harder bit has been done, we need the last step to make actually the magic happen. We need to install USBIPD-WIN and actually connect the USB device to the WSL2 virtual machine.

Quicker way – command line, just open again Powershell (Admin) and run:

winget install --interactive --exact dorssel.usbipd-win

Using usbipd list you can see which are the devices attached and pick the one you want to expose to the WSL2 vm. You need to look for the BUSID.

In this example, I can see that the USB drive is actually ID 1-16

> usbipd list
Connected:
BUSID  VID:PID    DEVICE                                                        STATE
1-10   8087:0026  Intel(R) Wireless Bluetooth(R)                                Not shared
1-16   05e3:0749  USB Mass Storage Device                                       Not shared
4-1    046d:0893  Logitech StreamCam, Logitech StreamCam WinUSB, USB Input ...  Not shared
6-3    046d:c31c  USB Input Device                                              Not shared
6-4    045e:0039  Microsoft USB IntelliMouse Optical                            Not shared

Cool, so we can finally attach (expose) the drive to our WSL2 vm.

As mentioned before, I have multiple WSL2 vms, so I wanted to connect to “Workspace” and not to the default Ubuntu one.

usbipd bind --busid 1-16
usbipd attach --busid 1-16 --wsl Workspace

With this command I have connected the USB Mass Storage Device with BUSID 1-16 to the WSL2 VM called Workspace. Without the name Workspace in the command, it will connect to the default WSL2 vm (you can check with wsl --list command).

At this stage, if you go again into your WSL2 vm, you should see the device available simply using lsblk command. And if you have installed gparted, for example, with a sudo gparted (needs to run with the main user but with privileged grants) you should access your SD card or USB drive, and perform all the checks etc you’d like to do.

Same, you can mount etc, exactly as you would do with your Linux machine.

Last but not least, once you’ve finished, you need to detach and unbind the device. Simply run in Powershell (Admin) the following:

usbipd detach -a
usbipd unbind -a

And that’s it! 🙂

I might work on a comprehensive script to do so – I have already my repository here – but for the time being, feel free to use these instructions.

Happy WSL2’ing 🙂

Ping on WSL

Do we really need to be root to simply to a ping from your WSL on Windows?
Apparently yes.
You have probably faced the following error:

ping: socktype: SOCK_RAW
ping: socket: Operation not permitted
ping: => missing cap_net_raw+p capability or setuid?

Wanna fix it?

sudo setcap cap_net_raw+ep /bin/ping

Run this command once, and the command ping will be “usable” again 😉

Happy ping’ing! 😉

Manage PDF files

Merge multiple files into single PDF

I’m sure that we all had the need to send a single PDF file, maybe a signed contract. Yes, those 20 or more pages that you need to return, probably with just two of them filled up and signed.

Some PDF give you the ability to digitally sign them. But in my experience, most of them aren’t so modern.

So, what do I do?

I print ONLY the pages that I need to sign, scan them and here I am, with the need to “rebuild” the PDF, replacing the pages signed.

Example.
You have the file contract.pdf, with 20 pages and you need to sign page 10 and page 20.
The scan has a different resolution (or, even worse, it’s a different format, like jpg).

Here the command to make the magic happen:

convert contract.pdf[0-8] mypage10.jpg contract.pdf[10-18] mypage20.jpg -resize 1240x1753 -extent 1240x1753 -gravity center -units PixelsPerInch -density 150x150 contract_signed.pdf

The bit before -resize is pretty self explanatory. The bit after is a way to have the size of all pages fitting an A4 format, with a good printable resolution.

Of course, to make this happen, you need Linux (or WSL on Windows 10) and imagemagick installed.

Another way is using ghostscript.

A simple Ghostscript command to merge two PDFs in a single file is shown below:

gs -dNOPAUSE -sDEVICE=pdfwrite -sOUTPUTFILE=combine.pdf -dBATCH 1.pdf 2.pdf

What about a quick onliner to reduce and convert to grayscale your pdf?

ghostscript -sDEVICE=pdfwrite -dCompatibilityLevel=1.4 -dPDFSETTINGS=/ebook -sProcessColorModel=DeviceGray -sColorConversionStrategy=Gray -dNOPAUSE -dQUIET -dBATCH -sOutputFile=output.pdf input.pdf

PDF size reduce

Sometimes instead, you need to reduce the size of an existing PDF. Here a handy oneliner, using ghostscript:

ghostscript -sDEVICE=pdfwrite -dCompatibilityLevel=1.4 -dPDFSETTINGS=/printer -dNOPAUSE -dQUIET -dBATCH -sOutputFile=output.pdf input.pdf

Other options for PDFSETTINGS:

  • /screen selects low-resolution output similar to the Acrobat Distiller “Screen Optimized” setting.
  • /ebook selects medium-resolution output similar to the Acrobat Distiller “eBook” setting.
  • /printer selects output similar to the Acrobat Distiller “Print Optimized” setting.
  • /prepress selects output similar to Acrobat Distiller “Prepress Optimized” setting.
  • /default selects output intended to be useful across a wide variety of uses, possibly at the expense of a larger output file.

Happy PDF’ing 🙂


Sources:
https://stackoverflow.com/questions/23214617/imagemagick-convert-image-to-pdf-with-a4-page-size-and-image-fit-to-page
https://www.shellhacks.com/merge-pdf-files-linux-command-line/

https://gist.github.com/firstdoit/6390547
Migrate Linux Subsystem from one PC to another

UPDATE: Now you can simply use the --export and --import capability of WSL2

To backup, simply open Powershell/CMD and do:

wsl --export (distribution) (file path)

(e.g. wsl --export Ubuntu "C:\Users\user1\Documents\ubuntu_wsl_backup.tar")

To restore, you need to copy the tar on the new machine (e.g. in C:\Users\user1\Downloads\), open Powershell/CMD and run:

wsl --import (distribution) (install location) (file path)
(e.g. wsl --import Ubuntu "C:\WSL_VMs\Ubuntu" "C:\Users\user1\Downloads\ubuntu_wsl_backup.tar"

NOTE: install location is a new path where you will store your WSL VMs. I’m not entirely sure where the default ones got stored (I could google it but I can’t be bothered, sorry :-p) and I honestly prefer having all in my own folder (e.g. C:\WSL_VMs).

NOTE n.2: To find the name of the distributions (aka how WSL labelled them), use the command wsl -l

Here the original article – before import/export was implemented/documented…

Are you enjoying your favorite Linux distro running within the Windows 10 Linux Subsystem?

Have you configured all nicely?

What happened if you get a new pc and you’d like to migrate your VM across?

This is what happened to me. And looking around, I found this post that gave me this kinda-dirty way, but did work!

After that, I decided to review the steps, and I’ve added these directories in the exclude’s list, to make clearer the process of export/import:

/dev
/proc
/sys
/run
/tmp
/media
/mnt
/var/cache
/var/run

Of course, if you have important data in these folders and you want to move across too, just update the one-liner below accordingly. 😉

On your OLD PC

  • Open your Linux VM
  • Get inside your Downloads directory (replace <user> with your username):

    cd /mnt/c/Users/<user>/Downloads
  • Make sure to be root (sudo su -)
  • Run:

    tar -cvpzf backup.tar.gz --exclude=/backup.tar.gz --exclude=/dev --exclude=/proc --exclude=/sys --exclude=/run --exclude=/tmp --exclude=/media --exclude=/mnt --exclude=/var/cache --exclude=/var/run --one-file-system /

    NOTE: you could achieve the same using the option --exclude-from=file.txt, and having the list of exclusions in this file. I used a one-liner as it’s quicker to copy and paste.
  • Once done, close your Linux VM
  • Verify that you have a new file called backup.tar.bz in Downloads

On your NEW PC

  • Install from Microsoft Store the same Linux VM (or reinstall in the same way you have done originally on your old pc)
  • Copy across your backup.tar.bz within your new Downloads folder
  • Open the VM that you’ve just installed (minimal setup – this will be completely overwritten, so don’t be bothered too much)
  • Once you’re inside and your backup.tar.bz is in Download, run the following (replace <user> with your username):

    sudo tar -xpzf /mnt/c/Users/<user>/Downloads/backup.tar.gz -C / --numeric-owner
  • Ignore the errors
  • Close and re-open the VM: DONE! 🙂

Happy migration! 😉

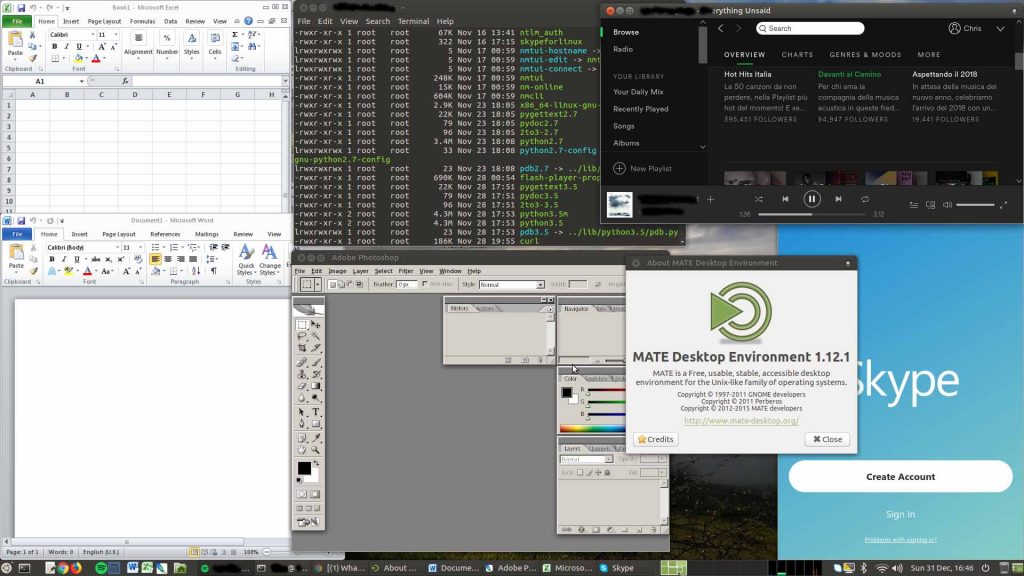
Ubuntu 16.04 with Office 2010, Photoshop CS2, Spotify and Skype

I can finally decommission my Windows VM!

Yes. I was keeping a Windows VM to use Office and Photoshop. Libreoffice and GIMP are alternative options that where not sufficient – at least for me. On top of that, Skype and Spotify were another couple of software that weren’t really working well or available (at least a while ago).

Now, I have a full working-workstation based on Ubuntu 16.04 LTS – MATE!

Desktop Screenshot

How to?

Well, here some easy instructions.

What you need?

  • Office Pro 2010 license
  • Office Pro 2010 installer (here where to download if you have lost it – 32bit version)
  • Photoshop installer: Adobe has now released version C2 free. You need an Adobe account. They provide installer and serial. For the installer, here the direct link
  • Spotify account
  • Skype account
  • Ubuntu 16.04 LTS 64 bit installed 🙂

Let’s install!

Spotify

For Spotify, I’ve just simply followed this: https://www.spotify.com/it/download/linux/

apt-key adv --keyserver hkp://keyserver.ubuntu.com:80 --recv-keys 0DF731E45CE24F27EEEB1450EFDC8610341D9410
echo deb http://repository.spotify.com stable non-free | sudo tee /etc/apt/sources.list.d/spotify.list
apt-get update
apt-get install spotify-client

Skype

For Skype, I have downloaded the deb from https://www.skype.com/en/get-skype/

wget https://go.skype.com/skypeforlinux-64.deb
dpkg -i skypeforlinux-64.deb


Office 2010 – Photoshop CS2

A bit more complicated how to install Office 2010 and Photoshop… but not too much 🙂
Just follow these instructions.

Firstly, we need to enable i386 architecture

dpkg --add-architecture i386

Then, add WineHQ repositories and install the latest stable version:

wget https://dl.winehq.org/wine-builds/Release.key
apt-key add Release.key
apt-add-repository 'https://dl.winehq.org/wine-builds/ubuntu/'
apt-get update && apt-get install --install-recommends winehq-stable

Install some extra packages, including winbind and the utility winetricks and create some symlinks

apt-get install mesa-utils mesa-utils-extra libgl1-mesa-glx:i386 libgl1-mesa-dev winbind winetricks

ln -s /usr/lib/i386-linux-gnu/mesa/libGL.so.1 /usr/lib/i386-linux-gnu/mesa/libGL.so
ln -s /usr/lib/i386-linux-gnu/mesa/libGL.so /usr/lib/i386-linux-gnu/libGL.so

NOTE: very importante the package winbind. Don’t miss this or Office won’t install.

Create the environment (assuming your user is called user)

mkdir -p /home/user/my_wine_env/

export WINEARCH="win32"
export WINEPREFIX="/home/user/my_wine_env/"

Install some required packages, using winetricks

winetricks dotnet20 msxml6 corefonts

After that, let’s make some changes to Wine conf.

winecfg

As described to this post, add riched20 and gdiplus libraries (snipped below):

Click the Libraries tab. Currently, there will be only a single entry for *msxml6 (native,built-in).
Now click in the ‘New override for library’ combo box and type ‘rich’. Click the down-arrow. That should now display an item called riched20. Click [Add].
In the same override combo box, now type ‘gdip’. Click the down-arrow. You should now see an item called gdiplus. Click on it and then click [Add]

Now… let’s install!

wine /path/installer/Setup.exe

This command is valid for both software: Office and Photoshop.

With this configuration, you should be able to complete the setup and see under “Others” menu (in Ubuntu MATE) the apps installed. Please note that you might need to reboot your box to see the app actually there.

During the Office setup, I choose the Custom setup, as I just wanted Word, Excel and Power Point. I selected “Run all from My Computer” to be sure there won’t be any extra to install while using the software, and after, I’ve de-selected/excluded what I didn’t want.


Once completed with the setup, if you don’t see the apps under “Others” menu, you can run them via command line (e.g. run Excel):

$ wine /home/user/my_wine_env/drive_c/Program\ Files/Microsoft\ Office/Office14/EXCEL.EXE

Office will ask to activate. I wasn’t able to activate it via Internet, so I have called the number found at this page.

The only issue I’ve experienced was that Word was showing “Configuring Office 2010…” and taking time to start. After that, I was getting a pop up asking to reboot. Saying “yes” was making all crashing. Saying “no” was allowing me to use Word with no issues.

I found this patch that worked perfectly:

reg add HKCU\Software\Microsoft\Office\15.0\Word\Options /v NoReReg /t REG_DWORD /d 1

Just do

wine cmd

  and paste the above command, or

wine regedit 

 and add manually the key.

Apart of this… all went smoothly. I have been able also to install the language packs, using the same procedure

wine setup.exe

  and I’m very happy now! 🙂

Have fun!