How to convert a EXT3 partition to EXT4 without reformatting
# tune2fs -O extents,uninit_bg,dir_index /dev/sdXx# fsck -pf /dev/sdXxThen, make sure to change to ext4 any entries in /etc/fstab
# tune2fs -O extents,uninit_bg,dir_index /dev/sdXx# fsck -pf /dev/sdXxThen, make sure to change to ext4 any entries in /etc/fstab
IP address classes
IP addresses can be broken down into classes. These classes are A, B, C, D, E and their possible ranges can be seen below.
| Class | Start address | Finish address |
| A | 0.0.0.0 | 126.255.255.255 |
| B | 128.0.0.0 | 191.255.255.255 |
| C | 192.0.0.0 | 223.255.255.255 |
| D | 224.0.0.0 | 239.255.255.255 |
| E | 240.0.0.0 | 255.255.255.255 |
If you look at the table you may notice something strange. The range of IP address from Class A to Class B skips the 127.0.0.0-127.255.255.255 range. That is because this range is reserved for the special addresses called Loopback addresses that have already been discussed above.
The rest of classes are allocated to companies and organizations based upon the amount of IP addresses that they may need. Listed below are descriptions of the IP classes and the organizations that will typically receive that type of allocation.
Default Network: The special network 0.0.0.0 is generally used for routing.
Class A: From the table above you see that there are 126 class A networks. These networks consist of 16,777,214 possible IP addresses that can be assigned to devices and computers. This type of allocation is generally given to very large networks such as multi-national companies.
Loopback: This is the special 127.0.0.0 network that is reserved as a loopback to your own computer. These addresses are used for testing and debugging of your programs or hardware.
Class B: This class consists of 16,384 individual networks, each allocation consisting of 65,534 possible IP addresses. These blocks are generally allocated to Internet Service Providers and large networks, like a college or major hospital.
Class C: There is a total of 2,097,152 Class C networks available, with each network consisting of 255 individual IP addresses. This type of class is generally given to small to mid-sized companies.
Class D: The IP addresses in this class are reserved for a service called Multicast.
Class E: The IP addresses in this class are reserved for experimental use.
Broadcast: This is the special network of 255.255.255.255, and is used for broadcasting messages to the entire network that your computer resides on.
Private Addresses
There are also blocks of IP addresses that are set aside for internal private use for computers not directly connected to the Internet. These IP addresses are not supposed to be routed through the Internet, and most service providers will block the attempt to do so. These IP addresses are used for internal use by company or home networks that need to use TCP/IP but do not want to be directly visible on the Internet. These IP ranges are:
|
Class
|
Private Start Address
|
Private End Address
|
|
A
|
10.0.0.0
|
10.255.255.255
|
|
B
|
172.16.0.0
|
172.31.255.255
|
|
C
|
192.168.0.0
|
192.168.255.255
|
If you are on a home/office private network and want to use TCP/IP, you should assign your computers/devices IP addresses from one of these three ranges. That way your router/firewall would be the only device with a true IP address which makes your network more secure.
Full source (and loads of thanks): http://www.bleepingcomputer.com/tutorials/ip-addresses-explained/
… some extra summary table from here:
| Class | 1st Octet Decimal Range | 1st Octet High Order Bits | Network/Host ID (N=Network, H=Host) | Default Subnet Mask | Number of Networks | Hosts per Network (Usable Addresses) |
|---|---|---|---|---|---|---|
| A | 1 – 126* | 0 | N.H.H.H | 255.0.0.0 | 126 (27 – 2) | 16,777,214 (224 – 2) |
| B | 128 – 191 | 10 | N.N.H.H | 255.255.0.0 | 16,382 (214 – 2) | 65,534 (216 – 2) |
| C | 192 – 223 | 110 | N.N.N.H | 255.255.255.0 | 2,097,150 (221– 2) | 254 (28 – 2) |
| D | 224 – 239 | 1110 | Reserved for Multicasting | |||
| E | 240 – 254 | 1111 | Experimental; used for research | |||
Note: Class A addresses 127.0.0.0 to 127.255.255.255 cannot be used and is reserved for loopback and diagnostic functions.
| Class | Private Networks | Subnet Mask | Address Range |
|---|---|---|---|
| A | 10.0.0.0 | 255.0.0.0 | 10.0.0.0 – 10.255.255.255 |
| B | 172.16.0.0 – 172.31.0.0 | 255.240.0.0 | 172.16.0.0 – 172.31.255.255 |
| C | 192.168.0.0 | 255.255.0.0 | 192.168.0.0 – 192.168.255.255 |
|
Regex operator |
Meaning |
|
. |
Matches any single character. |
|
? |
The preceding item is optional and will be matched, at most, once. |
|
* |
The preceding item will be matched zero or more times. |
|
+ |
The preceding item will be matched one or more times. |
|
{N} |
The preceding item is matched exactly N times. |
|
{N,} |
The preceding item is matched N or more times. |
|
{N,M} |
The preceding item is matched at least N times, but not more than M times. |
|
– |
Represents the range if it’s not first or last in a list or the ending point of a range in a list. |
|
^ |
Matches the empty string at the beginning of a line; also represents the characters not in the range of a list. |
|
$ |
Matches the empty string at the end of a line. |
|
\b |
Matches the empty string at the edge of a word. |
|
\B |
Matches the empty string provided it’s not at the edge of a word. |
|
\< |
Match the empty string at the beginning of word. |
|
\> |
Match the empty string at the end of word. |
|
(a|b) |
Match a or b |
|
[abc] |
Range (a or b or c) |
|
[^abc] |
NOT a or b or c |
|
[a-z] |
Any letter (lowercase) from a to z |
|
[A-Z] |
Any letter (uppercase) from a to z |
|
[a-zA-Z] |
Any letter (upper and lowercase) from a to z |
|
[0-9] |
Any digit from 0 to 9 |
A most exhaustive cheat sheet is available here
I was just looking around info about netcat and telnet, trying to understand a bit more. Well… in few words: no point to install telnet if you have netcat! 🙂 Netcat is perfect for scripting, ’cause it’s non-interactive, UDP/TCP capable, can be a listener as well… very powerful tool. Here some example.
~ $ nc -zv localhost 80
Connection to localhost 80 port [tcp/http] succeeded!
…and it closes gracefully 😉
~ $ nc -zv localhost 20-25
nc: connect to localhost port 20 (tcp) failed: Connection refused
Connection to localhost 21 port [tcp/ftp] succeeded!
Connection to localhost 22 port [tcp/ssh] succeeded!
nc: connect to localhost port 23 (tcp) failed: Connection refused
nc: connect to localhost port 24 (tcp) failed: Connection refused
nc: connect to localhost port 25 (tcp) failed: Connection refused$ nc -zv localhost 20 22 80 443
nc: connect to localhost port 20 (tcp) failed: Connection refused
Connection to localhost 22 port [tcp/ssh] succeeded!
Connection to localhost 80 port [tcp/http] succeeded!
Connection to localhost 443 port [tcp/https] succeeded!NOTE: If you want to grep or play with the “output” of the command, you need to use 2>&1
For example:nc -zv localhost 1-1024 2>&1 | grep succeeded
(From man) Alternatively, it might be useful to know which server software is running, and which versions. This information is often contained within the greeting banners. In order to retrieve these, it is necessary to first make a connection, and then break the connection when the banner has been retrieved. This can be accomplished by specifying a small timeout with the -w flag, or perhaps by issuing a “QUIT” command to the server:
$ echo "QUIT" | nc host.example.com 20-30
SSH-1.99-OpenSSH_3.6.1p2
Protocol mismatch.
220 host.example.com IMS SMTP Receiver Version 0.84 Ready
In some cases, it’s handy to add -q 1 at the end, if nc hangs (I’ve noticed this in some cases) Like this:
$ echo "QUIT" | nc host.example.com 20-30 -q 1On the receiver side:
$ nc -l 1234 > /tmp/file_to_receiveOn the sender side:
$ cat file_to_send | nc receiver_ip_or_fqdn 1234or
$ nc receiver_ip_or_fqdn 1234 < file_to_sendThere are plenty of things that you can do. These are just simple examples… enjoy! 🙂
This command will allow you to change the default editor in your Debian/Ubuntu machine
update-alternatives --config editorHere a quick how to, about how to configure Lighttpd to run with Virtualhosts.
This has been installed and tested on a Raspberry Pi.
apt-get install lighttpd php5 php5-cgiEnable modules:
lighttpd-enable-mod auth cgi fastcgi fastcgi-php nagios3 simple-vhost ssl statusContent of /etc/lighttpd/lighttpd.conf
server.modules = (
        "mod_access",
        "mod_alias",
        "mod_compress",
        "mod_redirect",
#       "mod_rewrite",
)

server.document-root        = "/var/www"
server.upload-dirs          = ( "/var/cache/lighttpd/uploads" )
server.errorlog             = "/var/log/lighttpd/error.log"
server.pid-file             = "/var/run/lighttpd.pid"
server.username             = "www-data"
server.groupname            = "www-data"
server.port                 = 80


index-file.names            = ( "index.php", "index.html", "index.lighttpd.html" )
url.access-deny             = ( "~", ".inc" )
static-file.exclude-extensions = ( ".php", ".pl", ".fcgi" )

compress.cache-dir          = "/var/cache/lighttpd/compress/"
compress.filetype           = ( "application/javascript", "text/css", "text/html", "text/plain" )

# default listening port for IPv6 falls back to the IPv4 port
include_shell "/usr/share/lighttpd/use-ipv6.pl " + server.port
include_shell "/usr/share/lighttpd/create-mime.assign.pl"
include_shell "/usr/share/lighttpd/include-conf-enabled.pl"
To easily manage virtual hosts, edit /etc/lighttpd/conf-available/10-simple-vhost.conf
server.modules += ( "mod_simple_vhost" )
simple-vhost.server-root = "/var/www/vhost"
simple-vhost.default-host = "error.default.loc"
simple-vhost.document-root = "/"
This configuration above will allow you to manage your virutalhosts simply storing them in a folder under /var/www/vhost
No extra configuration is needed from the server side.
Simply go into /var/www/vhost and create a folder named as the virtualhost you would like to manage.
In this particular case, please make sure to have a folder called error.default.loc with a page inside which will be displayed in case of ANY error.
For example, if you want to manage mysite.example.com, simply do the following:
cd /var/www/vhost
mkdir mysite.example.com
chown www-data:www-data mysite.example.com
…and put the html/php files inside that new folder! 🙂
To test if our webserver works, you can always use curl command as explained here.
Puppet is a quite powerful configuration manager tool which allows you to configure automatically hosts and keep configurations consistence.
I did some tests using 3 VMs:
Of course, most of the work is done on puppetmaster server. On the last two machines you will simply see the outcome of the configurations that you’re going do set on puppetmaster.
Important: all the machines have to be able to communicate between each others. Please make sure DNS is working or set local names/IPs in
/etc/hostsfile, and do some ping tests before proceeding.
On each puppetagent machine, just install the package puppet
apt-get install puppet
By default, the client will look for a host called “puppet” on the network.
If your DNS/hosts file doesn’t have this entry, and it can’t be resolved, you can manually set the name of the puppetmaster in /etc/puppet/puppet.conf file, adding this line under [main] section:
server=puppetmaster.yournet.loc
Now, no more configuration is required from the client side. Just edit /etc/default/puppet to start at boot time and start the service.
# Defaults for puppet - sourced by /etc/init.d/puppet

# Start puppet on boot?
START=yes

# Startup options
DAEMON_OPTS=""
service puppet start
Starting the service, will make automatically a request to the server to be added under his control.
If you want to do some tests, you can eventually use the following command to run puppet only once. This will also force the polling updates, which by default runs every 30 minutes.
puppet agent --no-daemonize --onetime --verbose
You can repeat all these steps on the second client machine.
apt-get install puppetmaster
Check if the service is running, otherwise, start it up.
Puppet uses this client/server certificate sign system to add/remove hosts from being managed by the server.
To see who has requested to be “controlled” use this command:
puppet cert --list
This will show all the hosts waiting to be added under puppetmaster server.
puppet cert --sign
This command will add the host.
The main configuration file is /etc/puppet/manifests/site.pp
Inside manifests folder, I’ve created a subfolder called classes with extra definitions (content of these files is showed later in this post).
/etc/puppet/manifests# tree
.
|___ classes
|   |___ apache.pp
|   |___ mysite.pp
|   |___ ntpd.pp
|   |___ packages.pp
|___ site.pp
/etc/puppet/manifests/site.pp
import 'classes/*.pp'
# This add all the custom .pp files into classes folder
class puppettools {
# Creates a file, setting permissions and content
        file { '/usr/local/sbin/puppet_once.sh':
                owner => root, group => root, mode => 755,
                content => "#!/bin/sh\npuppet agent --no-daemonize --onetime --verbose $1\n",
        }
# Install (if not present) some puppet modules required for 'vimconf' class
        exec { "install_puppet_module":
        command => "puppet module install puppetlabs-stdlib",
        path => [ "/bin", "/sbin", "/usr/bin", "/usr/sbin",
              "/usr/local/bin", "/usr/local/sbin" ],
        onlyif  => "test `puppet module list | grep puppetlabs-stdlib | wc -l` -eq 0"
        }
}

class vimconf {
# Modify vimrc conf file, enabling syntax on
        file_line { 'vim_syntax_on':
        path  => '/etc/vim/vimrc',
        match => '^.*syntax on.*$',
        line  => 'syntax on',
        }
}

node  default {
# this will be applied to all nodes without specific node definitions
        include packages
        include vimconf
        include ntp
        include puppettools
}

node  'puppetagent01' inherits default {
# this specific node, gets all the default classes PLUS some extras
        include mysite
}
Here the content of the single files .pp in classes folder:
class apache {
	package { 'apache2-mpm-prefork':
		ensure => installed
	}

	service { 'apache2':
		ensure => running,
		hasstatus => true,
		hasrestart => true,
	}
}
class mysite {

	include apache

	file { '/etc/apache2/sites-available/mysite':
		owner => root, group => root, mode => 0644,
		source => "puppet:///files/mysite/mysite_apache.conf",
	}

	file {'/var/www/mysite.localdomain':
		ensure => directory,
	}

	file {'/var/www/mysite.localdomain/index.html':
                owner => root, group => www-data, mode => 0755,
                source => "puppet:///files/mysite/index.html",
	}

	 exec {'/usr/sbin/a2dissite * ; /usr/sbin/a2ensite mysite':
            	onlyif => '/usr/bin/test -e /etc/apache2/sites-available/mysite',
		notify => Service['apache2'],
	}
}
class ntp {
		package { ntp: ensure => present }
		file { "/etc/ntp.conf":
			owner	 => root,
			group	 => root,
			mode	=> 444,
			backup => false,
			source	=> "puppet:///files/etc/ntp.conf",
			require => Package["ntp"],
                        notify  => Service["ntp"],
		}
		service { "ntp":
			enable => true ,
			ensure => running,
			subscribe => [Package[ntp], File["/etc/ntp.conf"],],
		}
	}
class packages  {
        Package { ensure => "installed" }

        package { "screen": }
        package { "dselect": }
        package { "vim": }
        package { "curl": }
}
It’s important to remember to NOT duplicate entries.
For example, in this case, we have a specific file where we have setupntpservice, including the required package. This means that we do NOT have to add this package in the list intopackages.pp, otherwise you will get an error and configs won’t get pushed.
As I’m sure you’ve noted, there are references to some “files”.
Yes, we need some extra configuration, to tell puppet to run as file server as well and where files are located.
In our example we are storing our files in here:
mkdir -p /etc/puppet/files
Now we need to add the following in /etc/puppet/fileserver.conf
[files]
  path /etc/puppet/files
allow *
Last bit, is creating the subfolders and place the files required for our configuration:
mkdir -p /etc/puppet/files
cd /etc/puppet/files
mkdir mysite mkdir etc
Inside mysite create mysite_apache.conf and index.html files.
Example mysite_apache.conf
<VirtualHost *:80>
  ServerName mysite.localdomain
  DocumentRoot /var/www/mysite.localdomain
</VirtualHost>
For index.html, you can simply have some text, just for testing purposes.
In this example, we have also setup ntp to be installed and to have a custom ntp.conf file pushed.
For this reason, we need to make sure to have this file present into /etc/puppet/files/etc as declared into our .pp file.
After doing all these changes, you should restart your puppetmaster service on the server.
If all went well, you should have the following:
Of course this is just a raw example and you can use template and other super features.
But I think it’s a good start 😉
Sources:
https://forge.puppetlabs.com/puppetlabs/stdlib
http://finninday.net/wiki/index.php/Zero_to_puppet_in_one_day
http://www.puppetcookbook.com/
http://foaa.de/old-blog/2010/07/playing-with-puppets-on-debian/trackback/index.html
http://www.harker.com/puppet/BayLISA100715.html
http://docs.puppetlabs.com/puppet/latest/reference/lang_relationships.html
For who’s using DD-WRT Router firmware, here a screenshot regarding the configuration for Internet.bs Dynamic DNS update service (included in all domains registered with them):
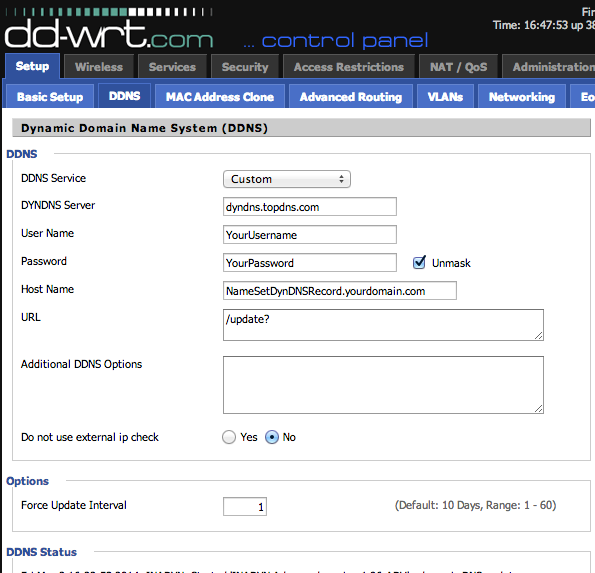
This seems to work well 🙂
Below a script that I’ve created to update your Dynamic DNS service.
It has been tested on Raspian (Raspberry Pi), Ubuntu 18.04 and Debian 9.
It works with Internet.bs, No-ip.com and CloudFlare
https://github.com/thtieig/dynip_update/
Also, for who as a router running DD-WRT, here a quick article about how to set it up.
Enjoy! 😉
Instert these lines below the “set backspace=2” in your /usr/share/vim file:
set ai                  " auto indenting
set history=100         " keep 100 lines of history
set ruler               " show the cursor position
syntax on               " syntax highlighting
set hlsearch            " highlight the last searched term
filetype plugin on      " use the file type plugins

" When editing a file, always jump to the last cursor position
autocmd BufReadPost *
\ if ! exists("g:leave_my_cursor_position_alone") |
\ if line("'\"") > 0 && line ("'\"") <= line("$") |
\ exe "normal g'\"" |
\ endif |
\ endif