The inetd daemon is sometimes referred to as a Super-Server because it manages connections for many services. Instead of starting multiple applications, only the inetd service needs to be started. When a connection is received for a service that is managed by inetd, it determines which program the connection is destined for, spawns a process for that program, and delegates the program a socket. Using inetd for services that are not heavily used can reduce system load, when compared to running each daemon individually in stand-alone mode.
Configuration file is /etc/inetd.conf
After making a change, you need to restart/reload the server.
On Debian (and similar), inetd can be restarted with the following
# /etc/init.d/openbsd-inetd restart
On RedHat (and similar) using this:
# service inetd reload
Example of configuration and explanation:
For an example, telnet can be configured as follows:
telnet stream tcp6 nowait root /usr/sbin/telnetd telnetd -a
The first word, telnet, is the official name of the service. It is resolved using the system database to map port numbers and protocols to service names. In this case, /etc/services should contain:
telnet 23/tcp
The second and third words describe the type of socket and underlying protocol respectively. The /etc/protocols database is consulted.
The fourth word is the wait/nowait switch. A single-threaded server expects inetd to wait until it finishes reading all the data. Otherwise inetd lets the server run and spawns new, concurrent processes for new requests.
The fifth word is the user name, from the /etc/passwd/ database, that the service program should run as.
Finally, the path and the arguments of an external program are given. As usual, the first argument is the program name. In the example, inetd is told to launch the program /usr/sbin/telnetd with the command line arguments telnetd -a. inetd automatically hooks the socket to stdin, stdout, and stderr of the server program.
Generally TCP sockets are handled by spawning a separate server to handle each connection concurrently. UDP sockets are generally handled by a single server instance that handles all packets on that port.
I was just looking around info about netcat and telnet, trying to understand a bit more. Well… in few words: no point to install telnet if you have netcat! 🙂 Netcat is perfect for scripting, ’cause it’s non-interactive, UDP/TCP capable, can be a listener as well… very powerful tool. Here some example.
How to check if your httpd is up and running:
~ $ nc -zv localhost 80
Connection to localhost 80 port [tcp/http] succeeded!
…and it closes gracefully 😉
How to check port-range ports:
~ $ nc -zv localhost 20-25
nc: connect to localhost port 20 (tcp) failed: Connection refused
Connection to localhost 21 port [tcp/ftp] succeeded!
Connection to localhost 22 port [tcp/ssh] succeeded!
nc: connect to localhost port 23 (tcp) failed: Connection refused
nc: connect to localhost port 24 (tcp) failed: Connection refused
nc: connect to localhost port 25 (tcp) failed: Connection refused
… or a list of ports:
$ nc -zv localhost 20 22 80 443
nc: connect to localhost port 20 (tcp) failed: Connection refused
Connection to localhost 22 port [tcp/ssh] succeeded!
Connection to localhost 80 port [tcp/http] succeeded!
Connection to localhost 443 port [tcp/https] succeeded!
NOTE: If you want to grep or play with the “output” of the command, you need to use 2>&1
For example:
nc -zv localhost 1-1024 2>&1 | grep succeeded
How to check the service that’s running on that port:
(From man) Alternatively, it might be useful to know which server software is running, and which versions. This information is often contained within the greeting banners. In order to retrieve these, it is necessary to first make a connection, and then break the connection when the banner has been retrieved. This can be accomplished by specifying a small timeout with the -w flag, or perhaps by issuing a “QUIT” command to the server:
This configuration above will allow you to manage your virutalhosts simply storing them in a folder under /var/www/vhost
No extra configuration is needed from the server side.
Simply go into /var/www/vhost and create a folder named as the virtualhost you would like to manage.
In this particular case, please make sure to have a folder called error.default.loc with a page inside which will be displayed in case of ANY error.
For example, if you want to manage mysite.example.com, simply do the following:
cd /var/www/vhost
mkdir mysite.example.com
chown www-data:www-data mysite.example.com
…and put the html/php files inside that new folder! 🙂
To test if our webserver works, you can always use curl command as explained here.
Puppet is a quite powerful configuration manager tool which allows you to configure automatically hosts and keep configurations consistence.
I did some tests using 3 VMs:
puppetmaster (server)
puppetagent01 (client)
puppetagent02 (client)
Of course, most of the work is done on puppetmaster server. On the last two machines you will simply see the outcome of the configurations that you’re going do set on puppetmaster.
Important: all the machines have to be able to communicate between each others. Please make sure DNS is working or set local names/IPs in /etc/hosts file, and do some ping tests before proceeding.
Client setup
On each puppetagent machine, just install the package puppet
apt-get install puppet
By default, the client will look for a host called “puppet” on the network.
If your DNS/hosts file doesn’t have this entry, and it can’t be resolved, you can manually set the name of the puppetmaster in /etc/puppet/puppet.conf file, adding this line under [main] section:
server=puppetmaster.yournet.loc
Now, no more configuration is required from the client side. Just edit /etc/default/puppet to start at boot time and start the service.
# Defaults for puppet - sourced by /etc/init.d/puppet

# Start puppet on boot?
START=yes

# Startup options
DAEMON_OPTS=""
service puppet start
Starting the service, will make automatically a request to the server to be added under his control.
If you want to do some tests, you can eventually use the following command to run puppet only once. This will also force the polling updates, which by default runs every 30 minutes.
puppet agent --no-daemonize --onetime --verbose
You can repeat all these steps on the second client machine.
Server setup
apt-get install puppetmaster
Check if the service is running, otherwise, start it up.
Sign clients’ certificates on the server side
Puppet uses this client/server certificate sign system to add/remove hosts from being managed by the server.
To see who has requested to be “controlled” use this command:
puppet cert --list
This will show all the hosts waiting to be added under puppetmaster server.
puppet cert --sign
This command will add the host.
Puppetmaster configuration files
The main configuration file is /etc/puppet/manifests/site.pp
Inside manifests folder, I’ve created a subfolder called classes with extra definitions (content of these files is showed later in this post).
import 'classes/*.pp'
# This add all the custom .pp files into classes folder
class puppettools {
# Creates a file, setting permissions and content
        file { '/usr/local/sbin/puppet_once.sh':
                owner => root, group => root, mode => 755,
                content => "#!/bin/sh\npuppet agent --no-daemonize --onetime --verbose $1\n",
        }
# Install (if not present) some puppet modules required for 'vimconf' class
        exec { "install_puppet_module":
        command => "puppet module install puppetlabs-stdlib",
        path => [ "/bin", "/sbin", "/usr/bin", "/usr/sbin",
              "/usr/local/bin", "/usr/local/sbin" ],
        onlyif  => "test `puppet module list | grep puppetlabs-stdlib | wc -l` -eq 0"
        }
}

class vimconf {
# Modify vimrc conf file, enabling syntax on
        file_line { 'vim_syntax_on':
        path  => '/etc/vim/vimrc',
        match => '^.*syntax on.*$',
        line  => 'syntax on',
        }
}

node  default {
# this will be applied to all nodes without specific node definitions
        include packages
        include vimconf
        include ntp
        include puppettools
}

node  'puppetagent01' inherits default {
# this specific node, gets all the default classes PLUS some extras
        include mysite
}
Here the content of the single files .pp in classes folder:
It’s important to remember to NOT duplicate entries.
For example, in this case, we have a specific file where we have setup ntp service, including the required package. This means that we do NOT have to add this package in the list into packages.pp, otherwise you will get an error and configs won’t get pushed.
As I’m sure you’ve noted, there are references to some “files”.
Yes, we need some extra configuration, to tell puppet to run as file server as well and where files are located.
In our example we are storing our files in here:
mkdir -p /etc/puppet/files
Now we need to add the following in /etc/puppet/fileserver.conf
[files]
  path /etc/puppet/files
allow *
Last bit, is creating the subfolders and place the files required for our configuration:
mkdir -p /etc/puppet/files
cd /etc/puppet/files
mkdir mysite mkdir etc
Inside mysite create mysite_apache.conf and index.html files.
For index.html, you can simply have some text, just for testing purposes.
In this example, we have also setup ntp to be installed and to have a custom ntp.conf file pushed.
For this reason, we need to make sure to have this file present into /etc/puppet/files/etc as declared into our .pp file.
After doing all these changes, you should restart your puppetmaster service on the server.
If all went well, you should have the following:
puppetagent02 host with screen, dselect, vim (installed and with syntax on), ntp (installed, running with custom ntp.conf file)
puppetagent01: with the same as puppetagent02 PLUS apache with a running website
Of course this is just a raw example and you can use template and other super features.
But I think it’s a good start 😉
I found this handy plugin to backup my blog: BackWPup
It has also an interesting feature which is the ability to backup remotely, for example on a FTP server.
So… here we go! 🙂
Few notes:
This uses vsftpd software
It will work ONLY over SSL
Due to SSL encryption, the FTP will also work ONLY in PASSIVE mode (ACTIVE mode is disabled)
This configuration has been made based of the fact that this raspberry pi is behind a router
This will use ONLY virtual users, chroot’ed, to increase the security (vsftpd will use a custom PAM auth file, which won’t lookup in /etc/passwd files – for this reason, any local user attempts to login will fail)
Virtual users usernames and credentials will be stored in a file
There is a workaround in place to avoid some common issues like “500 OOPS: Vsftpd: Refusing to Run With Writable Root Inside Chroot ()” – FYI, allow_writeable_chroot=yes does NOT work on vsftpd version 2.3.5.
Please note that all new virtual users added need its home directory manually created as per above. Also, due to the chroot option and the current limitation on vsftpd, if you want a user to be able to write in its home directory, you need to create an extra folder. Its root home folder has to be -w. This is a workaround that works 🙂
Setup PAM authentication
Create a new file /etc/pam.d/vsftpd.virtual and add the following:
Use the flag -c only the first time to create the file. If you re-use it, the file will be overwritten!
Also the -d flag is required because vsftpd is unable to read MD5 hashed password (default if -d is not used). The downside of this is a password limited to 8 characters.
Openssl could be used to produce a MD5 based BSD password with algorithm 1 using # openssl passwd -1 (not tested)
Now, on your router, make sure that the module ip_conntrack_ftp is loaded using lsmod command.
This is required for FTP PASSIVE mode to work.
I’ve realised that this can be called also nf_conntrack_ftp.
A good way to check all the alias associated to that netfilter module is using the following command:
I needed this on my Raspberry Pi for this article, and I didn’t want to make dirty the system using the common “make / make install” commands.
This are the simple steps I’ve followed (all as root – even if it’s not the best practise).
mkdir /tmp/netatalk
cd /tmp/netatalk
wget http://downloads.sourceforge.net/project/netatalk/netatalk/3.1.7/netatalk-3.1.7.tar.gz
tar xzvf netatalk-3.1.7.tar.gz
cd netatalk-3.1.7
Make sure the folder has this format: <name_of_the_package>-<version>ALL in lowercase!
It will ask for the type of the package. To make things easier, just select single entering s.
Edit the file debian/control adding the missing bits (example below):
Source: netatalk
Section: net
Priority: extra
Maintainer: root <[email protected]>
Build-Depends: debhelper (>= 8.0.0), autotools-dev
Standards-Version: 3.9.3
Homepage: http://netatalk.sourceforge.net/
#Vcs-Git: git://git.debian.org/collab-maint/netatalk.git
#Vcs-Browser: http://git.debian.org/?p=collab-maint/netatalk.git;a=summary

Package: netatalk
Architecture: any
Depends: ${shlibs:Depends}, ${misc:Depends}
Description: AppleTalk user binaries
 Open Source AFP fileserver capable of serving many Macintosh clients simultaneously as an AppleShare file server (AFP)
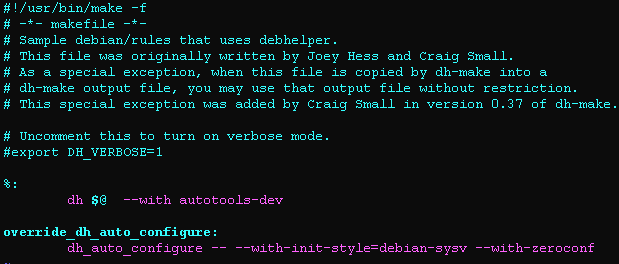
Then, add debian/rules adding this line, to pass custom configure parameters:
The <TAB> is what you have to press to indent the code. Without that TAB, the file won’t work properly. Before dh_auto_configure there is a TAB 🙂
MAKE SURE that the syntax gets highlighted like this:
I’ve read that it should be good to run dpkg-depcheck -d ./configure before the next step.
Honestly, I didn’t do that because it requires an extra package called devscripts that installs loads of dependencies, which I didn’t want to add on my Raspberry pi.
In a different situation, I would probably have done that.
Then run:
dpkg-buildpackage -us -uc
…and wait.
If you get something like this…
dpkg-deb: building package `netatalk' in `../netatalk_3.1.7-1_armhf.deb'.
dpkg-genchanges >../netatalk_3.1.7-1_armhf.changes
dpkg-genchanges: including full source code in upload
dpkg-source --after-build netatalk-3.1.7
dpkg-buildpackage: full upload (original source is included)
…you’ve been lucky! And you can cd .. and you should have your package .deb created and ready to be installed with a simple dpkg -i .deb
Good luck! 🙂
NOTE: I’ve noticed that the compile might fail due to ‘acl‘ package missing. I’m not a master in compiling, so what I’ve done is the following
apt-get install acl
Than I’ve modified include/atalk/acl.h start at line 63, adding #define O_IGNORE 0 to make it look like following:
This trick was from here
Than, you need to commit the change with the following command: dpkg-source --commit and save adding a little description like “patch to compile with no ACLs” or something like that.
This made me possible to finish the building of the package and have the deb.