Category Archives: Networking

Banana Pi Pro – WLAN configuration

Add ‘ap6210‘ to /etc/modules to enable WiFi, and use modprobe ap6210 to force load the module.

Check dmesg to see if all has been loaded correctly. If not, reboot and check again.

dmesg|grep WLAN

Install the required packages:

apt-get install wireless-tools iw wpasupplicant

Modify /etc/network/interfaces

# Dinamic IP:
auto wlan0
allow-hotplug wlan0
iface wlan0 inet dhcp
wpa-ap-scan 1
wpa-scan-ssid 1
wpa-ssid "WIFI_NETWORK_NAME"
wpa-psk "WLAN-KEY"

# Static IP:
auto wlan0
allow-hotplug wlan0
iface wlan0 inet static
address 192.168.xx.yy
netmask 255.255.255.0
gateway 192.168.0.1
wpa-ap-scan 1
wpa-scan-ssid 1
wpa-ssid "WIFI_NETWORK_NAME"
wpa-psk "WLAN-KEY"

Bring the interface up:

ifconfig wlan0 up

Source: http://oyox.de/882-wlan-auf-bananian-banana-pi-einrichten/

Networking – IP Address classes explained

IP address classes

IP addresses can be broken down into classes. These classes are A, B, C, D, E and their possible ranges can be seen below.

Class Start address Finish address
A 0.0.0.0 126.255.255.255
B 128.0.0.0 191.255.255.255
C 192.0.0.0 223.255.255.255
D 224.0.0.0 239.255.255.255
E 240.0.0.0 255.255.255.255

If you look at the table you may notice something strange. The range of IP address from Class A to Class B skips the 127.0.0.0-127.255.255.255 range. That is because this range is reserved for the special addresses called Loopback addresses that have already been discussed above.

The rest of classes are allocated to companies and organizations based upon the amount of IP addresses that they may need. Listed below are descriptions of the IP classes and the organizations that will typically receive that type of allocation.

Default Network: The special network 0.0.0.0 is generally used for routing.

Class A: From the table above you see that there are 126 class A networks. These networks consist of 16,777,214 possible IP addresses that can be assigned to devices and computers. This type of allocation is generally given to very large networks such as multi-national companies.

Loopback: This is the special 127.0.0.0 network that is reserved as a loopback to your own computer. These addresses are used for testing and debugging of your programs or hardware.

Class B: This class consists of 16,384 individual networks, each allocation consisting of 65,534 possible IP addresses. These blocks are generally allocated to Internet Service Providers and large networks, like a college or major hospital.

Class C: There is a total of 2,097,152 Class C networks available, with each network consisting of 255 individual IP addresses. This type of class is generally given to small to mid-sized companies.

Class D: The IP addresses in this class are reserved for a service called Multicast.

Class E: The IP addresses in this class are reserved for experimental use.

Broadcast: This is the special network of 255.255.255.255, and is used for broadcasting messages to the entire network that your computer resides on.

Private Addresses

There are also blocks of IP addresses that are set aside for internal private use for computers not directly connected to the Internet. These IP addresses are not supposed to be routed through the Internet, and most service providers will block the attempt to do so. These IP addresses are used for internal use by company or home networks that need to use TCP/IP but do not want to be directly visible on the Internet. These IP ranges are:

Class
Private Start Address
Private End Address
A
10.0.0.0
10.255.255.255
B
172.16.0.0
172.31.255.255
C
192.168.0.0
192.168.255.255

If you are on a home/office private network and want to use TCP/IP, you should assign your computers/devices IP addresses from one of these three ranges. That way your router/firewall would be the only device with a true IP address which makes your network more secure.

Full source (and loads of thanks):  http://www.bleepingcomputer.com/tutorials/ip-addresses-explained/


… some extra summary table from here:

Class 1st Octet Decimal Range 1st Octet High Order Bits Network/Host ID (N=Network, H=Host) Default Subnet Mask Number of Networks Hosts per Network (Usable Addresses)
A 1 – 126* 0 N.H.H.H 255.0.0.0 126 (27 – 2) 16,777,214 (224 – 2)
B 128 – 191 10 N.N.H.H 255.255.0.0 16,382 (214 – 2) 65,534 (216 – 2)
C 192 – 223 110 N.N.N.H 255.255.255.0 2,097,150 (221– 2) 254 (28 – 2)
D 224 – 239 1110 Reserved for Multicasting
E 240 – 254 1111 Experimental; used for research

Note: Class A addresses 127.0.0.0 to 127.255.255.255 cannot be used and is reserved for loopback and diagnostic functions.

Private IP Addresses

Class Private Networks Subnet Mask Address Range
A 10.0.0.0 255.0.0.0 10.0.0.0 – 10.255.255.255
B 172.16.0.0 – 172.31.0.0 255.240.0.0 172.16.0.0 – 172.31.255.255
C 192.168.0.0 255.255.0.0 192.168.0.0 – 192.168.255.255

Netcat – such a powerful ‘cat’!

I was just looking around info about netcat and telnet, trying to understand a bit more. Well… in few words: no point to install telnet if you have netcat! 🙂 Netcat is perfect for scripting, ’cause it’s non-interactive, UDP/TCP capable, can be a listener as well… very powerful tool. Here some example.

How to check if your httpd is up and running:

~ $ nc -zv localhost 80
Connection to localhost 80 port [tcp/http] succeeded!

…and it closes gracefully 😉

How to check port-range ports:

~ $ nc -zv localhost 20-25
nc: connect to localhost port 20 (tcp) failed: Connection refused
Connection to localhost 21 port [tcp/ftp] succeeded!
Connection to localhost 22 port [tcp/ssh] succeeded!
nc: connect to localhost port 23 (tcp) failed: Connection refused
nc: connect to localhost port 24 (tcp) failed: Connection refused
nc: connect to localhost port 25 (tcp) failed: Connection refused

… or a list of ports:

$ nc -zv localhost 20 22 80 443
nc: connect to localhost port 20 (tcp) failed: Connection refused
Connection to localhost 22 port [tcp/ssh] succeeded!
Connection to localhost 80 port [tcp/http] succeeded!
Connection to localhost 443 port [tcp/https] succeeded!

NOTE: If you want to grep or play with the “output” of the command, you need to use 2>&1
For example:

nc -zv localhost 1-1024 <strong>2>&1</strong> | grep succeeded

How to check the service that’s running on that port:

(From man) Alternatively, it might be useful to know which server software is running, and which versions. This information is often contained within the greeting banners. In order to retrieve these, it is necessary to first make a connection, and then break the connection when the banner has been retrieved. This can be accomplished by specifying a small timeout with the -w flag, or perhaps by issuing a “QUIT” command to the server:

$ echo "QUIT" | nc host.example.com 20-30
SSH-1.99-OpenSSH_3.6.1p2
Protocol mismatch.
220 host.example.com IMS SMTP Receiver Version 0.84 Ready

In some cases, it’s handy to add -q 1 at the end, if nc hangs (I’ve noticed this in some cases) Like this:

$ echo "QUIT" | nc host.example.com 20-30 <strong>-q 1</strong>

Or how to send/receive a file:

On the receiver side:

$ nc -l 1234 > /tmp/file_to_receive

On the sender side:

$ cat file_to_send | nc receiver_ip_or_fqdn 1234

or

$ nc receiver_ip_or_fqdn 1234 < file_to_send

There are plenty of things that you can do. These are just simple examples… enjoy! 🙂

Dynamic DNS update script

Below a script that I’ve created to update your Dynamic DNS service.

It has been tested on Raspian (Raspberry Pi), Ubuntu 18.04 and Debian 9.

It works with Internet.bs, No-ip.com and CloudFlare

https://bitbucket.org/thtieig/dynip_update/src/master/

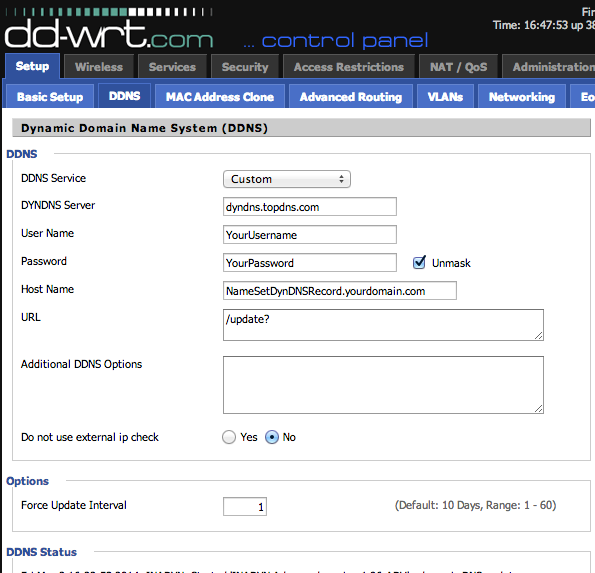
Also, for who as a router running DD-WRT, here a quick article about how to set it up.

Enjoy! 😉

SSL PASSIVE FTP with virtual users on Raspberry Pi

I found this handy plugin to backup my blog: BackWPup
It has also an interesting feature which is the ability to backup remotely, for example on a FTP server.

So… here we go! 🙂

Few notes:

  • This uses vsftpd software
  • It will work ONLY over SSL
  • Due to SSL encryption, the FTP will also work ONLY in PASSIVE mode (ACTIVE mode is disabled)
  • This configuration has been made based of the fact that this raspberry pi is behind a router
  • This will use ONLY virtual users, chroot’ed, to increase the security (vsftpd will use a custom PAM auth file, which won’t lookup in /etc/passwd files – for this reason, any local user attempts to login will fail)
  • Virtual users usernames and credentials will be stored in a file
  • There is a workaround in place to avoid some common issues like “500 OOPS: Vsftpd: Refusing to Run With Writable Root Inside Chroot ()” – FYI, allow_writeable_chroot=yes does NOT work on vsftpd version 2.3.5.

Install required packets:

apt-get install vsftpd apache2-utils libpam-pwdfile

Create SSL certificate:

openssl req -x509 -nodes -days 7300 -newkey rsa:2048 -keyout /etc/ssl/certs/vsftpd.pem -out /etc/ssl/certs/vsftpd.pem
chmod 600 /etc/ssl/certs/vsftpd.pem

Add a local user with limited access (like no console) that vsfpd will use to run virtual users:

useradd --home /home/vsftpd --gid nogroup -m --shell /bin/false vsftpd

Create directory structures for the virtual users:

mkdir -p /space/ftpusers/
chmod a-w /space/ftpusers/
mkdir -p /space/ftpusers/ftp01/rw
chmod a-w /space/ftpusers/ftp01
chown -R vsftpd:nogroup /space/ftpusers/ftp01

Please note that all new virtual users added need its home directory manually created as per above. Also, due to the chroot option and the current limitation on vsftpd, if you want a user to be able to write in its home directory, you need to create an extra folder. Its root home folder has to be -w. This is a workaround that works 🙂

Setup PAM authentication

Create a new file /etc/pam.d/vsftpd.virtual and add the following:

auth required pam_pwdfile.so pwdfile /etc/vsftpd/vsftpd.users
account required pam_permit.so

Now, let’s reorder a bit vsftp files in a directory:

mkdir -p /etc/vsftpd
cd /etc/
mv vsftpd.conf vsftpd
ln -s /etc/vsftpd/vsftpd.conf .

Add new users (password max 8 characters):

htpasswd -c -d -b /etc/vsftpd/vsftpd.users ftp01 ftp01password

Use the flag -c only the first time to create the file. If you re-use it, the file will be overwritten!
Also the -d flag is required because vsftpd is unable to read MD5 hashed password (default if -d is not used). The downside of this is a password limited to 8 characters.
Openssl could be used to produce a MD5 based BSD password with algorithm 1 using # openssl passwd -1 (not tested)

Let’s configure vsftpd

vi /etc/vsftpd.conf

# Main Settings
listen=YES
listen_port=21
connect_from_port_20=NO
ftpd_banner=Welcome to my FTP :-)
use_localtime=YES
force_dot_files=YES

# FTP Passive settings
pasv_enable=YES
pasv_min_port=1100
pasv_max_port=1150
pasv_addr_resolve=YES
pasv_enable=YES
pasv_addr_resolve=YES
pasv_address=<span style="color: #ff0000;"><EXTERNAL IP or DYN DNS></span>

# Virtual user settings
local_enable=YES
chroot_local_user=YES
secure_chroot_dir=/var/run/vsftpd/empty
virtual_use_local_privs=YES
guest_enable=YES
guest_username=vsftpd
pam_service_name=vsftpd.virtual
user_sub_token=$USER
local_root=/space/ftpusers/$USER
hide_ids=YES

# Anonymous settings
anonymous_enable=NO
anon_upload_enable=NO
no_anon_password=NO
anon_other_write_enable=NO
anon_mkdir_write_enable=NO

# Write permissions
write_enable=YES
local_umask=022
async_abor_enable=YES

# SSL
ssl_enable=YES
force_local_data_ssl=YES
force_local_logins_ssl=YES
ssl_tlsv1=YES
ssl_sslv2=NO
ssl_sslv3=NO
require_ssl_reuse=NO
ssl_ciphers=HIGH
rsa_cert_file=/etc/ssl/certs/vsftpd.pem

# Logging
xferlog_enable=YES
log_ftp_protocol=NO
syslog_enable=NO
vsftpd_log_file=/var/log/vsftpd.log

Now, on your router, make sure that the module ip_conntrack_ftp is loaded using lsmod command.
This is required for FTP PASSIVE mode to work.
I’ve realised that this can be called also nf_conntrack_ftp.
A good way to check all the alias associated to that netfilter module is using the following command:

# modinfo nf_conntrack_ftp
filename: /lib/modules/3.3.7/kernel/net/netfilter/nf_conntrack_ftp.ko
alias: nfct-helper-ftp
alias: <span style="color: #ff0000;">ip_conntrack_ftp</span>
description: ftp connection tracking helper
author: Rusty Russell <[email protected]>
license: GPL
depends: nf_conntrack
intree: Y
vermagic: 3.3.7 mod_unload MIPS32_R1 32BIT
parm: ports:array of ushort
parm: loose:bool

Also, make sure to setup a port forwarding like as below:

$IPT -t nat -A PREROUTING -p tcp -i $EXTIF -d $EXTIP --dport 21 -j DNAT --to $FTPIP:21 # FTP connection port
$IPT -t nat -A PREROUTING -d $EXTIP -p tcp -m tcp --dport 1100:1150 -j DNAT --to-destination $FTPI # FTP PASS ports
$IPT -A FORWARD -i $EXTIF -d $FTPI -p tcp --dport 21 -j ACCEPT
$IPT -A FORWARD -i $EXTIF -d $FTPI -p tcp --dport 1100:1150 -j ACCEPT

DNS updated via DHCP: BIND9 and ISC-DHCP on Linux

Linux: Debian stable (currently version 7)

Packages:

apt-get install install bind9 isc-dhcp-server

Create a key required for DHCP server to update the DNS zones:

/usr/sbin/rndc-confgen -a

This will create /etc/bind/rndc.key, whose contents will look something like this:

key "rndc-key" {
algorithm hmac-md5;
secret "+zZSeeetHWFdNwECit1Ktw==";
};

BIND configuration

Configuration files:


/etc/hosts

127.0.0.1 localhost
10.0.60.60 dns.lab.loc dns

# The following lines are desirable for IPv6 capable hosts
::1 localhost ip6-localhost ip6-loopback
ff02::1 ip6-allnodes
ff02::2 ip6-allrouters


/etc/bind/named.conf.local

// Do any local configuration here
// Consider adding the 1918 zones here, if they are not used in your organization
include "/etc/bind/zones.rfc1918";

include "/etc/bind/rndc.key";

zone "lab.loc" {
type master;
file "/etc/bind/db.lab.loc";
allow-update { key rndc-key; };
};

zone "60.0.10.in-addr.arpa" {
type master;
file "/etc/bind/db.10.0.60";
allow-update { key rndc-key; };
};


/etc/bind/named.conf.options

(just to setup the external forwarders)

options {
directory "/var/cache/bind";

// If there is a firewall between you and nameservers you want
// to talk to, you may need to fix the firewall to allow multiple
// ports to talk. See http://www.kb.cert.org/vuls/id/800113

// If your ISP provided one or more IP addresses for stable
// nameservers, you probably want to use them as forwarders.
// Uncomment the following block, and insert the addresses replacing
// the all-0's placeholder.

forwarders {
<strong>208.67.222.222;208.67.220.220;8.8.8.8;8.8.4.4;</strong>
};

//========================================================================
// If BIND logs error messages about the root key being expired,
// you will need to update your keys. See https://www.isc.org/bind-keys
//========================================================================
dnssec-validation auto;

auth-nxdomain no; # conform to RFC1035

allow-query {
10.0.60/24;
127.0.0.1;
};
allow-transfer {
10.0.60/24;
127.0.0.1;
};

listen-on-v6 { any; };
};


/etc/bind/db.lab.loc

$ORIGIN lab.loc.
$TTL 24h ;$TTL (DNS time-to-live setting) used for all RRs without explicit TTL value

;SOA - Start of Authority. This is the record that states that this server is authoritative for the specified domain
;The SOA record lists the name server for the domain, and next the e-mail address of the administer of the domain
;(note that the @ has been replaced by a period).
@ IN SOA dns.lab.loc. root.lab.loc. (
2014032109 ; serial YYYYMMDDNN
10800 ; refresh (3 hours)
1800 ; retry (30 minutes)
604800 ; expire (1 week)
38400 ; minimum (10 hrs 40 min)
)
IN NS dns.lab.loc. ;Specifies the name server to use to look up a domain
; IN NS dns2.lab.loc. ;Specifies the name server to use to look up a domain
IN A 10.0.60.60 ; IP Address(es) of the DNS server(s)
; IN A 10.0.60.61 ; IP Address(es) of the DNS server(s)
IN MX 10 dns.lab.loc. ;Specifies mail server(s) for the domain

; HOSTS
dns IN A 10.0.60.60
;dns2 A 10.0.60.61

esxi01 IN A 10.0.60.71
esxi02 IN A 10.0.60.72
esxi03 IN A 10.0.60.73

freenas IN A 10.0.60.80

mail IN CNAME dns
dnsmaster IN CNAME dns
storage IN CNAME freenas


/etc/bind/db.10.0.60

; BIND reverse file for lab.loc
$ORIGIN 60.0.10.in-addr.arpa.
$TTL 24h
@ IN SOA dsn.lab.loc. root.lab.loc. (
2014032104 ; serial number YYMMDDNN
10800 ; Refresh (3 hours)
3600 ; Retry (1 hour)
604800 ; Expire (1 week)
38400 ; Min TTL (10 hours 40 minutes)
)
IN NS dns.lab.loc.
; IN NS dns2.lab.loc.

;LIST OF HOSTS (reverse)

60 IN PTR dns.lab.loc.

71 IN PTR esxi01.lab.loc.
72 IN PTR esxi02.lab.loc.
73 IN PTR esxi03.lab.loc.

80 IN PTR freenas.lab.loc.


DHCP configuration

Here there is just one file that has to be modified: dhcpd.conf

/etc/dhcp/dhcpd.conf

Here we need to enter the key in plain text.

# DHCPD
ddns-updates on;
ddns-update-style interim;
update-static-leases on;
authoritative;
key rndc-key { algorithm hmac-md5; secret +zZSeeetHWFdNwECit1Ktw==;}
allow unknown-clients;
use-host-decl-names on;
default-lease-time 1814400; #21 days
max-lease-time 1814400; #21 days
log-facility local7;

# lab.loc DNS zones
zone lab.loc. {
primary localhost; # This server is the primary DNS server for the zone
key rndc-key; # Use the key we defined earlier for dynamic updates
}
zone 60.0.10.in-addr.arpa. {
primary localhost; # This server is the primary DNS server for the zone
key rndc-key; # Use the key we defined earlier for dynamic updates
}

# lab.loc LAN scope
subnet 10.0.60.0 netmask 255.255.255.0 {
range 10.0.60.100 10.0.60.200;
option subnet-mask 255.255.255.0;
option routers 10.0.60.2;
option domain-name-servers 10.0.60.60;
option domain-name "lab.loc";
ddns-domainname "lab.loc.";
ddns-rev-domainname "in-addr.arpa.";
}

# lab.loc STATIC assigned group
group {
host freenas.lab.loc {
hardware ethernet 00:0c:29:18:af:b4;
fixed-address 10.0.60.80;
ddns-hostname "freenas";
}
host esxi01.lab.loc {
hardware ethernet 00:0c:29:d4:14:ce;
fixed-address 10.0.60.71;
ddns-hostname "esxi01";
}
host esxi02.lab.loc {
hardware ethernet 00:0c:29:2c:30:fd;
fixed-address 10.0.60.72;
ddns-hostname "esxi02";
}
host esxi03.lab.loc {
hardware ethernet 00:0c:29:46:90:fd;
fixed-address 10.0.60.73;
ddns-hostname "esxi03";
}
}


Once everything is configured, just restart bind and dhcp:

/etc/init.d/bind9 restart && /etc/init.d/isc-dhcp-server restart


Sources:

https://www.centos.org/docs/4/html/rhel-rg-en-4/s1-bind-zone.html