Websites: https://www.chef.io Learning site: https://learn.chef.io As any other Configuration Manager tools, the main goal is automate and keep consistency in the infrastructure:
- create files if missing
- ignore file/task if already up to date
- replace with original version if modified
Typically, Chef is comprised of three parts:
- your workstation - where you create your recipes/cookbooks
- a Chef server - The guy who host the active version of recipes/cookbooks (central repository) and manage the nodes
- nodes - machines managed by Chef server. FYI, any nodes has Chef client installed.
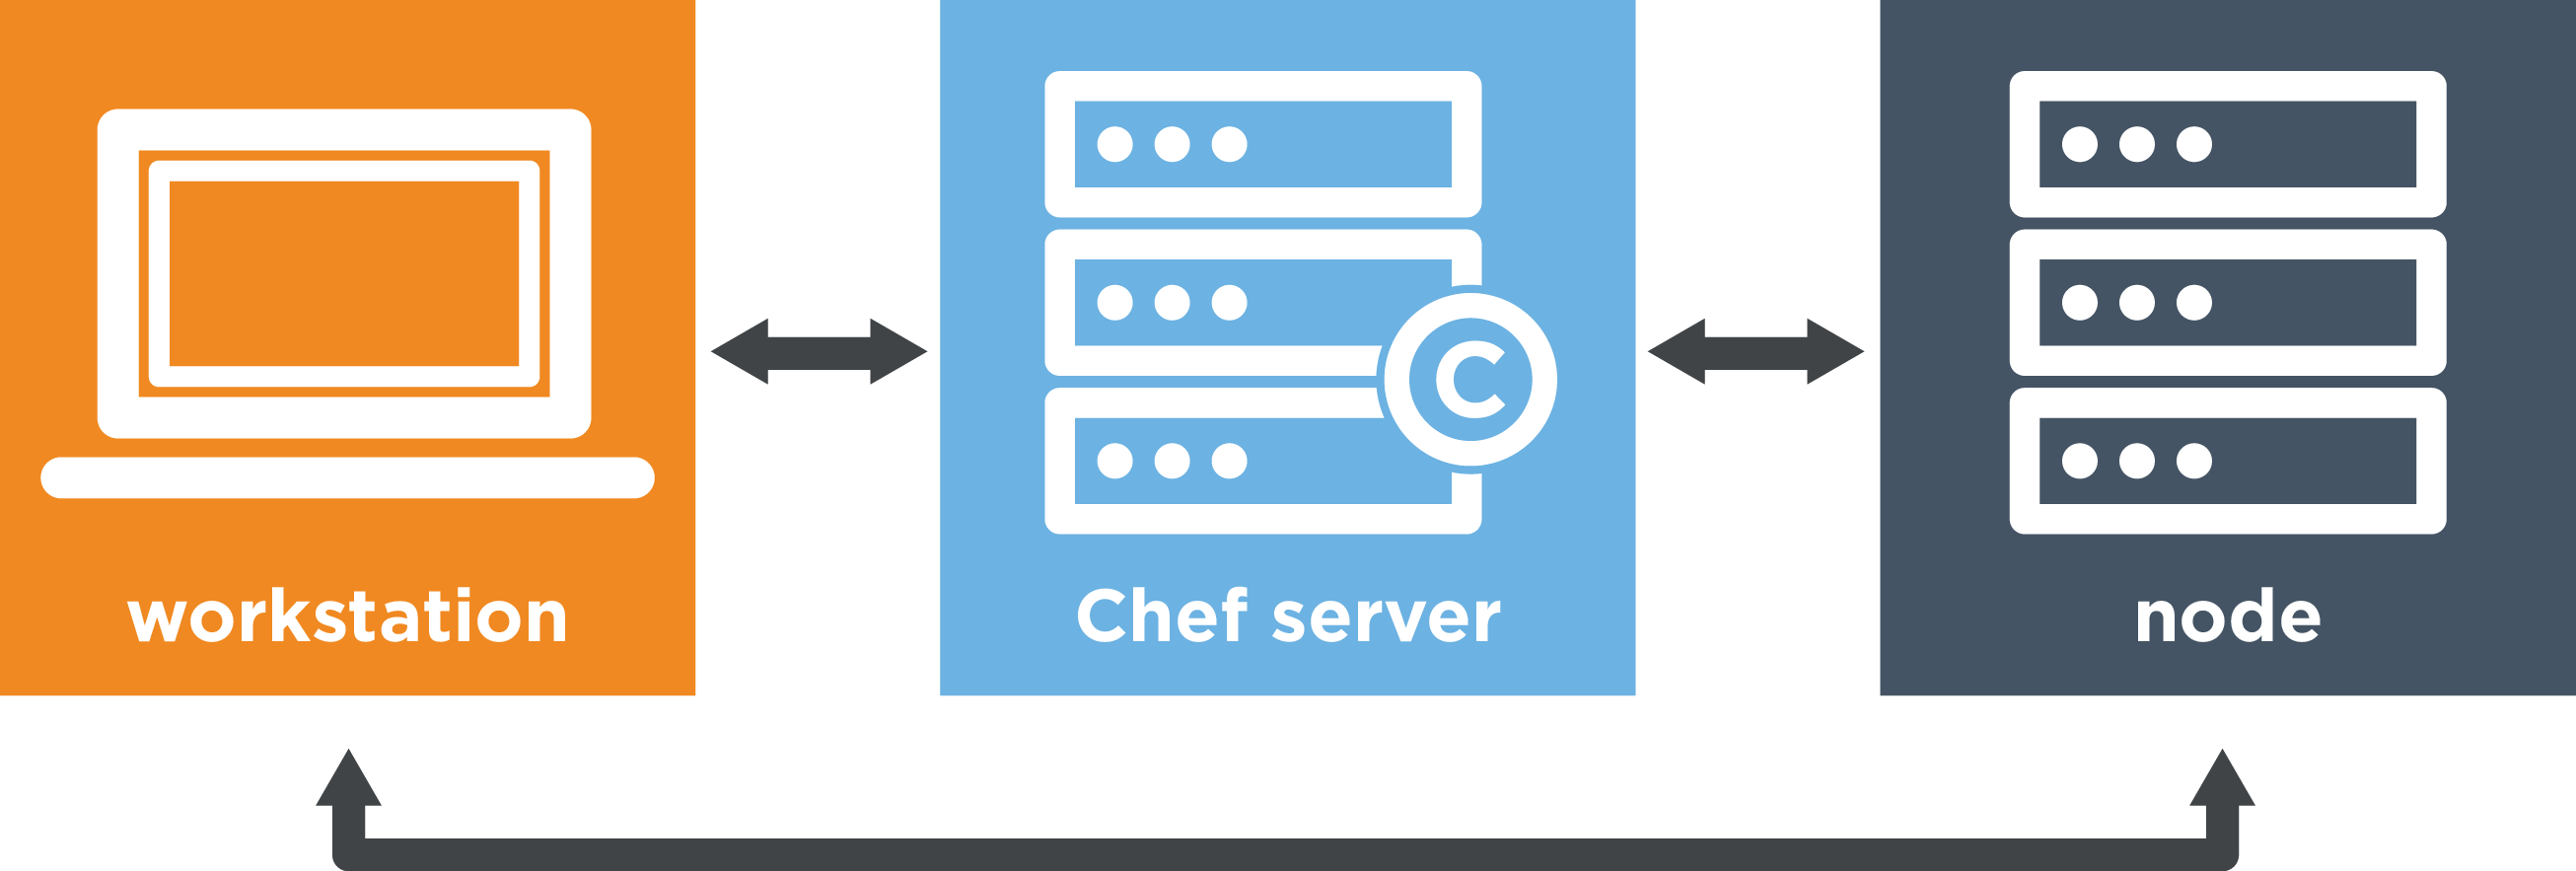
picture source https://learn.chef.io Generally, you deploy your cookbooks on your workstation and push them onto the Chef Server. The node(s) communicate with the Chef Server via chef-client and pulls and execute the cookbook. There is no communication between the workstation and the node EXCEPT for the first initial bootstrap task. This is the only time when the workstation connects directly to the node and provides the details required to communicate with the Chef Server (Chef Server's URL, validation Key). It also installs chef on the node and runs chef-client for the first time. During this time, the nodes gets registered on the Chef Sever and receive a unique client.pem key, that will be used by chef-client to authenticate afterwards. The information gets stored in a Postgress DB, and there is some indexing happening as well in Apache Solr (Elastic Search in a Chef Server cluster environment). Further explanation here: https://docs.chef.io/chef_overview.html
Some terms:
- resource: part of the system in a desiderable state (e.g. package installed, file created...);
- recipe: it contains declaration of resources, basically, the things to do;
- cookbook: is a collection of recipes, templates, attributes, etc... basically The final collection of all.
Important to remember:
- there are default actions. If not specified, the default action applies (e.g. :create for a file),
- in the recipe you define WHAT but not HOW. The "how" is managed by Chef itself,
- the order is important! For example, make sure to define the install of a package BEFORE setting a state enable. ONLY attributes can be listed without order.
Labs
Test images: http://chef.github.io/bento/ and https://atlas.hashicorp.com/bento=> you can get these boxes using Vagrant Example, how to get CentOS7 for Virtualbox and start it/connect/remove:
vagrant box add bento/centos-7.2 --provider=virtualbox

vagrant init bento/centos-7.2

vagrant up

vagrant ssh

vagrant destroy
Exercises:
Software links and info:
Chef DK: it provides tools (chef, knife, berks...) to manage your servers remotely from your workstation. Download link here. To communicate with the Chef Server, your workstation needs to have .chef/knife.rb file configured as well:
# See http://docs.chef.io/config_rb_knife.html for more information on knife configuration options

current_dir = File.dirname(__FILE__)
log_level                :info
log_location             STDOUT
node_name                "admin"
client_key               "#{current_dir}/admin.pem"
chef_server_url          "https://chef-server.test/organizations/myorg123"
cookbook_path            ["#{current_dir}/../cookbooks"]
Make sure to also have admin.pem (the RSA key) in the same .chef directory. To fetch and verify the SSL certificate from the Chef server:
knife ssl fetch

knife ssl check
Chef DK also provides tools to allow you to configure a machine directly, but it is just for testing purposes. Syntax example:
chef-client --local-mode myrecipe.rb
Chef Server: Download here. To remember, Chef Server needs RSA keys (command line switch --filename) to communicate. We have user's key, organisation key (chef-validator key). There are different type of installation. Here you can find more information. And here more detail about the new HA version. Chef Server can have a web interface, if you also install the Chef Management Console:
# chef-server-ctl install chef-manage
Alternatively you can use Hosted Chef service. Chef Client: (From official docs) The chef-client accesses the Chef server from the node on which it’s installed to get configuration data, performs searches of historical chef-client run data, and then pulls down the necessary configuration data. After the chef-client run is finished, the chef-client uploads updated run data to the Chef server.
Handy commands:
# Create a cookbook (structure) called chef_test01, into cookbooks dir
chef generate cookbook cookbooks/chef_test01

# Create a template for file "index.html"
# this will generate a file "index.html.erb" under "cookbooks/templates" folder
chef generate template cookbooks/chef_test01 index.html

# Run a specific recipe web.rb of a cookbook, locally
# --runlist + --local-mode
chef-client --local-mode --runlist 'recipe[chef_test01::web]'

# Upload cookbook to Chef server
knife cookbook upload chef_test01

# Verify uploaded cookbooks (and versions)
knife cookbook list

# Bootstrap a node (to do ONCE)
# knife bootstrap ADDRESS --ssh-user USER --sudo --identity-file IDENTITY_FILE --node-name NODE_NAME
# Opt: --run-list 'recipe[RECIPE_NAME]'
knife bootstrap 10.0.3.1 --ssh-port 22 --ssh-user user1 --sudo --identity-file /home/me/keys/user1_private_key --node-name node1
# Verify that the node has been added
knife node list
knife node show node1

# Run cookbook on one node
# (--attribute ipaddress is used if the node has no resolvable FQDN)
knife ssh 'name:node1' 'sudo chef-client' --ssh-user user1 --identity-file /home/me/keys/user1_private_key --attribute ipaddress

# Delete the data about your node from the Chef server
knife node delete node1
knife client delete node1

# Delete Cookbook on Chef Server (select which version)
# use  --all --yes if you want remove everything
knife cookbook delete chef_test01

# Delete a role
knife role delete web
Practical examples:
Create file/directory
directory '/my/path'

file '/my/path/myfile' do
  content 'Content to insert in myfile'
  owner 'user1'
  group 'user1'
  mode '0644'
end
Package management
package 'httpd'

service 'httpd' do
  action [:enable, :start]
end
Use of template
template '/var/www/html/index.html' do
  source 'index.html.erb'
end
Use variables in the template
<html>
  <body>
    <h1>hello from <%= node['fqdn'] %></h1>
  </body>
</html>
General notes
Chef Supermarket
link here - Community cookbook repository. Best way to get a cookbook from Chef Supermarket is using Berkshelf command (berks) as it resolves all the dependencies. knife supermarket does NOT resolve dependencies. Add the cookbooks in Berksfile
source 'https://supermarket.chef.io'
cookbook 'chef-client'
And run
berks install
This will download the cookbooks and dependencies in ~/.berkshelf/cookbooks Then to upload ALL to Chef Server, best way:
# Production
berks upload

# Just to test (ignore SSL check)
berks upload --no-ssl-verify
Roles
Define a function of a node. Stored as objects on the Chef server. knife role create OR (better) knife role from file <role/myrole.json>. Using JSON is recommended as it can be version controlled. Examples of web.json role:
{
   "name": "web",
   "description": "Role for Web Server",
   "json_class": "Chef::Role",
   "override_attributes": {
   },
   "chef_type": "role",
   "run_list": ["recipe[chef_test01::default]",
                "recipe[chef_test01::web]"
   ],
   "env_run_lists": {
   }
}
Commands:
# Push a role
knife role from file roles/web.json
knife role from file roles/db.json

# Check what's available
knife role list

# View the role pushed
knife role show web

# Assign a role to a specific node
knife node run_list set node1 "role[web]"
knife node run_list set node2 "role[db]"

# Verify
knife node show node1
knife node show node2
To apply the changes you need to run chef-client on the node. You can also verify:
knife status 'role:web' --run-list
Kitchen
All the following is extracted from the official https://learn.chef.io
Test Kitchen helps speed up the development process by applying your infrastructure code on test environments from your workstation, before you apply your work in production. Test Kitchen runs your infrastructure code in an isolated environment that resembles your production environment. With Test Kitchen, you continue to write your Chef code from your workstation, but instead of uploading your code to the Chef server and applying it to a node, Test Kitchen applies your code to a temporary environment, such as a virtual machine on your workstation or a cloud or container instance. When you use the chef generate cookbook command to create a cookbook, Chef creates a file named .kitchen.yml in the root directory of your cookbook. .kitchen.yml defines what's needed to run Test Kitchen, including which virtualisation provider to use, how to run Chef, and what platforms to run your code on.
Kitchen steps:
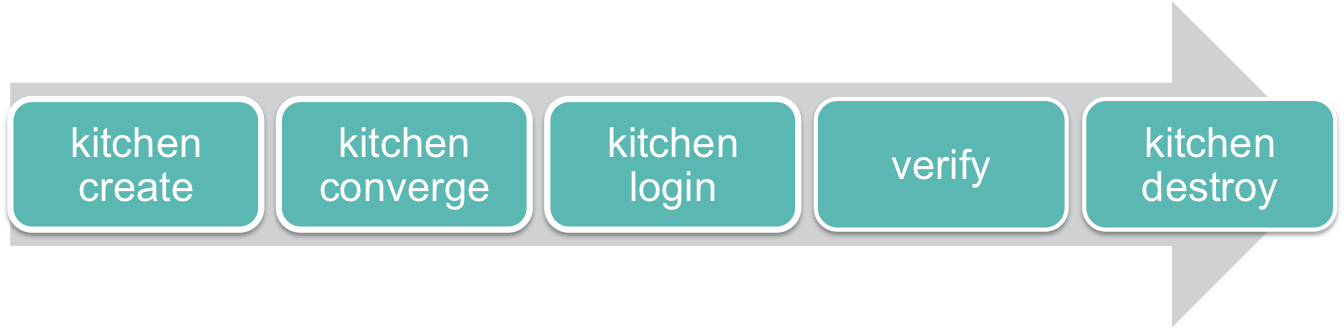
Kitchen WORKFLOW Handy commands:
$ kitchen list
$ kitchen create
$ kitchen converge