Tag Archives: ubuntu

Reverse SSH Tunnel

To allow LOCAL_SERVER behind a firewall/NAT/Home Router to be accessible via SSH from a REMOTE_SERVER you can use a ssh tunnel (reverse).

Basically, from your LOCAL_SERVER you forward port 22 (ssh) to another port on REMOTE_SERVER, for example 8000 and you can ssh into your LOCAL_SERVER from the public IP of the REMOTE_SERVER via port 8000.

To do so, you need to run the following from LOCAL_SERVER:

 local-server: ~ ssh -fNR 8000:localhost:22 <user>@<REMOTE_SERVER>

On REMOTE_SERVER you can use netstat -nlpt to check if there is a service listening on port 8000.

Example:

remote-server ~# netstat -nplt | grep 8000
tcp        0      0 0.0.0.0:8000            0.0.0.0:*               LISTEN      1396/sshd: root
tcp6       0      0 :::8000                 :::*                    LISTEN      1396/sshd: root

In this case, the REMOTE_SERVER allows connection from ALL the interfaces (0.0.0.0) to port 8000.
This means that, if the REMOTE_SERVER has IP 217.160.150.123, if you can connect to LOCAL_SERVER from a THIRD_SERVER using the following:

third-server: ~ ssh -p 8000 <user_local_server>@217.160.150.123

NOTE. If you see that the LISTEN connection on REMOTE_SERVER is bound to 127.0.0.1 and not to 0.0.0.0, it is probably related to the setting GatewayPorts set to no in /etc/ssh/sshd_config on REMOTE_SERVER.
Best setting is clientspecified (rather than yes) as per this post.

Set this value to yes and restart sshd service.

With that setting, you can potentially allow only connection from the REMOTE_SERVER to the LOCAL_SERVER, to increase security.
To do so, you need to use the following ssh command from LOCAL_SERVER:

 local-server: ~ ssh -fNR 127.0.0.1:8000:localhost:22 <user>@<REMOTE_SERVER>

With netstat, you’ll see now this:

remote-server:~# netstat -nplt | grep 8000
tcp        0      0 127.0.0.1:8000          0.0.0.0:*               LISTEN      1461/sshd: root

With this forward, you will be able to access LOCAL_SERVER ONLY from the REMOTE_SERVER itself:

remote-server: ~ ssh -p 8000 <user_local_server>@localhost

I hope this helps 🙂

Happy tunnelling!

Virtualhost and Letsencrypt

Quick guideline about how to install multiple sites on a single server using Virtualhosting, and have the SSL certificate installed and automatically renewed using Letsencrypt.

There are plenty of how to online, but I wanted to have a quick reference page for myself 🙂

Firstly, this has been tested on Debian 12, but it should work on previous Debian versions and Ubuntu too.

Apache setup and virtualhosts

Firstly, install Apache and other packages that you will mostly likely need, especially if you run WordPress or any php based framework:

apt-get install apache2 php php-mysql libapache2-mod-php php-gd php-curl net-tools telnet dos2unix

Now, you should create the folder structure to host your sites. I used /var/www/virtualhosts/<site>/public_html

I made sure permissions were set correctly too:

chown -R www-data:www-data /var/www/
find /var/www -type -d -exec chmod 775 {} \;

Now, create a virtualhost file for each site. In the following example we are going to create the conf file for site1.

Create /etc/apache2/sites-available/site1.conf

<VirtualHost *:80>
    ServerName site1.com
    ServerAlias www.site1.com
    ServerAdmin webmaster@localhost
    DocumentRoot /var/www/virtualhosts/site1/public_html

    <Directory /var/www/virtualhosts/site1/public_html>
        Options -Indexes +FollowSymLinks
        AllowOverride All
    </Directory>

    ErrorLog ${APACHE_LOG_DIR}/site1-error.log
    CustomLog ${APACHE_LOG_DIR}/site1-access.log combined
</VirtualHost>

Do the same for all the sites you have.

Once done, upload the content of your sites in public_html folder.

Disable all the default Apache sites and enable the ones you have created. You can use the commands a2dissite and a2ensite or manually create symbolic links into /etc/apache2/sites-enabled/

Check that all the virtualhosts are properly loaded:

source /etc/apache2/envvars
apache2 -S

You should see all your sites under *80 section.
Right now we have enabled only Apache on port 80 to return the sites we have hosted. No 443 yet.

Now, you can use curl to do some tests to see if the virtual hosts are responding correctly.

~ curl -IH'Host: site1.com' http://<server_IP>  # to get the header of site1.com
~ curl -H'Host: site1.com' http://<server_IP>  # to get the full page of site1.com

Hopefully all works (if not, troubleshoot it heheh), let’s point our DNS to our server, and test directly using the domain names.

All good? Cool!

Make sure now that your firewall allows port 80 and port 443. Even if you’re considering to serve your site ONLY over SSL (port 443), the certbot tool that does the auto-renewal of the certificate needs port 80 open.

Installation and configuration of certbot – Letsencrypt

As root, issue the below commands:

apt-get install snapd
snap install core
snap refresh core
snap install --classic certbot
ln -s /snap/bin/certbot /usr/bin/certbot

You have now the certbot tool installed.

Following the above example of site1.com, we are going now to get the SSL certificate for that site (even the www.site1.com one), and let the tool install and configure everything automatically.

certbot --apache -d site1.com -d www.site1.com

Hopefully all goes well 🙂 Repeat for each of your sites accordingly.

Once done with all the sites, just to make sure the auto-renewal works, you can also issue a dry-run check:

certbot renew --dry-run

Letsencrypt certificates last 90 days (afaik), but the certbot tool installed in this way does the auto-renewal in an automatic fashion.
If you’re curios where this is written (you might think about cron but unable to find anything – like it happend to me).
If this is the case, you can try to run this command, and you may find the certbot listed:

systemctl list-timers

More information are available on the official website at this address.

You can now test using curl again, but hitting https instead of http:

~ curl -IH'Host: site1.com' https://<server_IP>  # to get the header of site1.com
~ curl -H'Host: site1.com' https://<server_IP>  # to get the full page of site1.com

Oh, one note.
By default, at least at the time when I’m writing this article, once you install the certificate, the *80 virtualhost of your site will be modified, adding the following lines, which force a 302 redirect from http to https.

RewriteEngine on
RewriteCond %{SERVER_NAME} =www.site1.com [OR]
RewriteCond %{SERVER_NAME} =site1.com
RewriteRule ^ https://%{SERVER_NAME}%{REQUEST_URI} [END,NE,R=permanent]

If it’s what you want – cool.
If you still want to serve your site on http AND https, comment out (or delete) those new lines.

Happy virtualhosting and ssl’ing! 🙂

Migrate Linux Subsystem from one PC to another

Are you enjoying your favorite Linux distro running within the Windows 10 Linux Subsystem?

Have you configured all nicely?

What happened if you get a new pc and you’d like to migrate your VM across?

This is what happened to me. And looking around, I found this post that gave me this kinda-dirty way, but did work!

After that, I decided to review the steps, and I’ve added these directories in the exclude’s list, to make clearer the process of export/import:

/dev
/proc
/sys
/run
/tmp
/media
/mnt
/var/cache
/var/run

Of course, if you have important data in these folders and you want to move across too, just update the one-liner below accordingly. 😉

On your OLD PC

  • Open your Linux VM
  • Get inside your Downloads directory (replace <user> with your username):

    cd /mnt/c/Users/<user>/Downloads
  • Make sure to be root (sudo su -)
  • Run:

    tar -cvpzf backup.tar.gz --exclude=/backup.tar.gz --exclude=/dev --exclude=/proc --exclude=/sys --exclude=/run --exclude=/tmp --exclude=/media --exclude=/mnt --exclude=/var/cache --exclude=/var/run --one-file-system /

    NOTE: you could achieve the same using the option --exclude-from=file.txt, and having the list of exclusions in this file. I used a one-liner as it’s quicker to copy and paste.
  • Once done, close your Linux VM
  • Verify that you have a new file called backup.tar.bz in Downloads

On your NEW PC

  • Install from Microsoft Store the same Linux VM (or reinstall in the same way you have done originally on your old pc)
  • Copy across your backup.tar.bz within your new Downloads folder
  • Open the VM that you’ve just installed (minimal setup – this will be completely overwritten, so don’t be bothered too much)
  • Once you’re inside and your backup.tar.bz is in Download, run the following (replace <user> with your username):

    sudo tar -xpzf /mnt/c/Users/<user>/Downloads/backup.tar.gz -C / --numeric-owner
  • Ignore the errors
  • Close and re-open the VM: DONE! 🙂

Happy migration! 😉

Linux WiFi manual setup

You might have faced to have your laptop that doesn’t boot with your nice GUI interface, with Network Manager that handles your wifi connection. Maybe due to a failed update or a broken package.

Well, it happened to me exactly for that reason: some issues with an upgrade. And how can you fix a broken package or dependency without internet connection?

Oooh yes, that’s a nightmare! Thankfully, I found this handy article, which I will list some handy commands, that did help me in restoring the connection on my laptop, allowing me to fix the upgrade and restore its functionality.

NOTE: I had iwconfig and wpasupplicant already installed. If not, I should have downloaded the packages and all their dependencies and manually install them with dpkg -i command

Identify what’s the name of your wifi interface

iwconfig

This should return something like wlp4s0

Guessing that you know already the SSID (e.g. HomeFancyWiFi) of your wifi and the password (e.g. myWiFiPassw0rd), you can run directly this command:

wpa_passphrase HomeFancyWiFi myWiFiPassw0rd | sudo tee /etc/wpa_supplicant.conf
wpa_supplicant -c /etc/wpa_supplicant.conf -i wlp4s0

This will generate the config file, connect to the wifi. Once you see that all works as expected, you could use the -B flag to put the wpa_suppicant in background and release the terminal.

wpa_supplicant -B -c /etc/wpa_supplicant.conf -i wlp4s0

Alternatively, you can move to another tab (ALT+F1,F2,F3… in the text mode console), and run dhcpclient to get an IP and the DNS set.

dhclient wlp4s0

Once done, you can run iwconfig just to verify that the interface has the IP and do some basic network troubleshooting like ping etc to make sure all works, and you can go back to fix your broken upgrade 🙂

Ubuntu 16.04 – Wake on LAN

I have struggled a bit trying to understand while my Ubuntu 16.04 wasn’t waking up with the common 

etherwake

  commad.

I found the solution on this link:

you should disable Default option in Network-Manager GUI and enable only the Magic option. If you try this, then you should check if everything is ok opening the shell and issuing this command:

sudo ethtool *<your_eth_device_here>*

You should see the line:

Wake-on: g

If it’s not g but d or something else, something could be wrong.

Once done that, and verified with the command 

ethtool <myNetinterface> | grep "Wake-on:" 

 , all started to work again 🙂


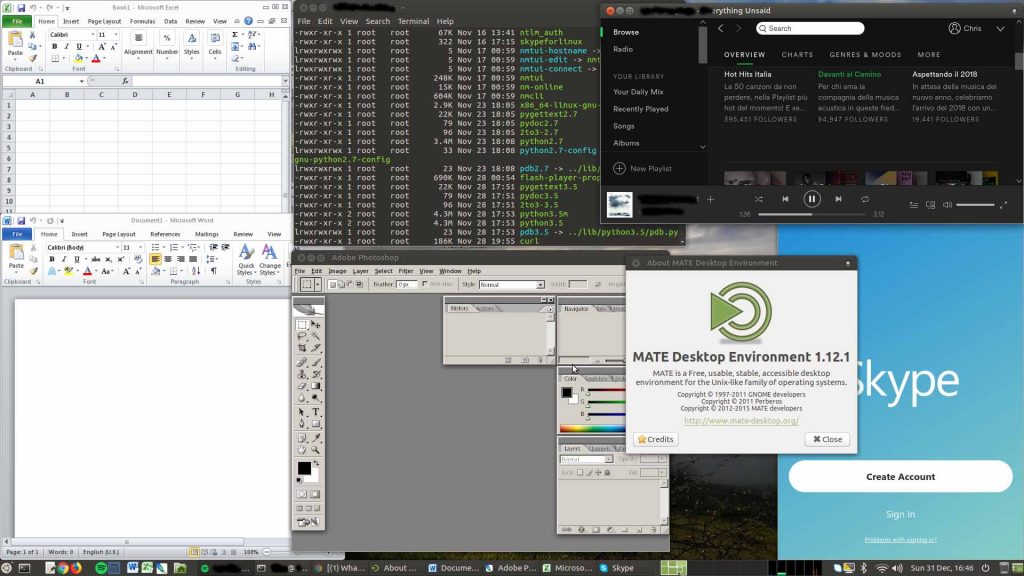
Ubuntu 16.04 with Office 2010, Photoshop CS2, Spotify and Skype

I can finally decommission my Windows VM!

Yes. I was keeping a Windows VM to use Office and Photoshop. Libreoffice and GIMP are alternative options that where not sufficient – at least for me. On top of that, Skype and Spotify were another couple of software that weren’t really working well or available (at least a while ago).

Now, I have a full working-workstation based on Ubuntu 16.04 LTS – MATE!

Desktop Screenshot

How to?

Well, here some easy instructions.

What you need?

  • Office Pro 2010 license
  • Office Pro 2010 installer (here where to download if you have lost it – 32bit version)
  • Photoshop installer: Adobe has now released version C2 free. You need an Adobe account. They provide installer and serial. For the installer, here the direct link
  • Spotify account
  • Skype account
  • Ubuntu 16.04 LTS 64 bit installed 🙂

Let’s install!

Spotify

For Spotify, I’ve just simply followed this: https://www.spotify.com/it/download/linux/

apt-key adv --keyserver hkp://keyserver.ubuntu.com:80 --recv-keys 0DF731E45CE24F27EEEB1450EFDC8610341D9410
echo deb http://repository.spotify.com stable non-free | sudo tee /etc/apt/sources.list.d/spotify.list
apt-get update
apt-get install spotify-client

Skype

For Skype, I have downloaded the deb from https://www.skype.com/en/get-skype/

wget https://go.skype.com/skypeforlinux-64.deb
dpkg -i skypeforlinux-64.deb


Office 2010 – Photoshop CS2

A bit more complicated how to install Office 2010 and Photoshop… but not too much 🙂
Just follow these instructions.

Firstly, we need to enable i386 architecture

dpkg --add-architecture i386

Then, add WineHQ repositories and install the latest stable version:

wget https://dl.winehq.org/wine-builds/Release.key
apt-key add Release.key
apt-add-repository 'https://dl.winehq.org/wine-builds/ubuntu/'
apt-get update && apt-get install --install-recommends winehq-stable

Install some extra packages, including winbind and the utility winetricks and create some symlinks

apt-get install mesa-utils mesa-utils-extra libgl1-mesa-glx:i386 libgl1-mesa-dev winbind winetricks

ln -s /usr/lib/i386-linux-gnu/mesa/libGL.so.1 /usr/lib/i386-linux-gnu/mesa/libGL.so
ln -s /usr/lib/i386-linux-gnu/mesa/libGL.so /usr/lib/i386-linux-gnu/libGL.so

NOTE: very importante the package winbind. Don’t miss this or Office won’t install.

Create the environment (assuming your user is called user)

mkdir -p /home/user/my_wine_env/

export WINEARCH="win32"
export WINEPREFIX="/home/user/my_wine_env/"

Install some required packages, using winetricks

winetricks dotnet20 msxml6 corefonts

After that, let’s make some changes to Wine conf.

winecfg

As described to this post, add riched20 and gdiplus libraries (snipped below):

Click the Libraries tab. Currently, there will be only a single entry for *msxml6 (native,built-in).
Now click in the ‘New override for library’ combo box and type ‘rich’. Click the down-arrow. That should now display an item called riched20. Click [Add].
In the same override combo box, now type ‘gdip’. Click the down-arrow. You should now see an item called gdiplus. Click on it and then click [Add]

Now… let’s install!

wine /path/installer/Setup.exe

This command is valid for both software: Office and Photoshop.

With this configuration, you should be able to complete the setup and see under “Others” menu (in Ubuntu MATE) the apps installed. Please note that you might need to reboot your box to see the app actually there.

During the Office setup, I choose the Custom setup, as I just wanted Word, Excel and Power Point. I selected “Run all from My Computer” to be sure there won’t be any extra to install while using the software, and after, I’ve de-selected/excluded what I didn’t want.


Once completed with the setup, if you don’t see the apps under “Others” menu, you can run them via command line (e.g. run Excel):

$ wine /home/user/my_wine_env/drive_c/Program\ Files/Microsoft\ Office/Office14/EXCEL.EXE

Office will ask to activate. I wasn’t able to activate it via Internet, so I have called the number found at this page.

The only issue I’ve experienced was that Word was showing “Configuring Office 2010…” and taking time to start. After that, I was getting a pop up asking to reboot. Saying “yes” was making all crashing. Saying “no” was allowing me to use Word with no issues.

I found this patch that worked perfectly:

reg add HKCU\Software\Microsoft\Office\15.0\Word\Options /v NoReReg /t REG_DWORD /d 1

Just do

wine cmd

  and paste the above command, or

wine regedit 

 and add manually the key.

Apart of this… all went smoothly. I have been able also to install the language packs, using the same procedure

wine setup.exe

  and I’m very happy now! 🙂

Have fun!

NFS – quick win

This is a very basic step-by-step guide to create a CentOS7 NFS server that shares a folder /nfsshare over 192.168.4.0/24 network. This share will be owned by apache and mountable on a CentOS web server.

Here the instructions how to create the server and how to setup the client.

NFS Server

Add this line in IPTABLES:

-A INPUT -s 192.168.4.0/24 -m comment --comment "NFS Network" -j ACCEPT


Run the following to create a share folder and setup NFS:

mkdir /nfsshare
yum install nfs-utils nfs-utils-lib -y
systemctl enable nfs-server
echo "/nfsshare 192.168.4.0/24(rw,sync,no_root_squash)" >> /etc/exports
sed -i 's/#Domain = local.domain.edu/Domain = nfsdomain.loc/' /etc/idmapd.conf
systemctl start rpcbind
systemctl start nfs-server

# Create apache user/group
# (NFS clients will read/write using this user so we want to have 
# the same set also on the server for an easier ownership management)
groupadd -g 48 apache
useradd -g 48 -u 48 apache


NFS Client

e.g. assuming that NFS server’s IP is 192.168.4.1

Add this line in IPTABLES:

-A INPUT -s 192.168.4.0/24 -m comment --comment "NFS Network" -j ACCEPT

Then, run this:

yum install nfs-utils rpcbind

sed -i 's/#Domain = local.domain.edu/Domain = nfsdomain.loc/' /etc/idmapd.conf
echo "192.168.4.1 NFS01" >> /etc/hosts
mount -t nfs4 -o noatime,proto=tcp,actimeo=3,hard,intr,acl,_netdev NFS01:/nfsshare
tail -1 /proc/mounts >> /etc/fstab

NOTE: we are hardly mapping the NFS server’s IP in /etc/hosts to make easier to recognise the mount (in case of multiple mounts).

If you are facing the issue where you mount /nfsshare and you see the owner of the files and folders showing as nobody:nobody, it could be related to rpcidmapd and DNS. To fix this, try to update /etc/hosts on the Client with <hostname>.nfsdomain.loc

# ============= #
# Ubuntu Notes  #
# ============= #

!! Same users on Server and Client - for the exported partition !!

SERVER
apt-get install nfs-kernel-server

vim /etc/exports
/var/www/vhosts		192.168.3.*(rw,sync,no_root_squash,no_subtree_check)

service nfs-kernel-server restart
exportfs -a


CLIENT
apt-get install nfs-common
mount -t nfs4 192.168.3.1:/var/www/vhosts /var/www/vhosts/

!! CHECK the output of cat /proc/mounts and you can get the correct rsize/wsize. If the firewall/network can handle, keep this value as big as possible:

e.g.

noatime,proto=tcp,actimeo=3,hard,intr,acl,_netdev,rsize=1048576,wsize=1048576

vim /etc/fstab
192.168.3.1:/var/www/vhosts   /var/www/vhosts nfs4    noatime,actimeo=3,hard,intr,acl,_netdev,rsize=32768,wsize=32768 0 0


Lsyncd – conf.d like setup on Ubuntu

On Ubuntu 14 (version 2.1.x)

Create configuration files

apt-get install lsyncd
grep "CONFIG=" /etc/init.d/lsyncd

-> it should be /etc/lsyncd/lsyncd.conf.lua

mkdir -p /etc/lsyncd/conf.d/

Backup the original file and create a new conf file

mv /etc/lsyncd/lsyncd.conf.lua{,.ORIG}
cat <<'EOF' > /etc/lsyncd/lsyncd.conf.lua 
-- DO NOT EDIT THIS FILE
settings {
logfile = "/var/log/lsyncd.log",
statusFile = "/var/log/lsyncd-status.log",
statusInterval = 5
}
-- conf.d style configs
package.path = "/etc/lsyncd/conf.d/?.lua;" .. package.path
local f = io.popen("ls /etc/lsyncd/conf.d/*.lua|xargs -n1 basename|sed 's/.lua//'") for mod in f:lines() do require(mod) end
-- // DO NOT EDIT THIS FILE
EOF


Create the config file for 2 web nodes called w01 and w02.
These 2 nodes have the following IPs:
10.180.3.201 w01
10.180.3.322 w02

cat <<'EOF' > /etc/lsyncd/conf.d/w0x.lua 
-- w01 and w02
servers = {
"10.180.3.201",
"10.180.3.322",
}

for _, server in ipairs(servers) do
sync {
default.rsync,
source="/var/www/vhosts/",
target=server..":/var/www/vhosts/",
rsync = {
compress = true,
archive = true,
verbose = true,
rsh = "/usr/bin/ssh -p 22 -o StrictHostKeyChecking=no"
},
excludeFrom = "/etc/lsyncd/conf.d/w0x.exclusions"
}
end
EOF

Now let’s create the exclusions file. This will be the list of paths that won’t be sync’d.

cat <<'EOF' > /etc/lsyncd/conf.d/w0x.exclusions
www.mytestsite.com/
EOF

NOTE! For exclusions, please remember to put the relative path, NOT the full path. In this case, it excludes www.mytestsite.com/ from /var/www/vhosts

Set up a logrotate conf file

cat > /etc/logrotate.d/lsyncd << EOF
/var/log/lsyncd/*log {
missingok
notifempty
sharedscripts
postrotate
if [ -f /var/lock/lsyncd ]; then
/sbin/service lsyncd restart > /dev/null 2>/dev/null || true
fi
endscript
}
EOF


Troubleshoot

Test Lsyncd

$ lsyncd --nodaemon -log Exec /etc/lsyncd/lsyncd.conf.lua


Error log – inotify issue

ERROR: Terminating since out of inotify watches//Consider increasing /proc/sys/fs/inotify/max_user_watches

Temporary fix:

# echo 100000 > /proc/sys/fs/inotify/max_user_watches

Permanent fix (ALSO write sysctl.conf):

# echo 100000 > /proc/sys/fs/inotify/max_user_watches
# echo "fs.inotify.max_user_watches = 100000" >> /etc/sysctl.conf

Linux Firewall notes

IPTABLES GENERIC

>> Allow port 80 ONLY to private interface for Cloud Load Balancer
-A INPUT -i eth1 -p tcp -m conntrack --ctstate NEW -m tcp --dport 80 -j ACCEPT

>> Block whole subnet
# iptables -I INPUT -s xxx.xxx.xxx.0/24 -j DROP

>> Allow specific IP only
iptables -I INPUT -p tcp -s YourIP --dport 22 -j ACCEPT

>> Delete rules

iptables -vnL --line-numbers

iptables -D <chain> /et<rule_number>
iptables -D INPUT 4

-A INPUT -s <SOURCE_NETWORK/32> -p tcp -m tcp --dport 21 -m comment --comment "FTP port open" -j ACCEPT
-A INPUT -s <SOURCE_NETWORK/32> -p tcp -m multiport --dports 60000:65000 -m comment --comment "FTP passive mode ports" -j ACCEPT


UBUNTU – UFW

service ufw status

ufw allow 80

ufw allow from <IP> to any port <port>

>> Allow network range
ufw allow 192.168.1.0/24

>> Delete rule
ufw status numbered
ufw delete <rule_number>

>> Allow port 80 only on eth1
ufw allow in on eth1 to [eth1 ip addr] port 80 proto tcp
# ufw allow from <SOURCE_IP>&nbsp;to any port 25
Rule added

# ufw delete allow from <SOURCE_IP> to any port 25
Rule deleted

ufw insert 1 allow from <ip address>

ufw deny from <ip address>
ufw deny from <ip address/24>

https://help.ubuntu.com/community/UFW


CENTOS / RH – Firewalld

Saved rules in: /etc/sysconfig/iptables

firewall-cmd --permanent --zone=public --add-service=http
firewall-cmd --permanent --zone=public --add-service=https
firewall-cmd --reload

firewall-cmd --permanent --add-rich-rule='rule family="ipv4" source address="<SOURCE_IP>" port port="10000" protocol="tcp" accept'

firewall-cmd --reload

firewall-cmd --list-all

firewall-cmd --add-service http --permanent
firewall-cmd --add-service https --permanent
systemctl restart firewalld.service
firewall-cmd --list-services

>> Add manual rule in firewalld

firewall-cmd --permanent --direct --add-rule ipv4 filter INPUT 0 -s 192.168.3.0/24 -m comment --comment "NFS Network" -j ACCEPT

>> Remove manual added rule in firewalld
vim /etc/firewalld/direct.xml


PHPMyAdmin on Centos/Ubuntu

BASIC SETUP (Apache)

>> Set password authentication
/etc/httpd/conf.d/phpMyAdmin.conf (or apache.conf on Ubuntu)

<Directory /usr/share/phpMyAdmin/>
# <IfModule mod_authz_core.c>
# Apache 2.4
# <RequireAny>
# Require ip 127.0.0.1
# Require ip ::1
# </RequireAny>
# </IfModule>
# <IfModule !mod_authz_core.c>
# Apache 2.2
# Order Deny,Allow
# Deny from All
# Allow from 127.0.0.1
# Allow from ::1
# </IfModule>
AuthUserFile /etc/httpd/.htpasswdfile
AuthName Restricted
AuthType Basic
require valid-user

</Directory>

>> Generate random password
PASS=$(tr -cd ‘[:alnum:]’ < /dev/urandom | fold -w12 | head -n1)

>> Set password automatically
htpasswd -bmc /etc/httpd/.htpasswdfile phpadminuser $PASS

>> Set password manually
htpasswd -c /etc/httpd/.htpasswdfile phpadminuser
(FYI ‘phpadminuser’ it’s the username)
>> To ADD users, just remove the -c flag

=====================================================================
Troubleshooting

curl -I http://<URL>/phpmyadmin/ –basic –user <username>:<password>

Example: (with error)
# curl -I http://<SERVERIP>/phpmyadmin/ –basic –user serverinfo:mxuYr35TTD5rgT3SR9ND
HTTP/1.1 500 Internal Server Error
Date: Thu, 25 Sep 2014 13:14:44 GMT
Server: Apache
Connection: close
Content-Type: text/html; charset=UTF-8

+=+=+=+=+=+=+=+=+=+=+=+=+=+=+=+=+=+=+=+=+=+=+=+=+=+=+=+=+=+=+=
+=+=+=+=+=+=+=+=+=+=+=+=+=+=+=+=+=+=+=+=+=+=+=+=+=+=+=+=+=+=+=

UBUNTU
>> Install the package
# apt-get update && apt-get -y install phpmyadmin

# ln -s /etc/phpmyadmin/apache.conf phpmyadmin.conf
# a2enconf phpmyadmin

>> Open firewall
ufw allow 80

>> When/if it asks the following:
> Please choose the web server that should be automatically configured to run phpMyAdmin => select apache2
> Configure database for phpmyadmin with dbconfig-common? => NO!!!

>> Enable mcrypt
php5enmod mcrypt
service apache2 graceful

>> Create phpmyadmin database and pmaadmin user
cd /usr/share/doc/phpmyadmin/examples
gunzip create_tables.sql.gz
mysql < create_tables.sql
mysql -e “GRANT SELECT, INSERT, DELETE, UPDATE ON phpmyadmin.* TO ‘pmaadmin’@’%’ IDENTIFIED BY ‘<PASSWORD>'”

>> Configuration file for phpmyadmin /etc/dbconfig-common/phpmyadmin.conf

mv /etc/dbconfig-common/phpmyadmin.conf{,.orig} ; vim /etc/dbconfig-common/phpmyadmin.conf

dbc_install=’false’
dbc_upgrade=’true’
dbc_remove=”
dbc_dbtype=’mysql’
dbc_dbuser=’pmaadmin’
dbc_dbpass='<PASSWORD>’
dbc_dbserver='<CLOUD_DB_HOST>’
dbc_dbport=”
dbc_dbname=’phpmyadmin’
dbc_dbadmin=’pmaadmin’
dbc_basepath=”
dbc_ssl=”
dbc_authmethod_admin=”
dbc_authmethod_user=”

>> Apply configuration
/usr/sbin/dbconfig-generate-include/etc/dbconfig-common/phpmyadmin.conf -f php > /etc/phpmyadmin/config-db.php

>> Disable MySQL different library warning
echo “\$cfg[‘ServerLibraryDifference_DisableWarning’] = true;” >> /etc/phpmyadmin/config.inc.php

>> Fix DB table references
sed -i.orig ‘s/pma_/pma__/g’ /etc/phpmyadmin/config.inc.php

>> Secure the main page (this should be under SSL)
htpasswd -c /etc/phpmyadmin/htpasswd.setup phpadminuser

ADD this into Directory for /usr/share/phpmyadmin

<IfModule mod_authn_file.c>
AuthType Basic
AuthName “phpMyAdmin Setup”
AuthUserFile /etc/phpmyadmin/htpasswd.setup
</IfModule>
Require valid-user
————————————————————–
-> Example:
<Directory /usr/share/phpmyadmin>
Options FollowSymLinks
DirectoryIndex index.php

<IfModule mod_php5.c>
AddType application/x-httpd-php .php

php_flag magic_quotes_gpc Off
php_flag track_vars On
php_flag register_globals Off
php_admin_flag allow_url_fopen Off
php_value include_path .
php_admin_value upload_tmp_dir /var/lib/phpmyadmin/tmp
php_admin_value open_basedir /usr/share/phpmyadmin/:/etc/phpmyadmin/:/var/lib/phpmyadmin/:/usr/share/php/php-gettext/:/usr/share/javascript/
</IfModule>
<IfModule mod_authn_file.c>
AuthType Basic
AuthName “phpMyAdmin Setup”
AuthUserFile /etc/phpmyadmin/htpasswd.setup
</IfModule>
Require valid-user

</Directory>
————————————————————–

====================================================================

Multiple DBs (Ubuntu) => /etc/phpmyadmin/config-db.php

/* Servers configuration */
$i = 0;

/* Server: db01 [1] */
$i++;
$cfg[‘Servers’][$i][‘verbose’] = ‘db01’;
$cfg[‘Servers’][$i][‘host’] = ‘<DB_IP/FQDN>’;
$cfg[‘Servers’][$i][‘port’] = ”;
$cfg[‘Servers’][$i][‘socket’] = ”;
$cfg[‘Servers’][$i][‘connect_type’] = ‘tcp’;
$cfg[‘Servers’][$i][‘extension’] = ‘mysqli’;
$cfg[‘Servers’][$i][‘auth_type’] = ‘cookie’;
$cfg[‘Servers’][$i][‘user’] = ”;
$cfg[‘Servers’][$i][‘password’] = ”;

/* Server: db02 [2] */
$i++;
$cfg[‘Servers’][$i][‘verbose’] = ‘db02’;
$cfg[‘Servers’][$i][‘host’] = ‘<DB_IP/FQDN>’;
$cfg[‘Servers’][$i][‘port’] = ”;
$cfg[‘Servers’][$i][‘socket’] = ”;
$cfg[‘Servers’][$i][‘connect_type’] = ‘tcp’;
$cfg[‘Servers’][$i][‘extension’] = ‘mysqli’;
$cfg[‘Servers’][$i][‘auth_type’] = ‘cookie’;
$cfg[‘Servers’][$i][‘user’] = ”;
$cfg[‘Servers’][$i][‘password’] = ”;

====================================================================
PHP-FPM (Ubuntu):

vim /etc/apache2/conf-enabled/phpmyadmin.conf

ProxyPassMatch ^/phpmyadmin/(.*\.php(/.*)?)$ fcgi://127.0.0.1:9001/usr/share/phpmyadmin/$1
ProxyPassMatch ^/phpmyadmin/(.*\.php(/.*)?)$ fcgi://127.0.0.1:9001/usr/share/phpmyadmin$1index.php

Multiple DBs (Ubuntu) /etc/phpmyadmin/config-db.php
/* Servers configuration */
$i = 0;

/* Server: db01 [1] */
$i++;
$cfg[‘Servers’][$i][‘verbose’] = ‘db01’;
$cfg[‘Servers’][$i][‘host’] = ‘<DB_IP/FQDN>’;
$cfg[‘Servers’][$i][‘port’] = ”;
$cfg[‘Servers’][$i][‘socket’] = ”;
$cfg[‘Servers’][$i][‘connect_type’] = ‘tcp’;
$cfg[‘Servers’][$i][‘extension’] = ‘mysqli’;
$cfg[‘Servers’][$i][‘auth_type’] = ‘cookie’;
$cfg[‘Servers’][$i][‘user’] = ”;
$cfg[‘Servers’][$i][‘password’] = ”;

/* Server: db02 [2] */
$i++;
$cfg[‘Servers’][$i][‘verbose’] = ‘db02’;
$cfg[‘Servers’][$i][‘host’] = ‘<DB_IP/FQDN>’;
$cfg[‘Servers’][$i][‘port’] = ”;
$cfg[‘Servers’][$i][‘socket’] = ”;
$cfg[‘Servers’][$i][‘connect_type’] = ‘tcp’;
$cfg[‘Servers’][$i][‘extension’] = ‘mysqli’;
$cfg[‘Servers’][$i][‘auth_type’] = ‘cookie’;
$cfg[‘Servers’][$i][‘user’] = ”;
$cfg[‘Servers’][$i][‘password’] = ”;

=====================================================================
Error: The mcrypt extension is missing. Please check your PHP configuration.

php5enmod mcrypt

sudo updatedb
locate mcrypt.ini

>> Verify that new files exists here (they should be auto created from the issue above)

ls -al /etc/php5/cli/conf.d/20-mcrypt.ini
ls -al /etc/php5/apache2/conf.d/20-mcrypt.ini

>> Otherwise… create symbol links now

ln -s /etc/php5/mods-available/mcrypt.ini/etc/php5/cli/conf.d/20-mcrypt.ini
ln -s /etc/php5/mods-available/mcrypt.ini/etc/php5/apache2/conf.d/20-mcrypt.ini

>> Restart Apacahe

service apache2 restart

+=+=+=+=+=+=+=+=+=+=+=+=+=+=+=+=+=+=+=+=+=+=+=+=+=+=+=+=+=+=+=

CENTOS

>>Install right RH repositories (if not present):
yum install epel-release
yum install httpd php php-mycrypt phpmyadmin

> Centos 5/6
chkconfig httpd on
service httpd start
-> open port 80 in /etc/sysconfig/iptables

> Centos 7
systemctl enable httpd.service
systemctl start httpd.service

firewall-cmd –add-service http –permanent
firewall-cmd –list-services
firewall-cmd –permanent –zone=public –add-service=http
firewall-cmd –reload

cd /usr/share/doc/phpMyAdmin-4.0.10.9/examples/
mysql < create_tables.sql

mysql -e “GRANT SELECT, INSERT, DELETE, UPDATE ON phpmyadmin.* TO ‘pmaadmin’@’%’ IDENTIFIED BY ‘<PASSWORD>'”

cp config.sample.inc.php /etc/phpMyAdmin/config.inc.php

>> Change these accordingly
$cfg[‘Servers’][$i][‘host’] = ‘<DB_IP/FQDN>’;
/* User used to manipulate with storage */
$cfg[‘Servers’][$i][‘controlhost’] = ‘<DB_IP/FQDN>’;
$cfg[‘Servers’][$i][‘controluser’] = ‘pmaadmin’;
$cfg[‘Servers’][$i][‘controlpass’] = ‘<PASSWORD>’;

/* Storage database and tables */
$cfg[‘Servers’][$i][‘pmadb’] = ‘phpmyadmin’;
$cfg[‘Servers’][$i][‘bookmarktable’] = ‘pma__bookmark’;
$cfg[‘Servers’][$i][‘relation’] = ‘pma__relation’;
$cfg[‘Servers’][$i][‘table_info’] = ‘pma__table_info’;
$cfg[‘Servers’][$i][‘table_coords’] = ‘pma__table_coords’;
$cfg[‘Servers’][$i][‘pdf_pages’] = ‘pma__pdf_pages’;
$cfg[‘Servers’][$i][‘column_info’] = ‘pma__column_info’;
$cfg[‘Servers’][$i][‘history’] = ‘pma__history’;
$cfg[‘Servers’][$i][‘table_uiprefs’] = ‘pma__table_uiprefs’;
$cfg[‘Servers’][$i][‘tracking’] = ‘pma__tracking’;
$cfg[‘Servers’][$i][‘designer_coords’] = ‘pma__designer_coords’;
$cfg[‘Servers’][$i][‘userconfig’] = ‘pma__userconfig’;
$cfg[‘Servers’][$i][‘recent’] = ‘pma__recent’;

>> Add these two lines at the bottom of /etc/phpMyAdmin/config.inc.php to disable the remaining 2 warnings

>> MySQL different library warning
$cfg[‘ServerLibraryDifference_DisableWarning’] = true;

>> A newer version of phpMyAdmin is available and you should consider upgrading
$cfg[‘VersionCheck’] = false;

=====================================================================
Multiple DBs (Centos) =>/etc/phpMyAdmin/config.inc.php
(example of 2 servers – comment out the below lines)

// Server db01
$i++;
/* Authentication type */
$cfg[‘Servers’][$i][‘auth_type’] = ‘cookie’;
/* Server parameters */
$cfg[‘Servers’][$i][‘host’] = ‘<DB_IP/FQDN>’;
$cfg[‘Servers’][$i][‘connect_type’] = ‘tcp’;
$cfg[‘Servers’][$i][‘compress’] = false;

// Server db02
$i++;
/* Authentication type */
$cfg[‘Servers’][$i][‘auth_type’] = ‘cookie’;
/* Server parameters */
$cfg[‘Servers’][$i][‘host’] = ‘<DB_IP/FQDN>’;
$cfg[‘Servers’][$i][‘connect_type’] = ‘tcp’;
$cfg[‘Servers’][$i][‘compress’] = false;

#$i++;
#$cfg[‘Servers’][$i][‘host’] = ‘localhost’; // MySQL hostname or IP address
$cfg[‘Servers’][$i][‘port’] = ”; // MySQL port – leave blank for default port
$cfg[‘Servers’][$i][‘socket’] = ”; // Path to the socket – leave blank for default socket

#$cfg[‘Servers’][$i][‘connect_type’] = ‘tcp’; // How to connect to MySQL server (‘tcp’ or ‘socket’)
$cfg[‘Servers’][$i][‘extension’] = ‘mysqli’; // The php MySQL extension to use (‘mysql’ or ‘mysqli’)
#$cfg[‘Servers’][$i][‘compress’] = FALSE; // Use compressed protocol for the MySQL connection
// (requires PHP >= 4.3.0)


If you’d like to install this from source, use this link.