Author Archives: thtieig

Ubuntu 16.04 with Office 2010, Photoshop CS2, Spotify and Skype

I can finally decommission my Windows VM!

Yes. I was keeping a Windows VM to use Office and Photoshop. Libreoffice and GIMP are alternative options that where not sufficient – at least for me. On top of that, Skype and Spotify were another couple of software that weren’t really working well or available (at least a while ago).

Now, I have a full working-workstation based on Ubuntu 16.04 LTS – MATE!
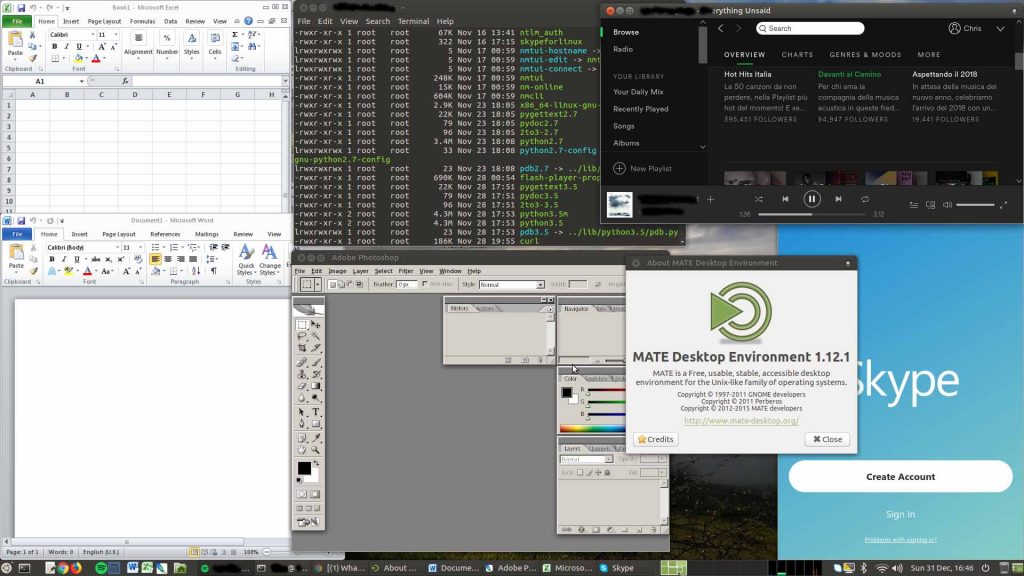
Desktop Screenshot

How to?

Well, here some easy instructions.

What you need?

  • Office Pro 2010 license
  • Office Pro 2010 installer (here where to download if you have lost it – 32bit version)
  • Photoshop installer: Adobe has now released version C2 free. You need an Adobe account. They provide installer and serial. For the installer, here the direct link
  • Spotify account
  • Skype account
  • Ubuntu 16.04 LTS 64 bit installed 🙂

Let’s install!

Spotify

For Spotify, I’ve just simply followed this: https://www.spotify.com/it/download/linux/

apt-key adv --keyserver hkp://keyserver.ubuntu.com:80 --recv-keys 0DF731E45CE24F27EEEB1450EFDC8610341D9410
echo deb http://repository.spotify.com stable non-free | sudo tee /etc/apt/sources.list.d/spotify.list
apt-get update
apt-get install spotify-client

Skype

For Skype, I have downloaded the deb from https://www.skype.com/en/get-skype/

wget https://go.skype.com/skypeforlinux-64.deb
dpkg -i skypeforlinux-64.deb


Office 2010 – Photoshop CS2

A bit more complicated how to install Office 2010 and Photoshop… but not too much 🙂
Just follow these instructions.

Firstly, we need to enable i386 architecture

dpkg --add-architecture i386

Then, add WineHQ repositories and install the latest stable version:

wget https://dl.winehq.org/wine-builds/Release.key
apt-key add Release.key
apt-add-repository 'https://dl.winehq.org/wine-builds/ubuntu/'
apt-get update && apt-get install --install-recommends winehq-stable

Install some extra packages, including winbind and the utility winetricks and create some symlinks

apt-get install mesa-utils mesa-utils-extra libgl1-mesa-glx:i386 libgl1-mesa-dev winbind winetricks

ln -s /usr/lib/i386-linux-gnu/mesa/libGL.so.1 /usr/lib/i386-linux-gnu/mesa/libGL.so
ln -s /usr/lib/i386-linux-gnu/mesa/libGL.so /usr/lib/i386-linux-gnu/libGL.so

NOTE: very importante the package winbind. Don’t miss this or Office won’t install.

Create the environment (assuming your user is called user)

mkdir -p /home/user/my_wine_env/

export WINEARCH="win32"
export WINEPREFIX="/home/user/my_wine_env/"

Install some required packages, using winetricks

winetricks dotnet20 msxml6 corefonts

After that, let’s make some changes to Wine conf.

winecfg

As described to this post, add riched20 and gdiplus libraries (snipped below):

Click the Libraries tab. Currently, there will be only a single entry for *msxml6 (native,built-in).
Now click in the ‘New override for library’ combo box and type ‘rich’. Click the down-arrow. That should now display an item called riched20. Click [Add].
In the same override combo box, now type ‘gdip’. Click the down-arrow. You should now see an item called gdiplus. Click on it and then click [Add]

Now… let’s install!

wine /path/installer/Setup.exe

This command is valid for both software: Office and Photoshop.

With this configuration, you should be able to complete the setup and see under “Others” menu (in Ubuntu MATE) the apps installed. Please note that you might need to reboot your box to see the app actually there.

During the Office setup, I choose the Custom setup, as I just wanted Word, Excel and Power Point. I selected “Run all from My Computer” to be sure there won’t be any extra to install while using the software, and after, I’ve de-selected/excluded what I didn’t want.


Once completed with the setup, if you don’t see the apps under “Others” menu, you can run them via command line (e.g. run Excel):

$ wine /home/user/my_wine_env/drive_c/Program\ Files/Microsoft\ Office/Office14/EXCEL.EXE

Office will ask to activate. I wasn’t able to activate it via Internet, so I have called the number found at this page.

The only issue I’ve experienced was that Word was showing “Configuring Office 2010…” and taking time to start. After that, I was getting a pop up asking to reboot. Saying “yes” was making all crashing. Saying “no” was allowing me to use Word with no issues.

I found this patch that worked perfectly:

reg add HKCU\Software\Microsoft\Office\15.0\Word\Options /v NoReReg /t REG_DWORD /d 1

Just do

wine cmd

  and paste the above command, or

wine regedit 

 and add manually the key.

Apart of this… all went smoothly. I have been able also to install the language packs, using the same procedure

wine setup.exe

  and I’m very happy now! 🙂

Have fun!

Grub console how to

I’m sure it happened to migrate a linux server, maybe in a slightly dirty way (rsync’ing) or had some issues with the boot loader.

And when you reach the point with this:

grub rescue>

…and you start to cry (or almost) 🙂

Well, here some steps that helped me to boot the server and restore grub.

Use 

ls

 to see the list of available partitions. Find the one where you know (or think) the kernel is installed. In my case it was 

(hd0,msdos1)

 , which is basically /dev/sda1

After that, use the following:

grub rescue > set root=(hd0,msdos1)
grub rescue > set prefix=(hd0,msdos1)/boot/grub
grub rescue > insmod normal
grub rescue > insmod linux
grub rescue > linux /vmlinuz root=/dev/sda1 ro
grub rescue > initrd /initrd.img
grub rescue > boot

With these commands, I have been able to boot into my OS.

After that, I re-installed grub:

update-grub
grub-install /dev/sda

NOTE: UUID could be a cause of failed boot too.
Under Debian/Ubuntu there is a file 

/etc/default/grub

 where you can disable the UUID format. This could generate some issues if you have swapped the disk so it might be good to check this config file and eventually enable 

GRUB_DISABLE_LINUX_UUID=true 

 and re run the 

update-grub

 . To remember as well, the UUID is set in 

/etc/fstab

 . You can replace that with /dev/sdXy accordingly as well.

I hope this will help someone else that, like me, got stuck in restoring a VM.


Sources:

TOP – memory explanation

(just few notes – to avoid to forget)

  • VIRT: not really relevant nowadays. It’s the memory that the process could use. But the OS loads only what needed, so rarely really used. On 32bit OS, it could be the only time when you need to keep an eye as the OS can allocate up to 2-3GB only.
  • RES: Resident Set Size memory – this is the actual memory in RAM. On low used machines, it might still show high usage even if not utilised as the process to free-up the memory costs more than leaving it. In fact, Linux OS tends to use as much memory available (“unused memory is wasted memory“).
  • SH: this is the shared memory which generally contains libraries etc

Kernel space – User space – Containers – Virtualisation

How many times I’ve heard “well, a container is like a super light-weight virtual machine“. And yes, true, I admit as well, that I was one of them.

But I wasn’t happy about this answer, so I did some researches and I think now I have a better understanding and I feel the pain of my friends where I was simplistically (and wrongly) saying that – public apologies 😛 🙂


So… let’s start…


Concept 1: Virtual memory.

Virtual memory is the collective memory used by processes (RAM, disk swap, etc).

Of this virtual memory, we have generally a separation beween 2 types:

  • kernel space: reserverd for the kernel and generally drivers
  • user space: for the applications, incluse libraries

This separation serves to provide memory protection and hardware protection from malicious or errant software behavior.

NOTE1: User space is not namespace.


NOTE2: FUSE is not really related with this topic, but could confuse someone. So, just to clarify: FUSE – (Filesystem in Userspace) is a software interface for Unix-like computer operating systems that lets non-privileged users create their own file systems without editing kernel code. This is achieved by running file system code in user space while the FUSE module provides only a “bridge” to the actual kernel interfaces.

Modern kernels have cgroups and namespace capabilities.

  • Cgroups can restrict what you can USE -> CPU, memory, storage, network, devices, etc. Also allows to ‘freeze’.
  • Namespace can restrict what you SEE -> PID, mnt, UID/GID, etc…

Containers runtimes (like LXC, Docker, etc…) are using cgroups and namespaces to create separate isolated user-space entities called ‘containers‘.
Containers have basically no overhead because they are using the same system calls to the host kernel => No need of emuation or virtual machine.

They use the same kernel of the host (this is a key difference with virtualisation). So, currently, you cannot run Windows containers on a Linux host. But you can still run different versions of Linux, as they all share the same kernel.

Virtualisation: fully isolated OS, running its own kernel.

  • Full virtualised: (eg. VMWare, Virtuabox, ESXi…). The OS in the VM is not aware to be a VM. Hypervisor emulates the hardware platform for the guest OS and then translates the hardware accesses requests to the physical hardware. Hypervisor provides the drivers to the guest OS.
    => higher overhead because hardware virtualisation BUT best isolation and security
  • Para virtualised: (XEN, KVM) the OS in the VM knows to be virtualised. Drivers are sending instructions directly to the hardware of the host, via the Hypervisor. Hardware is not virtualised BUT the OS runs in isolation.
    => better performance and ability to use recent hardware drivers directly BUT guest OS needs to be modified to use paravirtualised devices

NOTE: Emulation is not platform virtualisation (e.g. QEMU)
With emulation you can emulate different architectures (e.g. ARM/RISC…) on a host that has a differnt instruction set (eg. i386). Performances are cleary not ideal.


Main sources:

Docker and Kubernetes notes

[Raw notes from this free course: https://www.udacity.com/course/scalable-microservices-with-kubernetes–ud615 ]


Docker is one of the most famous container in use nowadays.

Docker container features/best practise:

  • is portable because you keep all what you need for your application in it (libraries etc) – always run the same, regardless of the environment;
  • reduce conflicts between teams running different software on the same infrastructure;
  • minimal: best practise is to keep as minimal as possible its content;
  • you can ‘freeze’ it and move to another host, if required (using the cgroup capability);
  • no hard coded values in it: variable passed during the deploy or pulled from a file mounted externally;
  • you can mount external storage;
  • you can expose a port -> for example you can have a web app listening on port 80. You can expose port 80 of your container so when you connect to the host’s port 80, traffic will be redirected to the container. This “port forwarding” is the container runtime’s job;
  • ‘Dockerfile’ is the configuration file for the container. You can speficy the image that you want to use (FROM …), which port to expose, the storage to mount etc;

COMMANDS:

docker images -> shows current images downloaded

docker pull <image_name:version>

docker run -d <image_name:version>

docker ps

docker inspect <id>

docker stop <id>

docker rm <id>

 
Dockerfile

FROM -> which base image => alpine (small/package manager)
ADD take file/dir and put into the container
ENTRYPOINT what to run when you start the container


Push container to repository
Dockerhub -> default public (you can also have private)

docker tag -h
Add tag – then login and push


Create/Package container (5% of the work)

  • App configuration
  • Service Discovery
  • Managing Updates
  • Monitoring

Kubernetes -> Cluster like single machine
You need to describe the apps and how they interact between each others

POD
– collection of containers (possible multiple apps on different containers)
– shares network namespace (IP)
– shares storage volumes

=> created with conf files

Monitoring
Rediness -> container ready
Liveness -> app not working / restart app
Configmaps
Secrets

Services -> labels

Deployments
Desidered state

Scaling -> increase “replicas”

Rolling updates – CTO roll => deploy new version, get traffic, stop traffic prev version, remove prev verision (this per each POD)

Tips for RHCSA certification

Just a collection of notes and screenshot that can help in getting ready for the RHCSA exam.
Basted on RHEL 7.


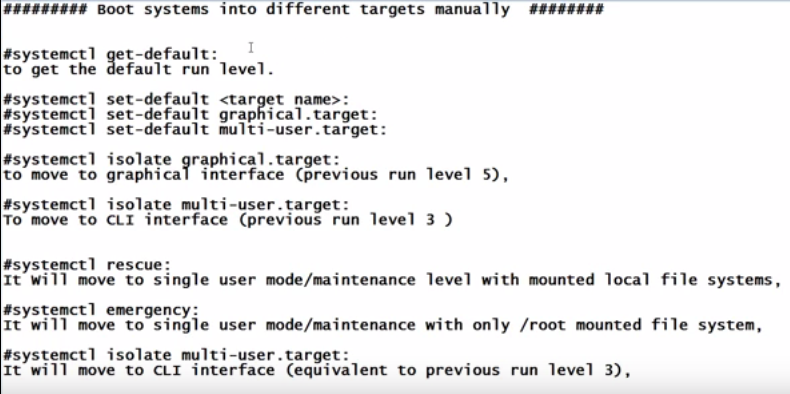
Boot systems into different targets manually


 Configure networking and hostname resolution statically or dynamically


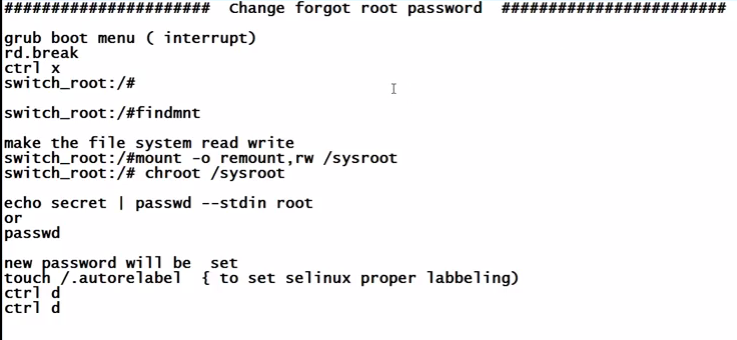
Interrupt the boot process in order to gain access to a system


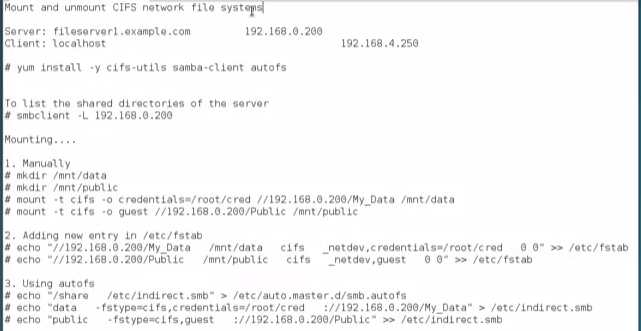
Mount and unmount CIFS network file systems


Configure a system to use time services

timedatectl

timedatectl list timezones
timedatectl set-timezone America/Phoenix


timedatectl set-time 9:00:00
timedatectl set-ntp true/false
timedatectl


Bridge / Bond interfaces CentOS/RedHat

Just few notes about how to bridge or bond network interfaces in CentOS/RedHat systems

# Install the required packages

yum install bridge-utils


BRIDGE
------

/etc/sysconfig/network-scripts/

#ifcfg-br0
DEVICE=br0
TYPE=Bridge
IPADDR=192.168.1.1
NETMASK=255.255.255.0
ONBOOT=yes
BOOTPROTO=none
NM_CONTROLLED=no
DELAY=0

#ifcfg-eth0
DEVICE=eth0
TYPE=Ethernet
HWADDR=AA:BB:CC:DD:EE:FF
BOOTPROTO=none
ONBOOT=yes
NM_CONTROLLED=no
BRIDGE=br0


#### USE SCREEN!!
service network restart 

================================
BOND >>> 2 or more eth interfaces!
----

#ifcfg-eth0
DEVICE=eth0
TYPE=Ethernet
USERCTL=no
SLAVE=yes
MASTER=bond0
BOOTPROTO=none
HWADDR=AA:BB:CC:DD:EE:FF
NM_CONTROLLED=no

#ifcfg-eth1
DEVICE=eth1
TYPE=Ethernet
USERCTL=no
SLAVE=yes
MASTER=bond0
BOOTPROTO=none
HWADDR=AA:BB:CC:DD:EE:FF
NM_CONTROLLED=no

#ifcfg-bond0
DEVICE=bond0
ONBOOT=yes
BONDING_OPTS='mode=1 miimon=100'
BRIDGE=br0
NM_CONTROLLED=no

#ifcfg-br0
DEVICE=br0
ONBOOT=yes
TYPE=Bridge
IPADDR=192.168.1.1
NETMASK=255.255.255.0
NM_CONTROLLED=no


# ifup bond0
#### USE SCREEN!!
# service network restart 


==========================

For DHCP and not static

DEVICE=eth0
BOOTPROTO=dhcp
ONBOOT=yes


Sources:

Systemd – find what’s wrong with systemctl

True: all the last changes in Linux distro didn’t make me really really happy.
I still like to use init.d to start a process (it took me a while to get used to service yourservice status syntax) and so.

Anyway, the main big ones don’t seem to look back, and we need to get used to this 🙂

I have few raspberry PIs at home, and I’ve noticed that after a restart I was experiencing different weird behaviours. The main two:

  • stuck and not rebooting
  • receiving strange logrotate email alerts (e.g. /etc/cron.daily/logrotate:
    gzip: stdin: file size changed while zipping)

I tried to ignore them, but when you issue a reboot from a remote place and it doesn’t reboot, you understand that you should start to check what’s going on, instead of just unplug-replug your PI.


And here the discovery: systemctl

This magic command was able to show me the processes with issues, and slowly find out what was wrong with logrotate or my reboot. Or, better, I have realised that after fixing what was marked as failed, I didn’t experience any weird behaviors.

So, here few steps that I’d like to share – to help maybe someone else in the future, myself included – as I tend to forget things if I don’t use them 🙂

To check if your system is healthy or not:

systemctl status

Output should return “running”. If you get “degraded”, well, there is definitely something wrong.

Use the following to check what has failed:

systemctl --failed

Now, investigate those specific processes. Try to analyse their status and logs or literally try to restart them to see live what is the error:

systemctl status <broken_service>

journalctl _PID=<PID_of_broken_service>

tail /var/log/<broken_service>

systemctl restart <broken_service>


After fixing all, I tried to reboot few times and after I was checking again the overall status to make sure it was “running”.

In my case, I had few issues with “systemd-modules-load.service”. This probably related to my dist-upgrade. Some old and no longer existing modules were still listed in /etc/modules and, of course, the service wasn’t able to load them, miserably failing.
I’ve tested each module using modprobe <module_name> and I’ve commented out the ones where failing. Restarted and voila`, status… running!

On another PI I had some issues with Apache, but I can’t remember how I fixed it. Still, the goal of this post is mostly make everyone aware that systemctl can give you some interesting info about the system and you can focus your energies on the failed services.

I admit in totally honesty that I have no much clue why after fixing these failed services, all issues disappeared. In fact, the reboot wasn’t affecting one PI with the same non-existing modules listed, but it was stopping another one during the boot. Again, I could probably troubleshoot further but I have a life to live as well 🙂


Sources:

OVH API notes


Create App: https://eu.api.ovh.com/createApp/

Python wrapper project: https://github.com/ovh/python-ovh

Web API control panel: https://eu.api.ovh.com/console/#/

# Where to find the ID of your application created from the portal

/me/api/application


# If you use the python script to get the customer_key
# You can find the ID here, filtering by application ID

/me/api/credential


# Here you can find your serviceName (project ID)
# - I got mad to understand what it was before!

/cloud/project


Example of ovh.conf file

[default]
endpoint=ovh-eu

[ovh-eu]
application_key=my_app_key
application_secret=my_application_secret
;consumer_key=my_consumer_key

;consumer_key needs to be uncommented once you have got it


Custom python script to allow access only to a specific project under my Cloud OVH account

# -*- encoding: utf-8 -*-

import ovh

# create a client using configuration
client = ovh.Client()

# Request full access to /cloud/project/<PROJECT_ID>/
ck = client.new_consumer_key_request()
ck.add_recursive_rules(ovh.API_READ_WRITE, '/cloud/project/<PROJECT_ID>/')

## Request full access to ALL
#ck = client.new_consumer_key_request()
# ck.add_recursive_rules(ovh.API_READ_WRITE, '/')

# Request token
validation = ck.request()

print "Please visit %s to authenticate" % validation['validationUrl']
raw_input("and press Enter to continue...")

# Print customerKey
print "Btw, your 'consumerKey' is '%s'" % validation['consumerKey']


How to create a script

  1. Create the app from the link above
  2. Get the keys and store them safely
  3. Install the OVH python wrapper
  4. Create ovh.conf file and use the keys from your app
  5. Use the python example (or mine) to get the customerKey
  6. Update ovh.conf with the customKey
  7. Create your script and have fun! 🙂

Script example to get a list of snapshots:

# -*- encoding: utf-8 -*-
import json
import ovh

serviceName="<PROJECT_ID>"
region="GRA3"


# Auth
client = ovh.Client()


result = client.get("/cloud/project/%s/snapshot" % serviceName,
    flavorType=None,
    region="%s" % region,
)


# Pretty print
print json.dumps(result, indent=4)


Email notification for successful SSH connection

If you manage a remote server, and you are a bit paranoiac about the bad guys outside, it could be nice to have some sort of notification every time a SSH connection is successful.

I found this post and it seems working pretty well for me as well.
I’ve installed this on my CentOS7 server and seems working good! Of course, this in addition to an aggressive Fail2Ban setup.

  1. Make sure you have your MTA (Postfix/Sendmail…) configured to deliver emails to the user root
  2. Make sure you get the emails for the user root (otherwise doesn’t make any sense 😛 )
  3. Create this script (this is a slightly modified version comparing with the one in the original post:
    #!/bin/sh
    if [ "$PAM_TYPE" != "open_session" ]
    then
      exit 0
    else
      {
        echo "User: $PAM_USER"
        echo "Remote Host: $PAM_RHOST"
        echo "Service: $PAM_SERVICE"
        echo "TTY: $PAM_TTY"
        echo "Date: `date`"
        echo "Server: `uname -a`"
      } | mail -s "$PAM_SERVICE login on `hostname -s` from user $PAM_USER@$PAM_RHOST" root
    fi
    exit 0
    
  4. Set the permission:
    chmod +x /usr/local/bin/send-mail-on-ssh-login.sh
  5. Append this line to /etc/pam.d/sshd
    session optional pam_exec.so /usr/local/bin/send-mail-on-ssh-login.sh
  6.  …and that’s it! 😉


If you’d like to have a specific domain/IP whitelisted, for example if you don’t want to get notified when you connect from your office or your home (fixed IP or dynamic IP is required), you can use this version of the script:

#!/bin/bash
if [ "$PAM_TYPE" != "open_session" ]; then
  exit 0
else
  MSG="$PAM_SERVICE login on `hostname -s` from user $PAM_USER@$PAM_RHOST"
  # check if the PAM_RHOST is shown as IP
  echo "$PAM_RHOST" | grep -q -Eo '[0-9]{1,3}\.[0-9]{1,3}\.[0-9]{1,3}\.[0-9]{1,3}'
  if [ $? -eq 0 ]; then
    SRCIP=$PAM_RHOST
  else
    SRCIP=$(dig +short $PAM_RHOST)
  fi
  SAFEIP=$(dig +short myofficedomain.com)
  if [ "$SRCIP" == "$SAFEIP" ]; then
    echo "Authorised $MSG" | logger
  else
  {
    echo "User: $PAM_USER"
    echo "Remote Host: $PAM_RHOST"
    echo "Service: $PAM_SERVICE"
    echo "TTY: $PAM_TTY"
    echo "Date: `date`"
    echo "Server: `uname -a`"
  } | mail -s "Unexpected $MSG" root
  fi
fi
exit 0

The script will send an email ONLY if the source IP is not the one from myofficedomain.com; however, it will log the authentication in /var/log/messages using logger command.