Category Archives: Cloud

Restore root access on Linux server

I have been working in IT since a while already, and I have faced multiple times customers that have accidentally lost the root password or the ssh key. In general, their servers is nicely up and running but they can’t connect anymore.

In the Cloud era, 99% of the time is going to be a virtual server, which makes things much easier. Of course, the same approach can be used with physical servers, but the “move disk” that I’m going to explain in a bit requires… literally… plug/unplug the disk šŸ™‚

Firstly, you can connect from your pc to a remote Linux server using:

  • username and password
  • ssh key

In both cases, the Linux server has “something stored” in it, a file (all Linux is based on files)… or more, that we can potentially edit/replace if we have access to the disk.

Getting there, don’t we? šŸ™‚

Cool. So, if we loose the password or the ssh key, and we still desperately need to access that server because we didn’t think about backing up (veeery bad – slap on your hands now!) or our laptop with the ssh key broke (didn’t you backed it up either?? Really? another slap!), one option is actually the following:

  1. Spin up a new server (we’re going to call it Saviour), and verify we can connect to it
  2. Remove the OS disk from the inaccessible server (called Desperate) and connect to Saviour
  3. Modify/replace files from Saviour onto Desperate’s disk
  4. Move back the Desperate’s disk into Desperate server
  5. Test if you can now connect to Desperate
  6. Delete Saviour

As I said before, this could work also with physical servers. The only bit that changes is that you literally need to remove the disk, install to the new server, and put it back. If you don’t have another server, you can use your laptop and a USB adapter, but you still need to have Linux. Anyway, I’m sure you can figure out how to adapt these instructions.

Now, let’s start, but DO IT AT YOUR OWN RISK.

I assume we have Saviour up and running. And we can connect via ssh. If not, stop reading and do something, come on! šŸ™‚

Works? Niiice!
Next, we move Desperate’s disk to Saviour and we make sure it’s visible.

You can use fdisk -l to see if there is a new disk (it’s generally the latest entry).
Here an example:

root@saviour:~# fdisk -l
Disk /dev/vda: 10 GiB, 10737418240 bytes, 20971520 sectors
Units: sectors of 1 * 512 = 512 bytes
Sector size (logical/physical): 512 bytes / 512 bytes
I/O size (minimum/optimal): 512 bytes / 512 bytes
Disklabel type: gpt
Disk identifier: 6CBB44F1-D559-9B42-A076-7C0EA2B76310

Device      Start      End  Sectors  Size Type
/dev/vda1  262144 20971486 20709343  9.9G Linux root (x86-64)
/dev/vda14   2048     8191     6144    3M BIOS boot
/dev/vda15   8192   262143   253952  124M EFI System

Partition table entries are not in disk order.


Disk /dev/vdb: 10 GiB, 10737418240 bytes, 20971520 sectors
Units: sectors of 1 * 512 = 512 bytes
Sector size (logical/physical): 512 bytes / 512 bytes
I/O size (minimum/optimal): 512 bytes / 512 bytes
Disklabel type: gpt
Disk identifier: 6CBB44F1-D559-9B42-A076-7C0EA2B76310

Device      Start      End  Sectors  Size Type
/dev/vdb1  262144 20971486 20709343  9.9G Linux root (x86-64)
/dev/vdb14   2048     8191     6144    3M BIOS boot
/dev/vdb15   8192   262143   253952  124M EFI System

Partition table entries are not in disk order.

We need to get the device ID. Using the example above I can see that Desperate’s disk is /dev/vdb1. How do I know it? Well, bit of experience I guess. But mainly, in this case, disks are listed as vdx. The “x” starts from “a” and continues till “z“. Saviour has one single disk of 10GB, which is the first (a) – of course. The second (b), has to be our Desperate’s disk.

Let’s create a temporary mount point /desperate to mount that disk and let’s mount it!
I assume that our disk was formatted as ext4. If not, you can try to skip the -t option and let the mount command to guess the filesystem or pass the right parameter.

root@saviour:~# mkdir /desperate
root@saviour:~# mount -t ext4 /dev/vdb1 /desperate
root@saviour:~# ls /desperate/
bin  boot  dev  etc  home  lib  lib64  lost+found  media  mnt  opt  proc  root  run  sbin  srv  sys  tmp  usr  var

If the ls command worked, it means we’re good to continue!

Restore SSH KEY connectivity

If we were able to connect to Savoiur as root using ssh key, it means that the root user on Saviour is properly setup. So, we can copy the same configuration onto the Desperate’s disk to restore ssh key connectivity!

SSH key works storing the public key into a file called authorized_key in .ssh of the user you’re connecting to the server, in this case root.

Simply, let’s copy that file onto Desperate’s disk, in the same path!

root@saviour:~# cp /root/.ssh/authorized_keys /desperate/root/.ssh/authorized_keys
root@saviour:~#

To be extremely sure, we can verify the copy using md5sum (OPTIONAL), and see that the number generated from both files is identical:

root@saviour:~# md5sum /root/.ssh/authorized_keys
17c1bba0ef42de1899b650b60dede12b  /root/.ssh/authorized_keys
root@saviour:~# md5sum /desperate/root/.ssh/authorized_keys
17c1bba0ef42de1899b650b60dede12b  /desperate/root/.ssh/authorized_keys

If we just want to restore ssh key connectivity, we should be good to go, simply turning off Saviour, move back Desperate’s disk in Desperate server, and once up and running, trying to ssh to it using Desperate’s IP/fqdn.

If you have also username and password connectivity to restore, here an example just for root user – but it can be used for all the users, but I won’t explain here how to do so, as I would recommend to restore root and make all the changes from the restored server to avoid misconfigurations.

Restore SSH root password access

The password of a user is stored into /etc/shadow, of course, not in clear.

If you have forgotten the root password, let’s set a root password on Saviour, and use what we can find in that file to update the one on Desperate.

Using the command passwd, as root, we can immediately set/update the password – this time, take a note of it! šŸ˜‰

And after have set it, we can get the line where it is stored, using grep, for example (or simply opening the file).

root@saviour:~# passwd
New password:
Retype new password:
passwd: password updated successfully
root@saviour:~# grep root /etc/shadow
root:$y$j9T$usUs5.xlf7HQj90AaeYYN.$SR2YO6yamYA1L59bUa193ndPgiyt1nEgCfkgjXEAxJ9:19986:0:99999:7:::

In this example we need to replace the line that starts with root in /desperate/etc/shadow with this one: root:$y$j9T$usUs5.xlf7HQj90AaeYYN.$SR2YO6yamYA1L59bUa193ndPgiyt1nEgCfkgjXEAxJ9:19986:0:99999:7:::
You can use your favourite editor to do so. Make sure you change ONLY that line and save.
You can use the same grep command to verify that it matches.

root@saviour:~# grep root /etc/shadow
root:$y$j9T$usUs5.xlf7HQj90AaeYYN.$SR2YO6yamYA1L59bUa193ndPgiyt1nEgCfkgjXEAxJ9:19986:0:99999:7:::
root@saviour:~# grep root /desperate/etc/shadow
root:$y$j9T$usUs5.xlf7HQj90AaeYYN.$SR2YO6yamYA1L59bUa193ndPgiyt1nEgCfkgjXEAxJ9:19986:0:99999:7:::

At this stage, the root user on Desperate should have the same password that you have set on Saviour.

Turn off Saviour, move the disk back to Desperate, turn it on and test! If all works, let’s thank Saviour, and delete it.

I hope this helps and yes… time to think about backups strategies šŸ˜‰

Happy restoring! šŸ˜‰

OVH API notes


Create App:Ā https://eu.api.ovh.com/createApp/

Python wrapper project:Ā https://github.com/ovh/python-ovh

Web API control panel:Ā https://eu.api.ovh.com/console/#/

# Where to find the ID of your application created from the portal

/me/api/application


# If you use the python script to get the customer_key
# You can find the ID here, filtering by application ID

/me/api/credential


# Here you can find your serviceName (project ID)
# - I got mad to understand what it was before!

/cloud/project


Example of ovh.conf file

[default]
endpoint=ovh-eu

[ovh-eu]
application_key=my_app_key
application_secret=my_application_secret
;consumer_key=my_consumer_key

;consumer_key needs to be uncommented once you have got it


Custom python script to allow access only to a specific project under my Cloud OVH account

# -*- encoding: utf-8 -*-

import ovh

# create a client using configuration
client = ovh.Client()

# Request full access to /cloud/project/<PROJECT_ID>/
ck = client.new_consumer_key_request()
ck.add_recursive_rules(ovh.API_READ_WRITE, '/cloud/project/<PROJECT_ID>/')

## Request full access to ALL
#ck = client.new_consumer_key_request()
# ck.add_recursive_rules(ovh.API_READ_WRITE, '/')

# Request token
validation = ck.request()

print "Please visit %s to authenticate" % validation['validationUrl']
raw_input("and press Enter to continue...")

# Print customerKey
print "Btw, your 'consumerKey' is '%s'" % validation['consumerKey']


How to create a script

  1. Create the app from the link above
  2. Get the keys and store them safely
  3. Install the OVH python wrapper
  4. Create ovh.conf file and use the keys from your app
  5. Use the python exampleĀ (or mine) to get the customerKey
  6. Update ovh.conf with the customKey
  7. Create your script and have fun! šŸ™‚

Script example to get a list of snapshots:

# -*- encoding: utf-8 -*-
import json
import ovh

serviceName="<PROJECT_ID>"
region="GRA3"


# Auth
client = ovh.Client()


result = client.get("/cloud/project/%s/snapshot" % serviceName,
    flavorType=None,
    region="%s" % region,
)


# Pretty print
print json.dumps(result, indent=4)


Chef – notes

Websites:Ā https://www.chef.io
Learning site:Ā https://learn.chef.io

As any other Configuration Manager tools, the main goal is automate and keep consistency in the infrastructure:

  • create files if missing
  • ignore file/task if already up to date
  • replace with original version if modified

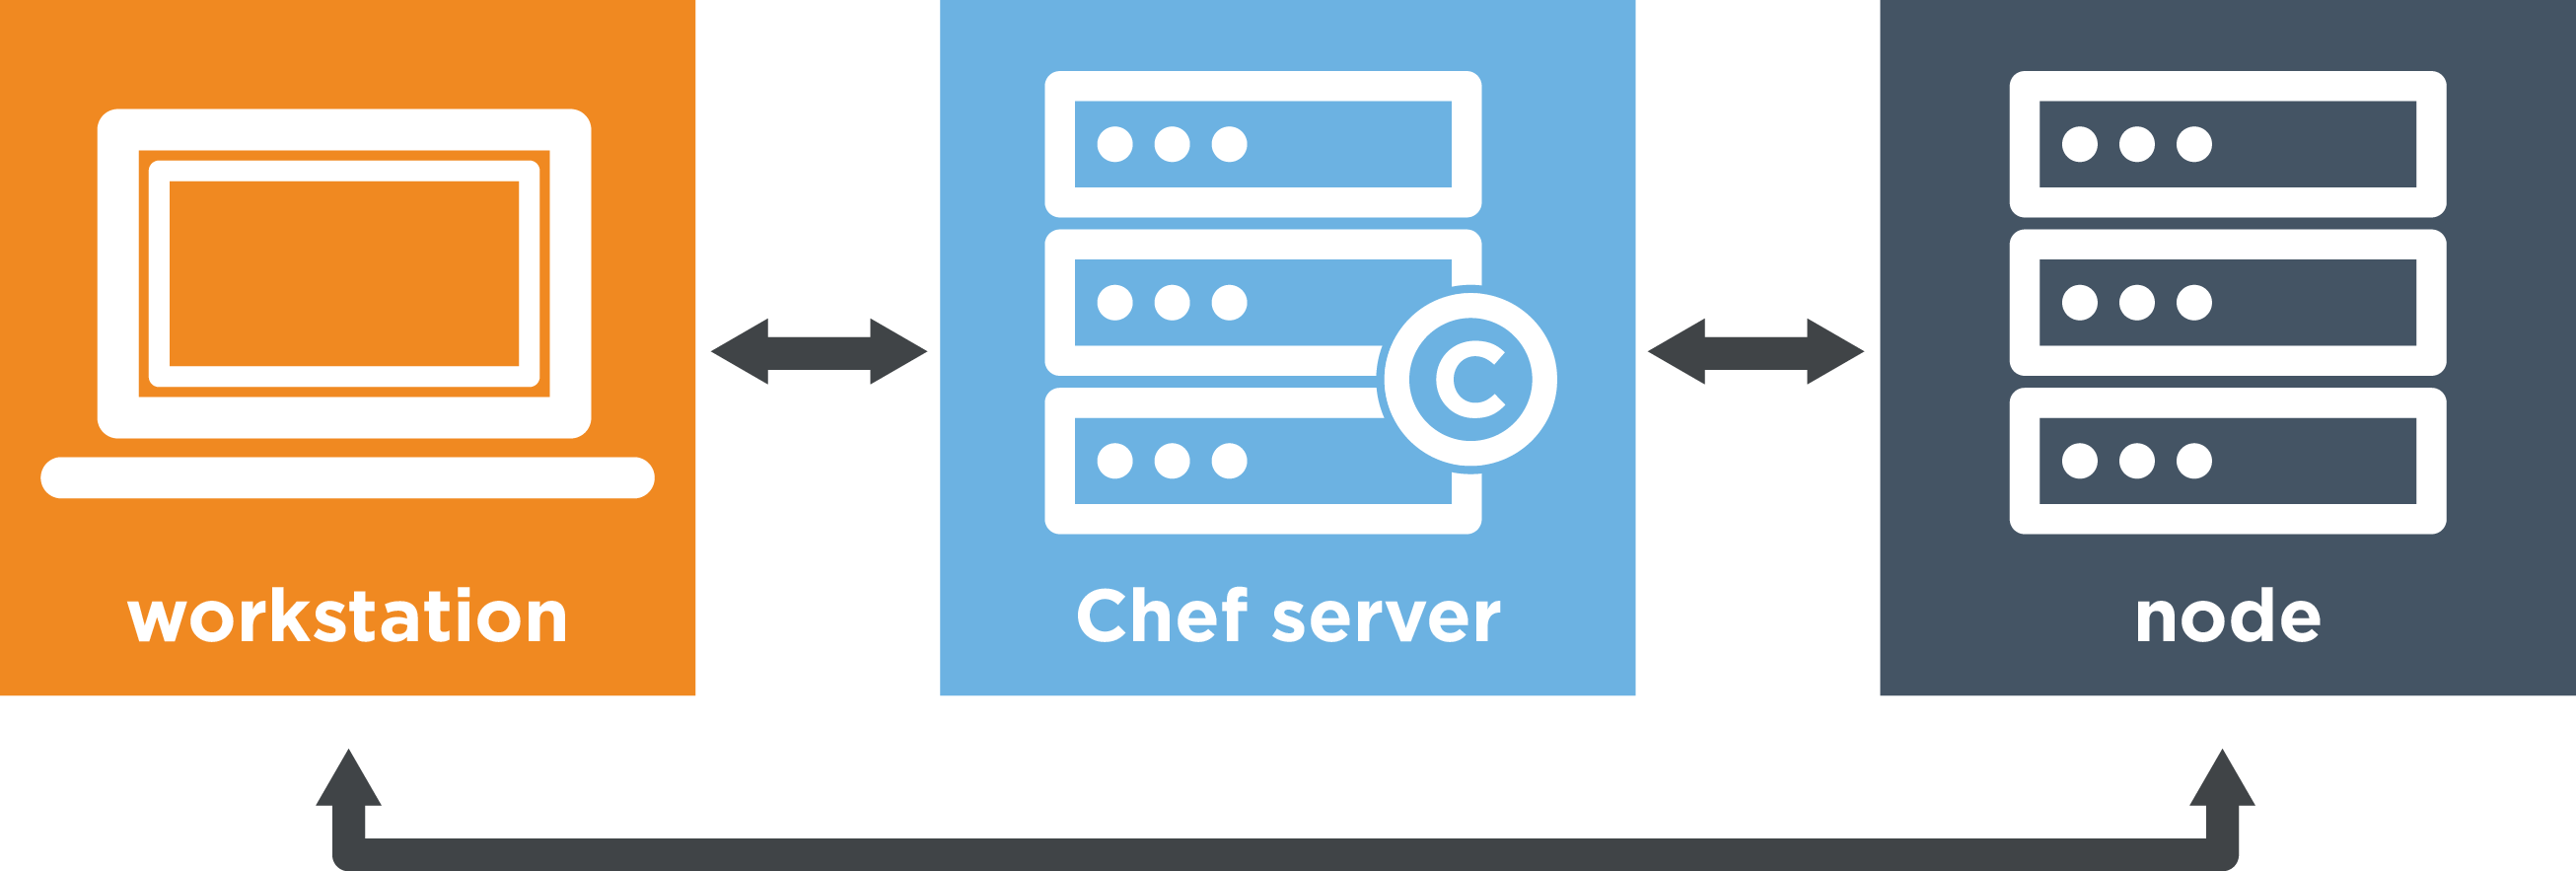
Typically, Chef is comprised of three parts:

  1. your workstation – where you create your recipes/cookbooks
  2. a Chef server –Ā The guy who host the active version of recipes/cookbooks (central repository) and manage the nodes
  3. nodes – machines managed by Chef server. FYI, any nodes hasĀ Chef client installed.

diagram

picture source https://learn.chef.io

Generally, you deploy your cookbooks on your workstation and push them onto the Chef Server. The node(s) communicate with the Chef Server via chef-client and pulls and execute the cookbook.

There is no communication between the workstation and the node EXCEPT for the first initialĀ bootstrap task. This is the only time when the workstation connects directly to the node and provides the details required to communicate with the Chef Server (Chef Server’s URL, validation Key). It also installsĀ chef on the node and runsĀ chef-client for the first time. During this time, the nodes gets registeredĀ on the Chef Sever and receive a uniqueĀ client.pemĀ key, that will be used by chef-client to authenticate afterwards.
The information gets stored in a Postgress DB, and there is some indexing happening as well in ApacheĀ Solr (Elastic SearchĀ in a Chef Server cluster environment).

Further explanation here:Ā https://docs.chef.io/chef_overview.html

Some terms:

  • resource: part of the system in a desiderable state (e.g. package installed, file created…);
  • recipe: it contains declaration of resources, basically, theĀ things to do;
  • cookbook: is a collection of recipes, templates, attributes, etc… basically The final collection of all.

Important to remember:

  • there are default actions. If not specified, the default action applies (e.g.Ā :create for a file),
  • in the recipe you define WHAT but notĀ HOW. The “how” is managed by Chef itself,
  • theĀ order is important! For example, make sure to define the install of a package BEFORE setting a state enable. ONLYĀ attributes can be listed without order.


Labs

Test images:Ā http://chef.github.io/bento/Ā andĀ https://atlas.hashicorp.com/bento
=> you can get these boxes using Vagrant

Example, how to get CentOS7 for Virtualbox and start it/connect/remove:

vagrant box add bento/centos-7.2 --provider=virtualbox

vagrant init bento/centos-7.2

vagrant up

vagrant ssh

vagrant destroy

Exercises:

Software links and info:

Chef DK: it provides tools (chef, knife, berks…) to manage your servers remotely from your workstation.
Download link here.

To communicate with the Chef Server, your workstation needs to haveĀ .chef/knife.rb file configured as well:

# See http://docs.chef.io/config_rb_knife.html for more information on knife configuration options

current_dir = File.dirname(__FILE__)
log_level                :info
log_location             STDOUT
node_name                "admin"
client_key               "#{current_dir}/admin.pem"
chef_server_url          "https://chef-server.test/organizations/myorg123"
cookbook_path            ["#{current_dir}/../cookbooks"]

Make sure to also haveĀ admin.pem (the RSA key) in the sameĀ .chef directory.

To fetch and verify the SSL certificate from the Chef server:

knife ssl fetch

knife ssl check


Chef DKĀ also provides tools toĀ allow you to configure a machine directly, but it is just for testing purposes. Syntax example:

chef-client --local-mode myrecipe.rb


Chef Server:Ā Download here.
To remember, Chef Server needsĀ RSA keys (command line switch –filename) to communicate. We have user’s key, organisation key (chef-validator key).
There are different type of installation.Ā Here you can find more information. And here more detail about the new HA version.

Chef Server can have a web interface, if you also install the Chef Management Console:

# chef-server-ctl install chef-manage


Alternatively you can use Hosted Chef service.

Chef Client:
(From official docs) The chef-client accesses the Chef server from the node on which itā€™s installed to get configuration data, performs searches of historical chef-client run data, and then pulls down the necessary configuration data. After the chef-client run is finished, the chef-client uploads updated run data to the Chef server.


Handy commands:

# Create a cookbook (structure) called chef_test01, into cookbooks dir
chef generate cookbook cookbooks/chef_test01

# Create a template for file "index.html" 
# this will generate a file "index.html.erb" under "cookbooks/templates" folder
chef generate template cookbooks/chef_test01 index.html

# Run a specific recipe web.rb of a cookbook, locally
# --runlist + --local-mode
chef-client --local-mode --runlist 'recipe[chef_test01::web]'

# Upload cookbook to Chef server
knife cookbook upload chef_test01

# Verify uploaded cookbooks (and versions)
knife cookbook list

# Bootstrap a node (to do ONCE)
# knife bootstrap ADDRESS --ssh-user USER --sudo --identity-file IDENTITY_FILE --node-name NODE_NAME
# Opt: --run-list 'recipe[RECIPE_NAME]'
knife bootstrap 10.0.3.1 --ssh-port 22 --ssh-user user1 --sudo --identity-file /home/me/keys/user1_private_key --node-name node1
# Verify that the node has been added
knife node list
knife node show node1

# Run cookbook on one node
# (--attribute ipaddress is used if the node has no resolvable FQDN)
knife ssh 'name:node1' 'sudo chef-client' --ssh-user user1 --identity-file /home/me/keys/user1_private_key --attribute ipaddress

# Delete the data about your node from the Chef server
knife node delete node1
knife client delete node1

# Delete Cookbook on Chef Server (select which version)
# use  --all --yes if you want remove everything
knife cookbook delete chef_test01

# Delete a role
knife role delete web


Practical examples:

Create file/directory

directory '/my/path'

file '/my/path/myfile' do
  content 'Content to insert in myfile'
  owner 'user1'
  group 'user1'
  mode '0644'
end

Package management

package 'httpd'

service 'httpd' do
  action [:enable, :start]
end

Use of template

template '/var/www/html/index.html' do
  source 'index.html.erb'
end

Use variables in the template

<html>
  <body>
    <h1>hello from <%= node['fqdn'] %></h1>
  </body>
</html>


General notes

Chef Supermarket

link here –Ā Community cookbook repository.
Best way to get a cookbook from Chef Supermarket is usingĀ Berkshelf command (berks)Ā as it resolves all the dependencies.Ā knive supermarket does NOT resolve dependencies.

Add the cookbooks in Berksfile

source 'https://supermarket.chef.io'
cookbook 'chef-client'

And run

berks install

This will download the cookbooks and dependencies inĀ ~/.berkshelf/cookbooks

Then to upload ALL to Chef Server, best way:

# Production
berks upload 

# Just to test (ignore SSL check)
berks upload --no-ssl-verify


Roles

Define a function of a node.
Stored as objects on the Chef server.
knife role create OR (better)Ā knife role from file <role/myrole.json>.Ā Using JSON is recommended as it can be version controlled.

Examples of web.json role:

{
   "name": "web",
   "description": "Role for Web Server",
   "json_class": "Chef::Role",
   "override_attributes": {
   },
   "chef_type": "role",
   "run_list": ["recipe[chef_test01::default]",
                "recipe[chef_test01::web]"
   ],
   "env_run_lists": {
   }
}

Commands:

# Push a role
knife role from file roles/web.json
knife role from file roles/db.json

# Check what's available
knife role list

# View the role pushed
knife role show web

# Assign a role to a specific node
knife node run_list set node1 "role[web]"
knife node run_list set node2 "role[db]"

# Verify
knife node show node1
knife node show node2

To apply the changes you need to runĀ chef-client on the node.

You can also verify:

knife status 'role:web' --run-list


Kitchen

All the following is extracted from the officialĀ https://learn.chef.io

Test Kitchen helps speed up the development process by applying your infrastructure code on test environments from your workstation, before you apply your work in production.

Test Kitchen runs your infrastructure code in an isolated environment that resembles your production environment. With Test Kitchen, you continue to write your Chef code from your workstation, but instead of uploading your code to the Chef server and applying it to a node, Test Kitchen applies your code to a temporary environment, such as a virtual machine on your workstation or a cloud or container instance.

When you use the chef generate cookbook command to create a cookbook, Chef creates a file named .kitchen.yml in the root directory of your cookbook. .kitchen.yml defines what’s needed to run Test Kitchen, including which virtualisation provider to use, how to run Chef, and what platforms to run your code on.

Kitchen steps:

Kitchen WORKFLOW

Handy commands:

$ kitchen list
$ kitchen create
$ kitchen converge


Dynamic MOTD on Centos7

Just few steps!

InstallĀ figlet package:

yum install figlet


Create /etc/motd.sh script with this content:

#!/bin/sh
#
clear
figlet -f slant $(hostnamectl --pretty)
printf "\n"
printf "\t- %s\n\t- Kernel %s\n" "$(cat /etc/redhat-release)" "$(uname -r)"
printf "\n"


date=`date`
load=`cat /proc/loadavg | awk '{print $1}'`
root_usage=`df -h / | awk '/\// {print $(NF-1)}'`
memory_usage=`free -m | awk '/Mem:/ { total=$2 } /buffers\/cache/ { used=$3 } END { printf("%3.1f%%", used/total*100)}'`
swap_usage=`free -m | awk '/Swap/ { printf("%3.1f%%", "exit !$2;$3/$2*100") }'`
users=`users | wc -w`
time=`uptime | grep -ohe 'up .*' | sed 's/,/\ hours/g' | awk '{ printf $2" "$3 }'`
processes=`ps aux | wc -l`
ethup=$(ip -4 ad | grep 'state UP' | awk -F ":" '!/^[0-9]*: ?lo/ {print $2}')
ip=$(ip ad show dev $ethup |grep -v inet6 | grep inet|awk '{print $2}')

echo "System information as of: $date"
echo
printf "System load:\t%s\tIP Address:\t%s\n" $load $ip
printf "Memory usage:\t%s\tSystem uptime:\t%s\n" $memory_usage "$time"
printf "Usage on /:\t%s\tSwap usage:\t%s\n" $root_usage $swap_usage
printf "Local Users:\t%s\tProcesses:\t%s\n" $users $processes
echo

[ -f /etc/motd.tail ] && cat /etc/motd.tail || true

Make the script executable:

chmod +x /etc/motd.sh

Append this script to /etc/profile in order to be executed as last command once a user logs in:

echo "/etc/motd.sh" >> /etc/profile

Try and have fun! šŸ™‚


If you are using Debian, here the other guide.

Develop your site using WordPress and publish a static version on Cloud Files

WordPress is a CMS widely used nowadays to develop sites. Even if it wasnā€™t created with this intent (blogging was actually the original reason), due to its simplicity and popularity, loads of people are using this software to build their websites.

When the end goal is no longer a blog but a pure website, and youā€™re not using any ‘search’ or ‘comment’ features which still require php functions, it could be worth considering a completely ā€œstatic’edā€ site which is then published in a Cloud Files Public Container. You could take advantage of the built-in CDN capability and forget about scaling on demand and all the limitations that WordPress has in the Cloud.
Having a static site as opposed to a PHP site means you can bypass security patch installations and avoid the possible risk of compromised servers.
And last but not least: cost reduction!
When you serve a static site from Cloud Files you pay only for the space utilized and the bandwidth ā€“ no more charges for Cloud Server(s) and better performance! So… why not give it a try?! šŸ™‚

Side note: this concept can be applied to any CMS and any Cloud Platform. In this post I will use WordPress and Rackspace Public Cloud as examples.

Here is a list of user cases:

  • Existing website built on WordPress; without search fields, comments, forms (dynamic content) which is still being updated on regular basis with extra pages.
  • Brand new project based on WordPress where the end goal is to use WordPress as a Content Management System (CMS) to build a site, without any comment or search fields.
  • Old website built on an old version of WordPress that cannot be updated due to some plugins that wonā€™t work on newest versions of this CMS, with no dynamic functionalities required.
  • Legacy site built on WordPress that is no longer being developed/updated but is still required to stay online, with no dynamic functionalities required.

To be able to make a site build using a CMS completely static, any dynamic functionality needs to be disabled (e.g. comments, forms, search fields…).
It’s possible to manually re-integrate some of them relying on trusted external sources (e.g. Facebook comments) with the introduction of some javascript. But this will require some editing of the static pages generated, something that is outside the scope of this article. However I wanted to mention this, as it could be a limitation in the decision to make the site static.

What do you need?

  • a Cloud Load Balancer: this is just to keep a static IP
  • a small Cloud Server LAMP stack (1/2GB max) where you will host your site
  • a Cloud Files Public container to host the static version of the site
  • access to your DNS
  • some basic Linux knowledge to install some packages and run a few commands via command line

How to set this up?

Imagine you have www.mywpsite.com built on WordPress.
Itā€™s a site that you keep updating generally once or twice a week.
Comments are all disabled and you don’t have any search fields.
You found this post and you’re interested in trying to save some money, improve performance and forget about patching and updating your CMS.

So, how can you achieve this?

You will have to build a development infrastructure made up of a Cloud Load Balancer and a single Linux LAMP Cloud Server plus a Cloud Files Public Container for your production static site.

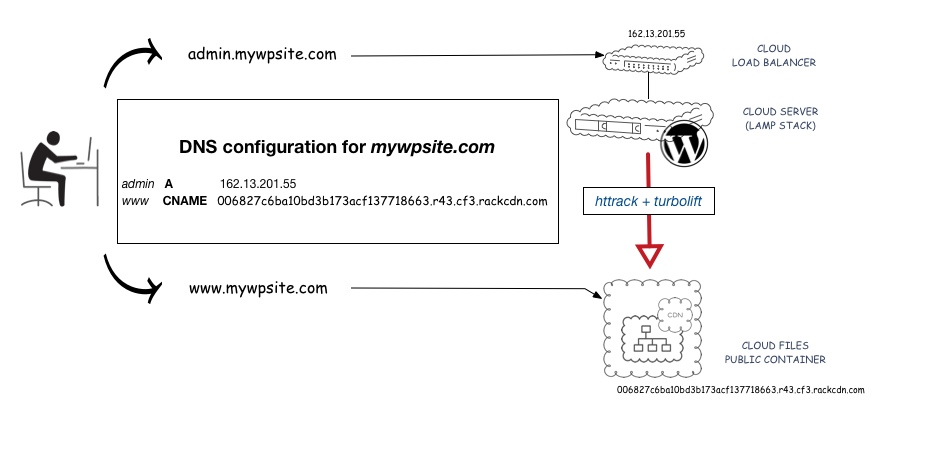
Your main domain www.mywpsite.com will need to point to the CNAME of the Cloud Files Container and no longer to your original site/server. You also need to create a new subdomain (e.g. admin.mywpsite.com) and point it to the development infrastructure: in specific, to the Cloud Load Balancer’s IP. You will then use admin.mywpsite.com/wp-admin/ instead of www.mywpsite.com/wp-admin/ to manage your site.

The only reason to use a Load Balancer in a single server’s solution is to keep the public IP, meaning you will no longer need to touch the DNS.
The goal is to image the server after you’ve completed making the changes and then delete it. In this way you won’t get charged for a resource that doesn’t serve any traffic and is there just for development. In this example, I’ve mentioned that changes are made a couple of times a week, so it’s cheaper and easier to always keep a Load Balancer with admin.mywpsite.com pointing to it, instead of a Cloud Server where you would be changing the DNS every time.
If you’re planning to keep the dev server up continuously, you could avoid using a Load Balancer entirely. However Cloud Servers might fail (we all know that Cloud is not designed to be resilient) so you may need to spin up a new server and have the DNS re-pointed again. In this case I do recommend keeping the DNS TTL as low as possible (e.g. 300 seconds).

Please note that the Site URL in your WordPress setup needs to be changed to admin.mywpsite.com. If you’re starting a new project you need to remember that the Site URL has to match the development subdomain that you have chosen. In our example, to admin.mywpsite.com.

Once you are happy with the site and everything works under admin.mywpsite.com, you will just need to run a command to make a static version of it, and another command to push the content onto the Cloud Files Container.

Once complete and verified, you can change the DNS for www.mywpsite.com to point to the Container, then image your dev server and delete it once the image has completed. You will create a new server from this image the next time you want to make a new change.

Here is a diagram that should help you to visualise the setup:

diagram

diagram

All clear?

So let’s do it!

How do you put this in practice?

Step by step guide (no downtime migration)
  1. Create a Cloud Server LAMP stack.
  2. Create a Cloud Load Balancer. Take note of its new IP.
  3. Add the server under the Load Balancer.
  4. Create a Cloud Files Public Container. Take note of its HTTP Public Link.
  5. Create the subdomain admin.mywpsite.com in your DNS and point it to the IP of your Cloud Load Balancer. Keep your www.mywpsite.com domain pointing to your live site to avoid downtime.
  6. Migrate WordPress files and database onto the new server and make sure NO changes on the live site will be done during the migration to avoid inconsistency of data.
  7. Change the Site URL to admin.mywpsite.com. Please note that this can be a bit tricky. Make sure all the references are properly updated. If it’s a new project, just install WordPress on it and set the Site URL directly to admin.mywpsite.com.
  8. Verify that you can access your site using admin.mywpsite.com and that also the wp-admin panel works correctly. Troubleshoot until this step is fully verified.

    NOTE: At this stage we have a new development site setup and the original live site still serving traffic. Next steps will complete the migration, having live traffic directly served from the Cloud Files Container.

  9. Install httrack and turbolift on your server.
    On a CentOS server you should be able to run the following:

    yum -y install pip httrack
    pip install turbolift
  10. [OPTIONAL, but recommended to avoid useless bandwidth charges]
    Manually set /etc/hosts to resolve to admin.mywpsite.com locally, to force httrack to pull the content without going via public net:

    echo "127.0.0.1 admin.mywpsite.com' >> /etc/hosts
  11. Combine these two commands to locally generate a static version of your admin.mywpsite.com and push it to the Cloud Files Container.
    To achieve that, you can use a simple BASH script like the one below:
    Script project:Ā https://bitbucket.org/thtieig/wp2static/

    #!/bin/bash
    
    #########################################################
    # Replace the quoted values with the right information: #
    # ------------------------------------------------------#
    
    USERNAME="yourusername"
    APIKEY="your_api_key"
    REGION="datacenter_region"
    CONTAINERNAME="mycontainer"
    DEVSITE="admin.mywpsite.com"
    
    #########################################################
    
    DEST=/tmp/$DEVSITE/ 
    USER=$(echo "$USERNAME" | tr '[:upper:]' '[:lower:]') 
    DC=$(echo "$REGION | tr '[:upper:]' '[:lower:]') 
    
    # Clean up / create destination directory
    ls $DEST > /dev/null 2&>1 && rm -rf $DEST || mkdir -p $DEST
    
    # Create static copy of the site
    httrack $DEVSITE -w -O "$DEST" -q -%i0 -I0 -K0 -X -*/wp-admin/* -*/wp-login*
    
    # Upload the static copy into the container via local network SNET (-I)
    turbolift -u $USER -a $APIKEY --os-rax-auth $DC -I upload -s $DEST/$DEVSITE -c $CONTAINERNAME
    
    
  12. Now you can test if the upload went well.
    Just open the HTTP link of your Cloud Files Container in your browser and make sure the site is displayed correctly.
  13. If all works as expected, you can now go and make your www.mywpsite.com domain to be a CNAME of that HTTP link instead. Once done, your live traffic will be served by your Cloud Files Container and no longer from your old live site!
  14. And yes, you can now image your Cloud Server and delete it once completed. Next time you need to edit/add some content, just spin up another server from its latest image and add it under the Cloud Load Balancer.

Happy “static’ing“! šŸ™‚

What to do with a down Magento site

1. Application level logs – First place to look.

If you are seeing the very-default-looking Magento page saying “There has been an error processing your request”, then look in here:

ls -lart <DOCROOT>/var/report/ | tail

The stack trace will be in the latest file (there might be a lot), and should highlight what broke.
Maybe the error was in a database library, or a Redis library…see next step if that’s the case.

General errors, often non-fatal, are in <DOCROOT>/var/log/exception.log
Other module-specific logs will be in the same log/ directory, for example SagePay.

NB: check /tmp/magento/var/ .
If the directories in the DocumentRoot are not writable (or weren’t in the past), Magento will use /tmp/magento/var and you’ll find the logs/reports/cache in there.

2. Backend services – Magento fails hard if something is inaccessible

First, find the local.xml. It should be under <DOCROOT>/app/etc/local.xml or possibly a subdirectory like <DOCROOT>/store/app/etc/local.xml

From that, take note of the database credentials, the <session_save>, and the <cache><backend>. If there’s no <cache> section, then you are using filesystem so it won’t be memcache or redis.

– Can you connect to that database from this server? authenticate? or is it at max-connections?
– To test memcache, “telnet host 11211” and type “STATS“.
– To test Redis, “telnet host 6379” and type “INFOā€.
You could also use:

redis-cli -s /tmp/redis.sock -a PasswordIfThereIsOne info


If you can’t connect to those from the web server, check that the relevant services are started, pay close attention to the port numbers, and make sure any firewalls allow the connection.
If the memcache/redis info shows evictions > 0, then it’s probably filled up at some point and restarting that service might get you out of the water.

ls -la /etc/init.d/mem* /etc/init.d/redis*

3. Check the normal places – sometimes itā€™s nothing to do with Magento!

  • – PHP-FPM logs – good place for PHP fatal errors. usually in var/log/php[5]-fpm/

– Apache or nginx logs
– Is Apache just at MaxClients?
– PHP-FPM max_children?

ps aux | grep fpm | grep -v root | awk '{print $11, $12, $13}' | sort | uniq -c

– Is your error really just a timeout, because the server’s too busy?
– Did OOM-killer break something?

grep oom /var/log/messages /var/log/kern.log

– Has a developer been caught out by apc.stat=0 (or opcache.validate_timestamp=0) ?


Credits:Ā https://willparsons.tech/

Fail2ban notes

General notes about Fail2ban

### Fail2Ban ###

Best practise:
- do NOT edit /etc/fail2ban/jail.conf BUT create a new /etc/fail2ban/jail.local file

=============================================================
# Test fail2ban regex:
example: fail2ban-regex /var/log/secure /etc/fail2ban/filter.d/sshd.conf
example2: fail2ban-regex --print-all-matched/var/log/secure /etc/fail2ban/filter.d/sshd.conf

=============================================================
# Remove email notifications:

comment out 'sendmail-whois' from action in [ssh-iptables]
FYI, comment with # at the BEGINNING of the line like this or it won't work!!!

[ssh-iptables]

enabled  = true
filter   = sshd
action   = iptables[name=SSH, port=ssh, protocol=tcp]
#           sendmail-whois[name=SSH, dest=root, [email protected], sendername="Fail2Ban"]
logpath  = /var/log/secure
maxretry = 5


=============================================================
# Wordpress wp-login - block POST attacks

/etc/fail2ban/jail.local

[apache-wp-login]
enabled = true
port = http,https
filter = apache-wp-login
logpath = /var/log/httpd/blog.tian.it-access.log
maxretry = 3
bantime = 604800 ; 1 week
findtime = 120

----------------------------------------------------------------------------------------------------------------------

/etc/fail2ban/filter.d/apache-wp-login.conf
[Definition]
failregex = <HOST>.*POST.*wp-login.php HTTP/1.1
ignoreregex =

=============================================================

# Manually ban an IP:
fail2ban-client -vvv set <CHAIN> banip <IP>

# Check status of sshd chain
fail2ban-client status sshd

How to “SSH” brute force

If you want to make safer your remote server, it is good practise to use a good combination of sshd setup and fail2ban.

Firstly, you should setup your server to allow only key auth, and no passwords. This will drastically reduce the risk. This means anyway that you need to keep your ssh key safe and you won’t be able to access your server unless you have this key. Most of the time is something possible šŸ™‚

For this reason, I’m explaining here how I configured my server.

SSHD

/etc/ssh/sshd_config

Have these settings in the config file (NOTE: the verbosity is for Fail2ban)

LogLevel VERBOSE

PasswordAuthentication no

(restart sshd)

/etc/fail2ban/jail.local

[DEFAULT]
# Ban hosts for 
# one hour:
#bantime = 3600

# one day:
bantime = 86400

# A host is banned if it has generated "maxretry" during the last "findtime"
# # seconds.
findtime  = 30

# # "maxretry" is the number of failures before a host get banned.
maxretry = 5

# Override /etc/fail2ban/jail.d/00-firewalld.conf:
banaction = iptables-multiport

[sshd]
enabled = true
filter = sshd-aggressive
port     = ssh
logpath  = /var/log/secure
maxretry = 3
findtime = 30
bantime  = 86400

/etc/fail2ban/filter.d/sshd.conf

Add a custom section after the ddos one:

custom = ^%(__prefix_line_sl)sDisconnected from <HOST> port [0-9]+ \[preauth\]$

This line matches whoever tries to connect without a proper ssh key.

Add this line to includeĀ customĀ to the sshd-aggressive setup:

aggressive = %(normal)s
             %(ddos)s
             %(custom)s


Create and mount SWAP file

In the Cloud era, virtual servers come with no swap. And it’s perfectly fine, cause swapping isn’t good in terms of performace, and Cloud technology is designed for horizontal scaling, so, if you need more memory, add another server.

However, it could be handy sometimes to have a some more room for testing (and save some money).

So here below one quick script to automatically create a 4GB swap file, activate and also tune some system parameters to limit the use of the swap only when really necessary:

fallocate -l 4G /swapfile
chmod 600 /swapfile
mkswap /swapfile
swapon /swapfile
echo '/swapfile none swap sw 0 0' | sudo tee -a /etc/fstab
sysctl vm.swappiness=0
echo 'vm.swappiness=0' >> /etc/sysctl.conf
tail /etc/sysctl.conf

NOTES:
Swappiness: setting to zero means that the swap won’t be used unless absolutely necessary (you run out of memory), while a swappiness setting of 100 means that programs will be swapped to disk almost instantly.

Holland backup setup

>> package:

yum install holland-mysqldump

>> Auto install script:

#!/bin/bash
which yum
rc=$?
if [ $rc != 0 ] ; then
    apt-get install -y python-setuptools python-mysqldb
else
    yum install -y MySQL-python
fi

if [ ! -f holland-1.0.10.tar.gz ] ; then
    wget http://hollandbackup.org/releases/stable/1.0/holland-1.0.10.tar.gz
fi
if [ ! -d holland-1.0.10 ] ; then
    tar zxf holland-1.0.10.tar.gz 
fi

cd holland-1.0.10
python setup.py install 

cd plugins/holland.lib.common/
python setup.py install

cd ../holland.lib.mysql/
python setup.py install

cd ../holland.backup.mysqldump/
python setup.py install

cd ../../config
mkdir -p /etc/holland/providers
mkdir -p /etc/holland/backupsets
cp holland.conf  /etc/holland/
cp providers/mysqldump.conf /etc/holland/providers/
cp backupsets/examples/mysqldump.conf /etc/holland/backupsets/default.conf

cd /etc/holland
sed -i 's=/var/spool/holland=/var/lib/mysqlbackup=g' holland.conf
sed -i 's/backups-to-keep = 1/backups-to-keep = 7/g' backupsets/default.conf
sed -i 's/file-per-database.*=.*no/file-per-database = yes/g' backupsets/default.conf
sed -i 's/file-per-database.*=.*no/file-per-database = yes/g' providers/mysqldump.conf

hour=$(python -c "import random; print random.randint(0, 4)")
minute=$(python -c "import random; print random.randint(0, 59)")
echo '# Dump mysql DB to files. Time was chosen randomly' > /etc/cron.d/holland
echo "$minute $hour * * * root /usr/local/bin/holland -q bk" >> /etc/cron.d/holland

mkdir -p /var/lib/mysqlbackup
mkdir -p /var/log/holland
chmod o-rwx /var/log/holland

echo 
echo
echo "Holland should be installed now."
echo "Test backup: holland bk"
echo "See cron job: cat /etc/cron.d/holland"
echo "See backups: find /var/lib/mysqlbackup/"

>> Where is the DB conf file:

/etc/holland/backupsets

>> When it runs

cat /etc/cron.d/holland

>> Test command to see if all works without actually run it

holland bk --dry-run

>> /etc/holland/backupsets/default.conf

[mysql:client]
defaults-extra-file = /root/.my.cnf