Tag Archives: debian

Nagios3 and Lighttpd

This guide will explain how to install Nagios3 on a machine with Debian and Lighttpd webserver.

If you haven’t installed Lighttpd yet, please follow this tutorial.

Install Nagios server

Now, let’s install Nagios.

apt-get install nagios3 nagios-plugins nagios-nrpe-plugin

This will automatically install all the required dependencies.

Enable check_external_commands in /etc/nagios3/nagios.cfg

check_external_commands=1

Add www-data in nagios’ group:

usermod -a -G nagios www-data

And fix some permission issues to avoid some errors like “error: Could not stat() command file”

chmod g+x /var/lib/nagios3/rw

Let’s configure a bit Lighttpd.
Make sure cgi and php modules are enabled.

Then, create a new conf file and enable it:

vim /etc/lighttpd/conf-available/10-nagios3.conf
# Nagios3
 
alias.url =     (
                "/cgi-bin/nagios3" => "/usr/lib/cgi-bin/nagios3",
                "/nagios3/cgi-bin" => "/usr/lib/cgi-bin/nagios3",
                "/nagios3/stylesheets" => "/etc/nagios3/stylesheets",
                "/nagios3" => "/usr/share/nagios3/htdocs"
                )
 
$HTTP["url"] =~ "^/nagios3/cgi-bin" {
        cgi.assign = ( "" => "" )
}
 
$HTTP["url"] =~ "nagios" {
        auth.backend = "htpasswd"
        auth.backend.htpasswd.userfile = "/etc/nagios3/htpasswd.users"
        auth.require = ( "" => (
                "method" => "basic",
                "realm" => "nagios",
                "require" => "user=nagiosadmin"
                )
        )
        setenv.add-environment = ( "REMOTE_USER" => "user" )
}
lighttpd-enable-mod nagios3

Let’s apply the changes:

/etc/init.d/lighttpd force-reload

We need to setup the “nagiosadmin” password:

htpasswd -c /etc/nagios3/htpasswd.users nagiosadmin

Now, open your browser and digit http://yourserver/nagios3
Insert username: nagiosadmin and the password you’ve just chosen… and voila`… 🙂

And now we have installed our nagios server. As you can see, it’s currently monitoring itself.

But what about the other hosts in the network?

Adding hosts

Host configuration

To let our Nagios server to monitor other hosts, we need to follow these steps on any client we want to add:

apt-get install -y nagios-plugins nagios-nrpe-server

Once completed, we need to add the IP of our monitoring host in /etc/nagios/nrpe.cfg under allowed_hosts=xxx.xxx.xxx.xxx.

Also, add this line in /etc/nagios/nrpe_local.cfg:

command[check_all_disks]=/usr/lib/nagios/plugins/check_disk -w '20%' -c '10%' -e -A

This will be used from our monitor server to query nrpe and provide info about ALL the disks.
You can use also -I flag to exclude a specific path. For example on my Time Capsule Pi, I’ve used the following line, to exclude the mount point “TimeMachine” from the checks:

command[check_all_disks]=/usr/lib/nagios/plugins/check_disk -w '20%' -c '10%' -e -A -I '/TimeMachine/*

Monitoring configuration for new host

Now back to our Nagios monitoring machine
In /etc/nagios3/conf.d create a file called for example host1_nagios2.cfg and add the following basic services (add/remove/modify based on your local configuration):

define host{
        use             generic-host
        host_name       host1
        alias           host1
        address         xxx.xxx.xxx.xxx
}

define service{
        use                     generic-service
        host_name               host1
        service_description     Current Load
        check_command           check_nrpe_1arg!check_load
}

define service{
        use                     generic-service
        host_name               host1
        service_description     Current Users
        check_command           check_nrpe_1arg!check_users
}
define service{
        use                     generic-service
        host_name               host1
        service_description     Disk Space
        check_command           check_nrpe_1arg!check_all_disks
}
define service{
        use                     generic-service
        host_name               host1
        service_description     Total Processes
        check_command           check_nrpe_1arg!check_total_procs
}

Also, you can add the new host host1 to be part of any related groups, modifying /etc/nagios3/conf.d/hostgroups_nagios2.cfg

For example, we can add it to debian-servers and ssh-servers groups. This will automatically get some checks like SSH.

# Some generic hostgroup definitions

# A simple wildcard hostgroup
define hostgroup
        hostgroup_name  all
		alias           All Servers
		members         *
        }

# A list of your Debian GNU/Linux servers
define hostgroup {
        hostgroup_name  debian-servers
		alias           Debian GNU/Linux Servers
		members         localhost,host1
        }

# A list of your web servers
define hostgroup {
        hostgroup_name  http-servers
		alias           HTTP servers
		members         localhost
        }

# A list of your ssh-accessible servers
define hostgroup {
        hostgroup_name  ssh-servers
		alias           SSH servers
		members         localhost,host1
        }

Sources:
http://zeldor.biz/2010/11/nagios3-with-lighttpd/comment-page-1/
https://www.digitalocean.com/community/articles/how-to-install-nagios-on-ubuntu-12-10
http://cloud101.eu/blog/2012/03/01/setting-up-nagios-on-debian-or-ubuntu/
http://technosophos.com/2010/01/13/nagios-fixing-error-could-not-stat-command-file-debian.html
Lighttpd and virtualhosts

Here a quick how to, about how to configure Lighttpd to run with Virtualhosts.
This has been installed and tested on a Raspberry Pi.

apt-get install lighttpd php5 php5-cgi

Enable modules:

lighttpd-enable-mod auth cgi fastcgi fastcgi-php nagios3 simple-vhost ssl status

Content of /etc/lighttpd/lighttpd.conf

server.modules = (
        "mod_access",
        "mod_alias",
        "mod_compress",
        "mod_redirect",
#       "mod_rewrite",
)

server.document-root        = "/var/www"
server.upload-dirs          = ( "/var/cache/lighttpd/uploads" )
server.errorlog             = "/var/log/lighttpd/error.log"
server.pid-file             = "/var/run/lighttpd.pid"
server.username             = "www-data"
server.groupname            = "www-data"
server.port                 = 80


index-file.names            = ( "index.php", "index.html", "index.lighttpd.html" )
url.access-deny             = ( "~", ".inc" )
static-file.exclude-extensions = ( ".php", ".pl", ".fcgi" )

compress.cache-dir          = "/var/cache/lighttpd/compress/"
compress.filetype           = ( "application/javascript", "text/css", "text/html", "text/plain" )

# default listening port for IPv6 falls back to the IPv4 port
include_shell "/usr/share/lighttpd/use-ipv6.pl " + server.port
include_shell "/usr/share/lighttpd/create-mime.assign.pl"
include_shell "/usr/share/lighttpd/include-conf-enabled.pl"

To easily manage virtual hosts, edit /etc/lighttpd/conf-available/10-simple-vhost.conf

server.modules += ( "mod_simple_vhost" )
simple-vhost.server-root = "/var/www/vhost"
simple-vhost.default-host = "error.default.loc"
simple-vhost.document-root = "/"

This configuration above will allow you to manage your virutalhosts simply storing them in a folder under /var/www/vhost
No extra configuration is needed from the server side.
Simply go into /var/www/vhost and create a folder named as the virtualhost you would like to manage.
In this particular case, please make sure to have a folder called error.default.loc with a page inside which will be displayed in case of ANY error.
For example, if you want to manage mysite.example.com, simply do the following:

cd /var/www/vhost
mkdir mysite.example.com
chown www-data:www-data mysite.example.com

…and put the html/php files inside that new folder! 🙂

To test if our webserver works, you can always use curl command as explained here.

Puppet – Let’s start

Puppet is a quite powerful configuration manager tool which allows you to configure automatically hosts and keep configurations consistence.

I did some tests using 3 VMs:

  • puppetmaster (server)
  • puppetagent01 (client)
  • puppetagent02 (client)

Of course, most of the work is done on puppetmaster server. On the last two machines you will simply see the outcome of the configurations that you’re going do set on puppetmaster.

Important: all the machines have to be able to communicate between each others. Please make sure DNS is working or set local names/IPs in /etc/hosts file, and do some ping tests before proceeding.

Client setup

On each puppetagent machine, just install the package puppet

apt-get install puppet

By default, the client will look for a host called “puppet” on the network.
If your DNS/hosts file doesn’t have this entry, and it can’t be resolved, you can manually set the name of the puppetmaster in /etc/puppet/puppet.conf file, adding this line under [main] section:

server=puppetmaster.yournet.loc

Now, no more configuration is required from the client side. Just edit /etc/default/puppet to start at boot time and start the service.

# Defaults for puppet - sourced by /etc/init.d/puppet

# Start puppet on boot?
START=yes

# Startup options
DAEMON_OPTS=""


service puppet start

Starting the service, will make automatically a request to the server to be added under his control.

If you want to do some tests, you can eventually use the following command to run puppet only once. This will also force the polling updates, which by default runs every 30 minutes.

puppet agent --no-daemonize --onetime --verbose

You can repeat all these steps on the second client machine.

Server setup

apt-get install puppetmaster

Check if the service is running, otherwise, start it up.

Sign clients’ certificates on the server side

Puppet uses this client/server certificate sign system to add/remove hosts from being managed by the server.

To see who has requested to be “controlled” use this command:

puppet cert --list

This will show all the hosts waiting to be added under puppetmaster server.

puppet cert --sign

This command will add the host.

Puppetmaster configuration files

The main configuration file is /etc/puppet/manifests/site.pp

Inside manifests folder, I’ve created a subfolder called classes with extra definitions (content of these files is showed later in this post).

/etc/puppet/manifests# tree
.
|___ classes
|   |___ apache.pp
|   |___ mysite.pp
|   |___ ntpd.pp
|   |___ packages.pp
|___ site.pp

/etc/puppet/manifests/site.pp

import 'classes/*.pp'
# This add all the custom .pp files into classes folder
class puppettools {
# Creates a file, setting permissions and content
        file { '/usr/local/sbin/puppet_once.sh':
                owner => root, group => root, mode => 755,
                content => "#!/bin/sh\npuppet agent --no-daemonize --onetime --verbose $1\n",
        }
# Install (if not present) some puppet modules required for 'vimconf' class
        exec { "install_puppet_module":
        command => "puppet module install puppetlabs-stdlib",
        path => [ "/bin", "/sbin", "/usr/bin", "/usr/sbin",
              "/usr/local/bin", "/usr/local/sbin" ],
        onlyif  => "test `puppet module list | grep puppetlabs-stdlib | wc -l` -eq 0"
        }
}

class vimconf {
# Modify vimrc conf file, enabling syntax on
        file_line { 'vim_syntax_on':
        path  => '/etc/vim/vimrc',
        match => '^.*syntax on.*$',
        line  => 'syntax on',
        }
}

node  default {
# this will be applied to all nodes without specific node definitions
        include packages
        include vimconf
        include ntp
        include puppettools
}

node  'puppetagent01' inherits default {
# this specific node, gets all the default classes PLUS some extras
        include mysite
}

Here the content of the single files .pp in classes folder:

class apache {
	package { 'apache2-mpm-prefork':
		ensure => installed
	}

	service { 'apache2':
		ensure => running,
		hasstatus => true,
		hasrestart => true,
	}
}


class mysite {

	include apache

	file { '/etc/apache2/sites-available/mysite':
		owner => root, group => root, mode => 0644,
		source => "puppet:///files/mysite/mysite_apache.conf",
	}

	file {'/var/www/mysite.localdomain':
		ensure => directory,
	}

	file {'/var/www/mysite.localdomain/index.html':
                owner => root, group => www-data, mode => 0755,
                source => "puppet:///files/mysite/index.html",
	}

	 exec {'/usr/sbin/a2dissite * ; /usr/sbin/a2ensite mysite':
            	onlyif => '/usr/bin/test -e /etc/apache2/sites-available/mysite',
		notify => Service['apache2'],
	}
}


class ntp {
		package { ntp: ensure => present }
		file { "/etc/ntp.conf":
			owner	 => root,
			group	 => root,
			mode	=> 444,
			backup => false,
			source	=> "puppet:///files/etc/ntp.conf",
			require => Package["ntp"],
                        notify  => Service["ntp"],
		}
		service { "ntp":
			enable => true ,
			ensure => running,
			subscribe => [Package[ntp], File["/etc/ntp.conf"],],
		}
	}


class packages  {
        Package { ensure => "installed" }

        package { "screen": }
        package { "dselect": }
        package { "vim": }
        package { "curl": }
}


It’s important to remember to NOT duplicate entries.
For example, in this case, we have a specific file where we have setup ntp service, including the required package. This means that we do NOT have to add this package in the list into packages.pp, otherwise you will get an error and configs won’t get pushed.

As I’m sure you’ve noted, there are references to some “files”.
Yes, we need some extra configuration, to tell puppet to run as file server as well and where files are located.

In our example we are storing our files in here:

mkdir -p /etc/puppet/files

Now we need to add the following in /etc/puppet/fileserver.conf

[files]
  path /etc/puppet/files
allow *

Last bit, is creating the subfolders and place the files required for our configuration:

mkdir -p /etc/puppet/files 
cd /etc/puppet/files 
mkdir mysite mkdir etc

Inside mysite create mysite_apache.conf and index.html files.

Example mysite_apache.conf

<VirtualHost *:80> 
  ServerName mysite.localdomain 
  DocumentRoot /var/www/mysite.localdomain 
</VirtualHost>

For index.html, you can simply have some text, just for testing purposes.

In this example, we have also setup ntp to be installed and to have a custom ntp.conf file pushed.
For this reason, we need to make sure to have this file present into /etc/puppet/files/etc as declared into our .pp file.

After doing all these changes, you should restart your puppetmaster service on the server.

If all went well, you should have the following:

  • puppetagent02 host with screen, dselect, vim (installed and with syntax on), ntp (installed, running with custom ntp.conf file)
  • puppetagent01: with the same as puppetagent02 PLUS apache with a running website

Of course this is just a raw example and you can use template and other super features.
But I think it’s a good start 😉


Sources:


https://forge.puppetlabs.com/puppetlabs/stdlib
http://finninday.net/wiki/index.php/Zero_to_puppet_in_one_day
http://www.puppetcookbook.com/
http://foaa.de/old-blog/2010/07/playing-with-puppets-on-debian/trackback/index.html
http://www.harker.com/puppet/BayLISA100715.html
http://docs.puppetlabs.com/puppet/latest/reference/lang_relationships.html

Dynamic DNS update script

Below a script that I’ve created to update your Dynamic DNS service.

It has been tested on Raspian (Raspberry Pi), Ubuntu 18.04 and Debian 9.

It works with Internet.bs, No-ip.com and CloudFlare

https://bitbucket.org/thtieig/dynip_update/src/master/

Also, for who as a router running DD-WRT, here a quick article about how to set it up.

Enjoy! 😉

SSL PASSIVE FTP with virtual users on Raspberry Pi

I found this handy plugin to backup my blog: BackWPup
It has also an interesting feature which is the ability to backup remotely, for example on a FTP server.

So… here we go! 🙂

Few notes:

  • This uses vsftpd software
  • It will work ONLY over SSL
  • Due to SSL encryption, the FTP will also work ONLY in PASSIVE mode (ACTIVE mode is disabled)
  • This configuration has been made based of the fact that this raspberry pi is behind a router
  • This will use ONLY virtual users, chroot’ed, to increase the security (vsftpd will use a custom PAM auth file, which won’t lookup in /etc/passwd files – for this reason, any local user attempts to login will fail)
  • Virtual users usernames and credentials will be stored in a file
  • There is a workaround in place to avoid some common issues like “500 OOPS: Vsftpd: Refusing to Run With Writable Root Inside Chroot ()” – FYI, allow_writeable_chroot=yes does NOT work on vsftpd version 2.3.5.

Install required packets:

apt-get install vsftpd apache2-utils libpam-pwdfile

Create SSL certificate:

openssl req -x509 -nodes -days 7300 -newkey rsa:2048 -keyout /etc/ssl/certs/vsftpd.pem -out /etc/ssl/certs/vsftpd.pem
chmod 600 /etc/ssl/certs/vsftpd.pem

Add a local user with limited access (like no console) that vsfpd will use to run virtual users:

useradd --home /home/vsftpd --gid nogroup -m --shell /bin/false vsftpd

Create directory structures for the virtual users:

mkdir -p /space/ftpusers/
chmod a-w /space/ftpusers/
mkdir -p /space/ftpusers/ftp01/rw
chmod a-w /space/ftpusers/ftp01
chown -R vsftpd:nogroup /space/ftpusers/ftp01

Please note that all new virtual users added need its home directory manually created as per above. Also, due to the chroot option and the current limitation on vsftpd, if you want a user to be able to write in its home directory, you need to create an extra folder. Its root home folder has to be -w. This is a workaround that works 🙂

Setup PAM authentication

Create a new file /etc/pam.d/vsftpd.virtual and add the following:

auth required pam_pwdfile.so pwdfile /etc/vsftpd/vsftpd.users
account required pam_permit.so

Now, let’s reorder a bit vsftp files in a directory:

mkdir -p /etc/vsftpd
cd /etc/
mv vsftpd.conf vsftpd
ln -s /etc/vsftpd/vsftpd.conf .

Add new users (password max 8 characters):

htpasswd -c -d -b /etc/vsftpd/vsftpd.users ftp01 ftp01password

Use the flag -c only the first time to create the file. If you re-use it, the file will be overwritten!
Also the -d flag is required because vsftpd is unable to read MD5 hashed password (default if -d is not used). The downside of this is a password limited to 8 characters.
Openssl could be used to produce a MD5 based BSD password with algorithm 1 using # openssl passwd -1 (not tested)

Let’s configure vsftpd

vi /etc/vsftpd.conf

# Main Settings
listen=YES
listen_port=21
connect_from_port_20=NO
ftpd_banner=Welcome to my FTP :-)
use_localtime=YES
force_dot_files=YES

# FTP Passive settings
pasv_enable=YES
pasv_min_port=1100
pasv_max_port=1150
pasv_addr_resolve=YES
pasv_enable=YES
pasv_addr_resolve=YES
pasv_address=<span style="color: #ff0000;"><EXTERNAL IP or DYN DNS></span>

# Virtual user settings
local_enable=YES
chroot_local_user=YES
secure_chroot_dir=/var/run/vsftpd/empty
virtual_use_local_privs=YES
guest_enable=YES
guest_username=vsftpd
pam_service_name=vsftpd.virtual
user_sub_token=$USER
local_root=/space/ftpusers/$USER
hide_ids=YES

# Anonymous settings
anonymous_enable=NO
anon_upload_enable=NO
no_anon_password=NO
anon_other_write_enable=NO
anon_mkdir_write_enable=NO

# Write permissions
write_enable=YES
local_umask=022
async_abor_enable=YES

# SSL
ssl_enable=YES
force_local_data_ssl=YES
force_local_logins_ssl=YES
ssl_tlsv1=YES
ssl_sslv2=NO
ssl_sslv3=NO
require_ssl_reuse=NO
ssl_ciphers=HIGH
rsa_cert_file=/etc/ssl/certs/vsftpd.pem

# Logging
xferlog_enable=YES
log_ftp_protocol=NO
syslog_enable=NO
vsftpd_log_file=/var/log/vsftpd.log

Now, on your router, make sure that the module ip_conntrack_ftp is loaded using lsmod command.
This is required for FTP PASSIVE mode to work.
I’ve realised that this can be called also nf_conntrack_ftp.
A good way to check all the alias associated to that netfilter module is using the following command:

# modinfo nf_conntrack_ftp
filename: /lib/modules/3.3.7/kernel/net/netfilter/nf_conntrack_ftp.ko
alias: nfct-helper-ftp
alias: <span style="color: #ff0000;">ip_conntrack_ftp</span>
description: ftp connection tracking helper
author: Rusty Russell <[email protected]>
license: GPL
depends: nf_conntrack
intree: Y
vermagic: 3.3.7 mod_unload MIPS32_R1 32BIT
parm: ports:array of ushort
parm: loose:bool

Also, make sure to setup a port forwarding like as below:

$IPT -t nat -A PREROUTING -p tcp -i $EXTIF -d $EXTIP --dport 21 -j DNAT --to $FTPIP:21 # FTP connection port
$IPT -t nat -A PREROUTING -d $EXTIP -p tcp -m tcp --dport 1100:1150 -j DNAT --to-destination $FTPI # FTP PASS ports
$IPT -A FORWARD -i $EXTIF -d $FTPI -p tcp --dport 21 -j ACCEPT
$IPT -A FORWARD -i $EXTIF -d $FTPI -p tcp --dport 1100:1150 -j ACCEPT

How to build a Debian package from source

There are plenty of articles on the net… but here I’m posting my notes about compiling netatalk.

First of all, you need the minimum packages:

apt-get install build-essential dh-make autotools-dev

I needed this on my Raspberry Pi for this article, and I didn’t want to make dirty the system using the common “make / make install” commands.

This are the simple steps I’ve followed (all as root – even if it’s not the best practise).

mkdir /tmp/netatalk
cd /tmp/netatalk
wget http://downloads.sourceforge.net/project/netatalk/netatalk/3.1.7/netatalk-3.1.7.tar.gz
tar xzvf netatalk-3.1.7.tar.gz
cd netatalk-3.1.7

Make sure the folder has this format: <name_of_the_package>-<version> ALL in lowercase!

dh_make -e [email protected] -f ../netatalk-3.1.7.tar.gz

It will ask for the type of the package. To make things easier, just select single entering s.

Edit the file debian/control adding the missing bits (example below):

Source: netatalk
Section: net
Priority: extra
Maintainer: root <[email protected]>
Build-Depends: debhelper (>= 8.0.0), autotools-dev
Standards-Version: 3.9.3
Homepage: http://netatalk.sourceforge.net/
#Vcs-Git: git://git.debian.org/collab-maint/netatalk.git
#Vcs-Browser: http://git.debian.org/?p=collab-maint/netatalk.git;a=summary

Package: netatalk
Architecture: any
Depends: ${shlibs:Depends}, ${misc:Depends}
Description: AppleTalk user binaries
 Open Source AFP fileserver capable of serving many Macintosh clients simultaneously as an AppleShare file server (AFP)

Then, add debian/rules adding this line, to pass custom configure parameters:

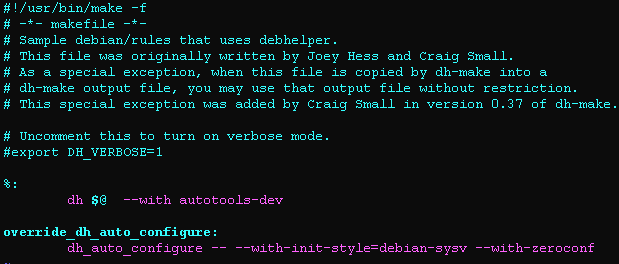
override_dh_auto_configure:
	dh_auto_configure -- --with-init-style=debian-sysv --with-zeroconf

The <TAB> is what you have to press to indent the code. Without that TAB, the file won’t work properly. Before dh_auto_configure there is a TAB 🙂
MAKE SURE that the syntax gets highlighted like this:

debian_rules

I’ve read that it should be good to run dpkg-depcheck -d ./configure before the next step.
Honestly, I didn’t do that because it requires an extra package called devscripts that installs loads of dependencies, which I didn’t want to add on my Raspberry pi.
In a different situation, I would probably have done that.

Then run:

dpkg-buildpackage -us -uc

…and wait.

If you get something like this…

dpkg-deb: building package `netatalk' in `../netatalk_3.1.7-1_armhf.deb'.
dpkg-genchanges >../netatalk_3.1.7-1_armhf.changes
dpkg-genchanges: including full source code in upload
dpkg-source --after-build netatalk-3.1.7
dpkg-buildpackage: full upload (original source is included)

…you’ve been lucky! And you can cd .. and you should have your package .deb created and ready to be installed with a simple dpkg -i .deb

Good luck! 🙂

NOTE: I’ve noticed that the compile might fail due to ‘acl‘ package missing. I’m not a master in compiling, so what I’ve done is the following

apt-get install acl

Than I’ve modified include/atalk/acl.h start at line 63, adding #define O_IGNORE 0 to make it look like following:

#define O_NETATALK_ACL 0
#define O_IGNORE 0
#define chmod_acl chmod

This trick was from here
Than, you need to commit the change with the following command: dpkg-source --commit and save adding a little description like “patch to compile with no ACLs” or something like that.
This made me possible to finish the building of the package and have the deb.


UPDATE: Debian jessy systemd

# Packages to install

apt-get install build-essential libevent-dev libssl-dev libgcrypt11-dev libkrb5-dev libpam0g-dev libwrap0-dev libdb-dev libtdb-dev libmysqlclient-dev avahi-daemon libavahi-client-dev libacl1-dev libldap2-dev libcrack2-dev systemtap-sdt-dev libdbus-1-dev libdbus-glib-1-dev libglib2.0-dev tracker libtracker-sparql-1.0-dev libtracker-miner-1.0-dev autotools-dev debhelper 

# How to edit debian/rules

override_dh_auto_configure:
	dh_auto_configure -- --with-init-style=debian-systemd  --without-libevent --without-tdb --with-cracklib --enable-krbV-uam --with-pam-confdir=/etc/pam.d --with-dbus-sysconf-dir=/etc/dbus-1/system.d --with-tracker-pkgconfig-version=1.0

And here the already compiled file netatalk_3.1.8

DNS updated via DHCP: BIND9 and ISC-DHCP on Linux

Linux: Debian stable (currently version 7)

Packages:

apt-get install install bind9 isc-dhcp-server

Create a key required for DHCP server to update the DNS zones:

/usr/sbin/rndc-confgen -a

This will create /etc/bind/rndc.key, whose contents will look something like this:

key "rndc-key" {
algorithm hmac-md5;
secret "+zZSeeetHWFdNwECit1Ktw==";
};

BIND configuration

Configuration files:


/etc/hosts

127.0.0.1 localhost
10.0.60.60 dns.lab.loc dns

# The following lines are desirable for IPv6 capable hosts
::1 localhost ip6-localhost ip6-loopback
ff02::1 ip6-allnodes
ff02::2 ip6-allrouters


/etc/bind/named.conf.local

// Do any local configuration here
// Consider adding the 1918 zones here, if they are not used in your organization
include "/etc/bind/zones.rfc1918";

include "/etc/bind/rndc.key";

zone "lab.loc" {
type master;
file "/etc/bind/db.lab.loc";
allow-update { key rndc-key; };
};

zone "60.0.10.in-addr.arpa" {
type master;
file "/etc/bind/db.10.0.60";
allow-update { key rndc-key; };
};


/etc/bind/named.conf.options

(just to setup the external forwarders)

options {
directory "/var/cache/bind";

// If there is a firewall between you and nameservers you want
// to talk to, you may need to fix the firewall to allow multiple
// ports to talk. See http://www.kb.cert.org/vuls/id/800113

// If your ISP provided one or more IP addresses for stable
// nameservers, you probably want to use them as forwarders.
// Uncomment the following block, and insert the addresses replacing
// the all-0's placeholder.

forwarders {
<strong>208.67.222.222;208.67.220.220;8.8.8.8;8.8.4.4;</strong>
};

//========================================================================
// If BIND logs error messages about the root key being expired,
// you will need to update your keys. See https://www.isc.org/bind-keys
//========================================================================
dnssec-validation auto;

auth-nxdomain no; # conform to RFC1035

allow-query {
10.0.60/24;
127.0.0.1;
};
allow-transfer {
10.0.60/24;
127.0.0.1;
};

listen-on-v6 { any; };
};


/etc/bind/db.lab.loc

$ORIGIN lab.loc.
$TTL 24h ;$TTL (DNS time-to-live setting) used for all RRs without explicit TTL value

;SOA - Start of Authority. This is the record that states that this server is authoritative for the specified domain
;The SOA record lists the name server for the domain, and next the e-mail address of the administer of the domain
;(note that the @ has been replaced by a period).
@ IN SOA dns.lab.loc. root.lab.loc. (
2014032109 ; serial YYYYMMDDNN
10800 ; refresh (3 hours)
1800 ; retry (30 minutes)
604800 ; expire (1 week)
38400 ; minimum (10 hrs 40 min)
)
IN NS dns.lab.loc. ;Specifies the name server to use to look up a domain
; IN NS dns2.lab.loc. ;Specifies the name server to use to look up a domain
IN A 10.0.60.60 ; IP Address(es) of the DNS server(s)
; IN A 10.0.60.61 ; IP Address(es) of the DNS server(s)
IN MX 10 dns.lab.loc. ;Specifies mail server(s) for the domain

; HOSTS
dns IN A 10.0.60.60
;dns2 A 10.0.60.61

esxi01 IN A 10.0.60.71
esxi02 IN A 10.0.60.72
esxi03 IN A 10.0.60.73

freenas IN A 10.0.60.80

mail IN CNAME dns
dnsmaster IN CNAME dns
storage IN CNAME freenas


/etc/bind/db.10.0.60

; BIND reverse file for lab.loc
$ORIGIN 60.0.10.in-addr.arpa.
$TTL 24h
@ IN SOA dsn.lab.loc. root.lab.loc. (
2014032104 ; serial number YYMMDDNN
10800 ; Refresh (3 hours)
3600 ; Retry (1 hour)
604800 ; Expire (1 week)
38400 ; Min TTL (10 hours 40 minutes)
)
IN NS dns.lab.loc.
; IN NS dns2.lab.loc.

;LIST OF HOSTS (reverse)

60 IN PTR dns.lab.loc.

71 IN PTR esxi01.lab.loc.
72 IN PTR esxi02.lab.loc.
73 IN PTR esxi03.lab.loc.

80 IN PTR freenas.lab.loc.


DHCP configuration

Here there is just one file that has to be modified: dhcpd.conf

/etc/dhcp/dhcpd.conf

Here we need to enter the key in plain text.

# DHCPD
ddns-updates on;
ddns-update-style interim;
update-static-leases on;
authoritative;
key rndc-key { algorithm hmac-md5; secret +zZSeeetHWFdNwECit1Ktw==;}
allow unknown-clients;
use-host-decl-names on;
default-lease-time 1814400; #21 days
max-lease-time 1814400; #21 days
log-facility local7;

# lab.loc DNS zones
zone lab.loc. {
primary localhost; # This server is the primary DNS server for the zone
key rndc-key; # Use the key we defined earlier for dynamic updates
}
zone 60.0.10.in-addr.arpa. {
primary localhost; # This server is the primary DNS server for the zone
key rndc-key; # Use the key we defined earlier for dynamic updates
}

# lab.loc LAN scope
subnet 10.0.60.0 netmask 255.255.255.0 {
range 10.0.60.100 10.0.60.200;
option subnet-mask 255.255.255.0;
option routers 10.0.60.2;
option domain-name-servers 10.0.60.60;
option domain-name "lab.loc";
ddns-domainname "lab.loc.";
ddns-rev-domainname "in-addr.arpa.";
}

# lab.loc STATIC assigned group
group {
host freenas.lab.loc {
hardware ethernet 00:0c:29:18:af:b4;
fixed-address 10.0.60.80;
ddns-hostname "freenas";
}
host esxi01.lab.loc {
hardware ethernet 00:0c:29:d4:14:ce;
fixed-address 10.0.60.71;
ddns-hostname "esxi01";
}
host esxi02.lab.loc {
hardware ethernet 00:0c:29:2c:30:fd;
fixed-address 10.0.60.72;
ddns-hostname "esxi02";
}
host esxi03.lab.loc {
hardware ethernet 00:0c:29:46:90:fd;
fixed-address 10.0.60.73;
ddns-hostname "esxi03";
}
}


Once everything is configured, just restart bind and dhcp:

/etc/init.d/bind9 restart && /etc/init.d/isc-dhcp-server restart


Sources:

https://www.centos.org/docs/4/html/rhel-rg-en-4/s1-bind-zone.html